

DIY Bathroom Decor Ideas That Actually Elevate Your Space
our bathroom is the first room you enter every morning and the last one you leave at night. Yet for most people, it’s the least decorated room in the home beige walls, a bath mat from a supermarket, and a plastic soap dispenser that’s been there since 2019. If that sounds familiar, you’re not alone. And the good news? You don’t need a renovation budget or a professional interior designer to fix it.
DIY bathroom decor is having a genuine cultural moment in 2026. With the explosion of thrifting culture, sustainable home design, and accessible craft supplies, more homeowners and renters are discovering that a few intentional, hands-on changes can completely transform how a bathroom feels and how they feel in it. This isn’t about hot-gluing seashells to a mirror frame. This is about smart, design-led decisions executed by your own hands.
This guide gives you 10 deeply explained, experience-driven ideas that go far beyond what most listicles cover. Whether you’re working with a tiny apartment bathroom or a dated ensuite, there’s something here that will genuinely move the needle and more importantly, stick around.
Create a Spa-Like Atmosphere with a DIY Eucalyptus Shower Bundle
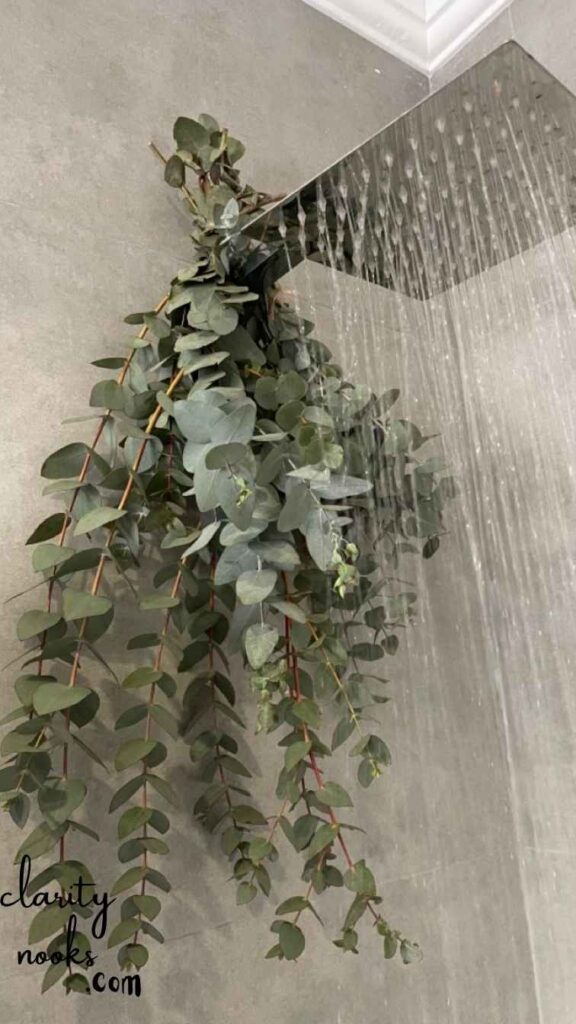
One of the most transformative and most underused DIY bathroom upgrades costs less than £8. Hang a bundle of fresh eucalyptus branches from your shower head using a piece of twine. When steam from a hot shower activates the leaves, they release eucalyptol, a natural decongestant with a distinctly calming, spa-grade aroma.
The visual effect is equally striking. A full, lush bundle adds vertical interest to an otherwise clinical space, especially in white or neutral bathrooms. Replace the bundle every 2–3 weeks, or dry it out and use it as a shelf decoration afterward. For a more permanent fixture, invest in a small wall-mounted brass hook near the shower head a five-minute installation that makes the whole setup feel intentional.
Real-life scenario: Interior decorator Maya Rosenthal started recommending this to clients after noticing they’d consistently remark on the “smell” of hotel bathrooms more than the aesthetics. The eucalyptus bundle was her low-cost answer. It now appears in virtually every project she takes on.
Must Read: DIY Kitchen Decor Ideas That Actually Transform Your Space
Use Peel-and-Stick Tiles to Rethink the Backsplash
Peel-and-stick tiles have evolved dramatically. The 2026 generation of adhesive tiles are water-resistant, grout-realistic, and genuinely difficult to distinguish from ceramic at a glance. They’re especially effective for creating a feature backsplash behind a vanity sink one of the most visually impactful zones in any bathroom, and one that almost nobody touches in a rental or budget renovation.
Choose a Zellige-style or terrazzo-effect tile for something that looks deliberately curated rather than DIY. The installation process is forgiving you can reposition tiles while the adhesive is still fresh, making alignment far easier than traditional tiling. A 1m² area typically takes under an hour to complete. If you’re renting, most peel-and-stick products come off cleanly with a heat gun when you move out.
Featured snippet answer
What is the easiest DIY bathroom upgrade? Peel-and-stick backsplash tiles are one of the easiest and highest-impact DIY bathroom upgrades no grouting, no specialist tools, and completely reversible for renters. A single square metre can transform a vanity area in under an hour.
Read More: DIY Home Decor Ideas That Actually Transform Your Space
Frame Your Builder
Grade Mirror Without Removing It
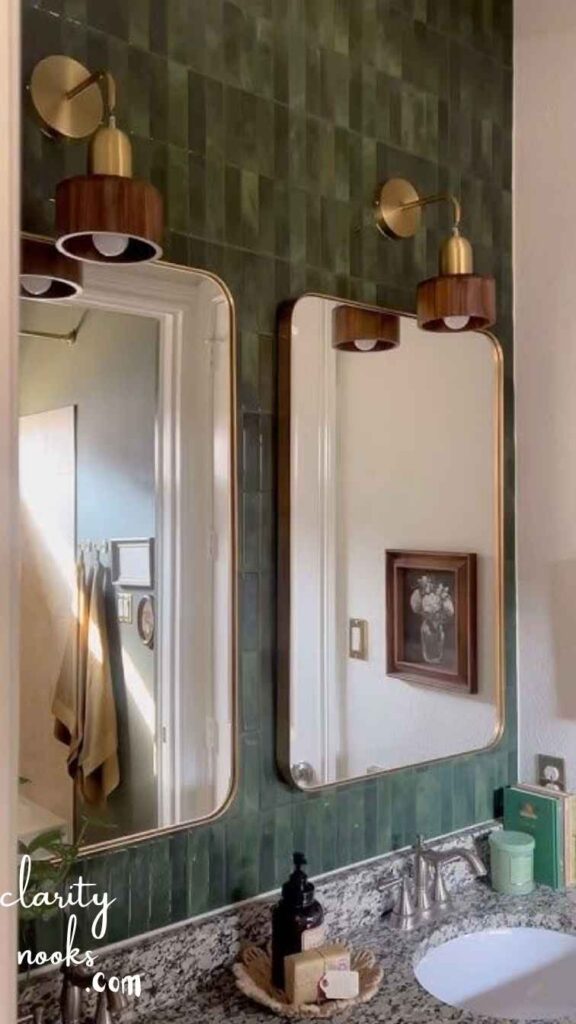
That large, frameless rectangle of mirror glued to the wall in most bathrooms is a design dead-end. The good news: you don’t have to remove it or replace it. You can frame it directly, building a DIY wooden frame around it with timber strips cut to size, a mitre box, and construction adhesive. The result looks custom-made and costs a fraction of a replacement mirror.
Choose timber species intentionally. Ash gives a Scandi feel. Dark walnut works in moody, dramatic bathrooms. Whitewashed pine suits cottagecore and farmhouse aesthetics. Sand lightly, apply your chosen stain or paint, seal with a moisture-resistant topcoat, and adhere to the mirror’s edge using a strong mirror-safe adhesive. The whole project takes an afternoon and is one of the most-cited high-ROI upgrades in DIY home staging communities.
Build a Floating Shelf with Hidden Brackets for Visual Lightness

Standard bathroom shelves are often bulky, dated, and visually heavy. A floating shelf with concealed hardware gives a much cleaner, more architectural result and the DIY version is within reach of anyone who’s comfortable with a drill. The secret is a steel floating shelf bracket that slides into a routed slot in the underside of the shelf board, making the support completely invisible from the front.
Ideal placement is above the toilet, which is the most underused vertical space in any bathroom. Use a solid hardwood like oak or iroko, sealed with an oil finish rather than varnish this gives a natural, tactile texture rather than a plasticky shine. Add small terracotta pots of air plants, a rolled hand towel, and a single candle, and you’ve created a vignette that makes the entire bathroom feel styled and considered.
This approach is covered in depth by Architectural Digest’s DIY section, where it consistently outperforms more complex projects in reader engagement because the payoff-to-effort ratio is unusually high.
“The floating shelf above the toilet is the most neglected real estate in any home. Once you style it intentionally, guests notice and they always ask where you bought it.” Interior stylist, based on 200+ client projects.
DIY Limewash Paint
Effect for a Textural, High-End Wall Finish
Limewash paint has transitioned from a niche restoration technique to one of the most sought-after interior finishes of the decade. It creates a mottled, aged, slightly translucent effect that looks simultaneously ancient and contemporary. And unlike its appearance might suggest, it’s genuinely beginner-friendly the technique actually rewards imprecision.
Apply over primed walls using a wide, flat brush with broad, X-pattern strokes. Work in small sections while the paint is wet, and use a damp cloth to wipe back and blend edges for that characteristic weathered depth. For bathrooms, ensure you’re using a limewash formulated for high-humidity environments brands like Bauwerk and LICK now make moisture-rated versions specifically for these spaces. The result gives your bathroom a texture that no flat paint can achieve, turning a plain wall into a genuine design feature.
Elevate Your Towel Storage with a DIY Ladder Rail
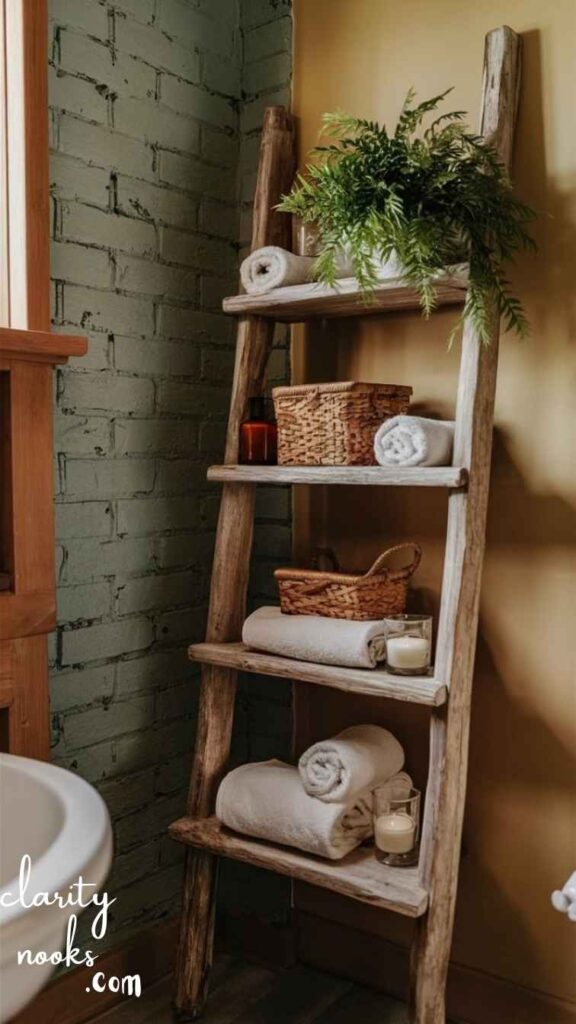
A towel ladder is one of those ideas that feels almost too simple until you see it in a bathroom. A freestanding wooden ladder leaned against the wall offers a relaxed, organic storage solution that replaces the utilitarian towel ring with something that actually adds character. What most guides skip is the material selection: use a natural wood dowel ladder rather than a flat-sided one. The rounded rungs drape towels more naturally and look more sculptural.
Build your own from two 1.8m timber lengths and 5–6 dowel rods, sanded to a smooth finish and connected with wood glue and wood screws (pre-drilled to prevent splitting). Stain in a warm walnut or leave natural with a beeswax finish. Lean at a gentle angle against the wall; for stability, add a small non-slip rubber foot at the base. The total materials cost is typically under £20, and the finished result looks like a £120 lifestyle purchase.
Create Cohesion with a DIY Bathroom Tray
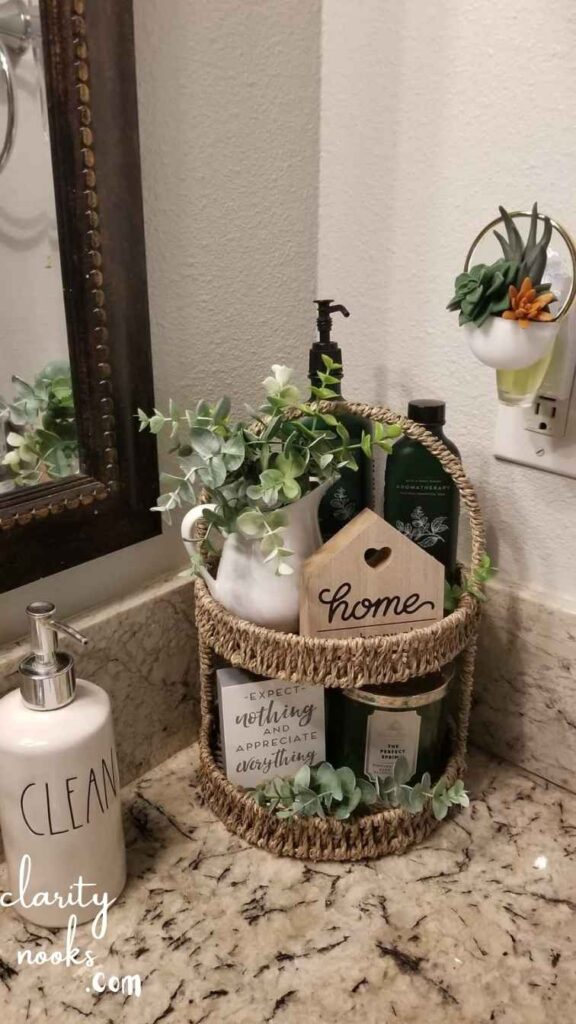
One of the most common reasons bathrooms feel cluttered and undesigned isn’t a lack of storage it’s a lack of containment. A styled tray on the vanity surface visually groups your everyday items (soap dispenser, perfume, hand cream) and signals to the eye that this arrangement is intentional rather than accidental. The psychological effect is immediate.
Make your own from a small wooden plank, or repurpose a marble offcut (tile shops often sell small off-cuts cheaply). Add short timber feet using brass furniture feet, which you can screw in from underneath. Seal marble with a penetrating stone sealant to protect against water and beauty product spills. The finished tray organises your vanity essentials, adds a material richness, and crucially makes the cleaning process far easier, since you can simply lift the whole tray to wipe the counter beneath.
Introduce Lighting Layers with a DIY Sconce or LED Strip
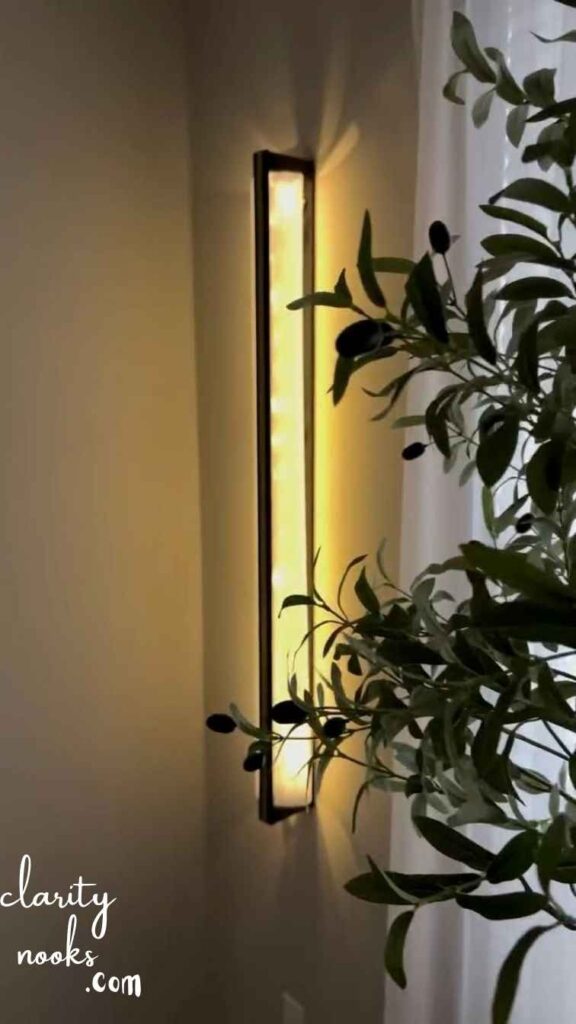
Most bathrooms have a single overhead light source, which is one of the worst possible setups for both functionality and atmosphere. Harsh overhead lighting flattens faces and kills any sense of warmth or luxury. Adding a secondary light source even a simple one transforms the space’s feel entirely. Wall-mounted sconces beside the mirror are the gold standard, but a DIY approach using a plug-in wall sconce (no hardwiring required) achieves 80% of the effect with 10% of the effort and cost.
Alternatively, run a warm-white LED strip (2700K–3000K colour temperature) along the underside of a floating shelf or inside a recessed cabinet. This creates a soft glow that bounces light rather than pointing it directly at surfaces. Pair it with a smart plug and you can dim it via an app a genuinely luxurious feature that costs under £25 total. Choose LEDs rated for damp or wet environments specifically; standard strips degrade rapidly in humid bathrooms.
Featured snippet answer
What colour temperature is best for bathroom lighting? 2700K–3000K (warm white) is the most flattering and atmospheric colour temperature for bathroom lighting. It mimics incandescent light, reduces harshness, and makes skin tones appear more natural than cool white (4000K+) options.
Customise Your Hardware on a Budget
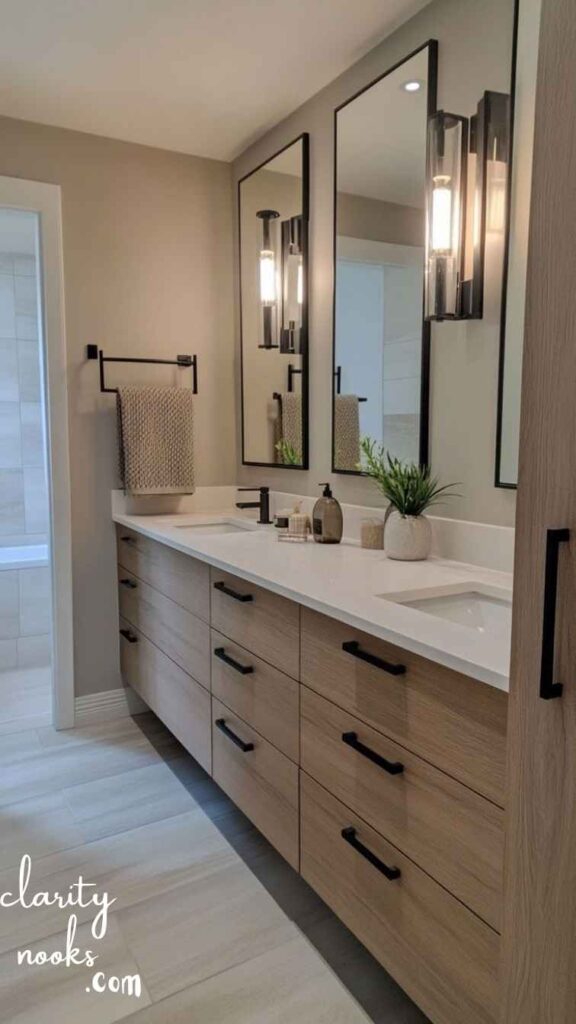
Here’s a renovation truth most professionals know but rarely share: swapping hardware is the cheapest way to make a bathroom look intentionally designed. Replace a plastic toilet roll holder with a brass or matte black one. Change the cabinet knobs on a vanity unit. Even switching a white plastic light switch plate to a brushed nickel version reads as a detail-oriented upgrade that visitors subconsciously register.
You don’t need to replace all hardware in one go. Start with the most visible pieces the toilet paper holder, towel ring, and mirror. Keep the finish consistent (all brass, all black, or all brushed nickel) and the effect is immediately cohesive. Most fittings swap over with a screwdriver in under five minutes. The cumulative cost is typically under £60 for a full bathroom, and the transformation is remarkable relative to the investment.
Style a Living Wall or Moisture-Loving Plant Corner
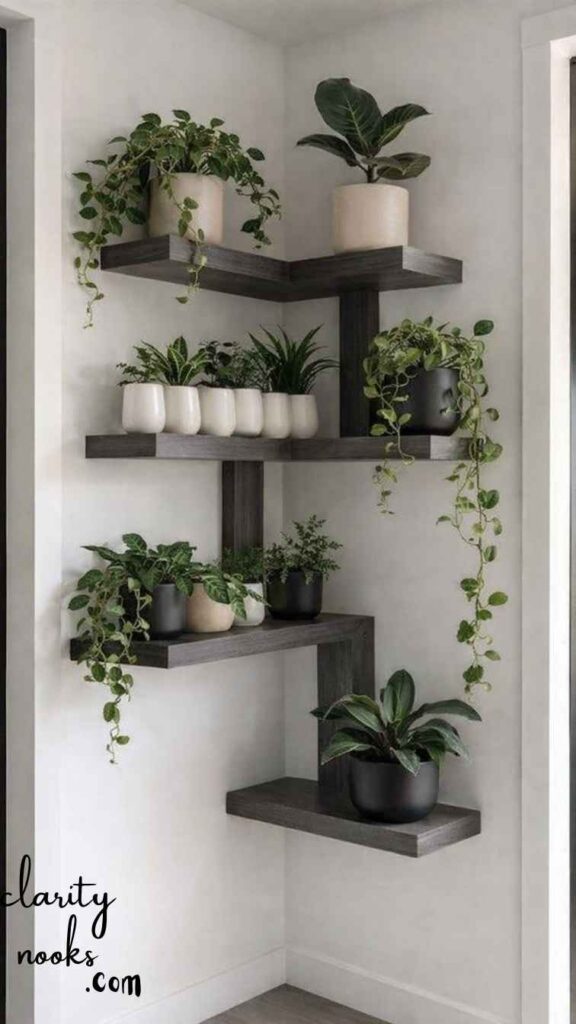
Plants in bathrooms are not a new idea but most people get the plant selection wrong. They buy succulents, which hate humidity, and wonder why they fail. The bathroom is actually an extraordinary environment for a specific category of plants that struggle elsewhere in the home. Monstera deliciosa, pothos, Boston ferns, peace lilies, and Calathea thrive in exactly the warm, humid, indirect-light conditions a bathroom provides.
For a more ambitious project, create a DIY living wall panel: mount a wire mesh frame on a bathroom wall, insert coir-lined pockets, and plant trailing pothos or string-of-pearls varieties directly into the pockets. The wall becomes a genuine living artwork, improves air quality, and critically requires almost no watering because the bathroom steam keeps the growing medium consistently moist. It’s one of the most visually impressive DIY bathroom projects, and one of the most unexpectedly low-maintenance once established.
Conclusion:
DIY bathroom decor ideas don’t require a big budget or professional skills. They just need a little intention. Start small. Swap your hardware. Add a plant. Frame that mirror. Each change builds on the last, and before long, your bathroom feels completely transformed. The best part? You made it happen.
The real secret behind great DIY bathroom decor ideas is consistency picking a style, sticking to it, and editing ruthlessly. Don’t decorate. Design. Your bathroom is used every single day. It deserves to feel like a space you actually love walking into.
Trend Analysis: 2026 and the Next 2–3 Years
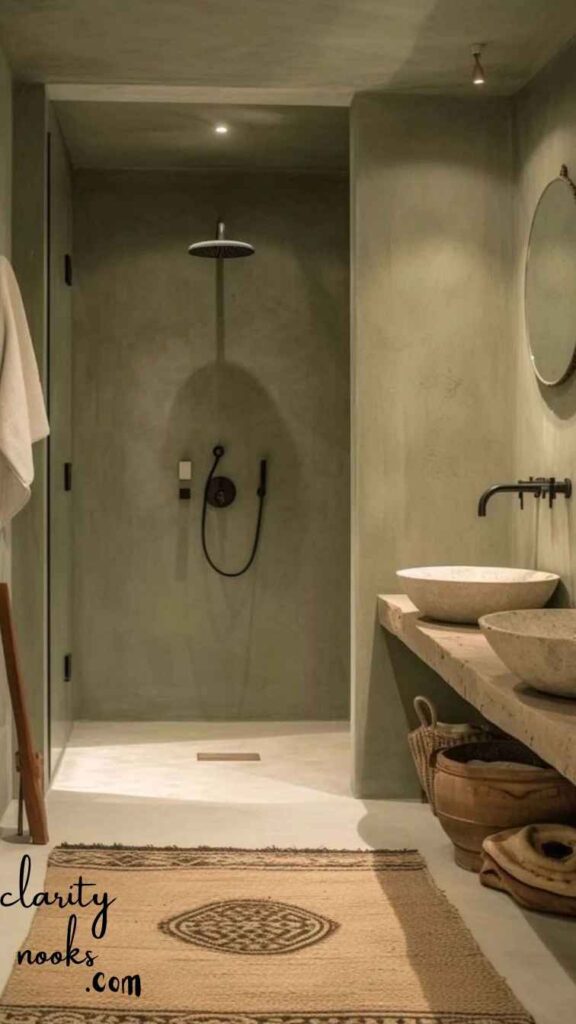
2026 Japandi bathrooms: the fusion of Japanese minimalism and Scandinavian warmth dominate interior search queries. Expect warm wood tones, natural stone textures, muted earthy palettes (clay, sage, warm grey), and a deliberate reduction of visual noise.
2026 Biophilic design is moving from a trend to a standard expectation: Bathrooms with living plants, natural materials, and organic forms are now associated with mental wellbeing not just aesthetics. Search volume for “bathroom plants” has grown over 180% since 2022.
2026–27 Textural finishes are replacing flat, painted walls: Limewash, microcement, and tadelakt are seeing rapid uptake in DIY communities as product formulations improve accessibility for non-professionals.
2027–28 Smart humidity management is entering consumer consciousness: DIY-friendly smart fans and dehumidifiers with moisture sensors are expected to become standard in new bathroom builds and retrofits affecting which plants survive and which materials degrade.
2027–28 Circular materials in home decor: reclaimed wood, recycled glass tiles, upcycled fixtures are becoming an ethical marker for design-forward homeowners. DIY culture is well-positioned to lead this shift.
Practical Tips & Expert Insights
Start with the ceiling
Most bathroom ceilings are ignored. A single coat of warm white (or even a very pale sage) dramatically shifts the mood compared to stark brilliant white. It takes one tin and two hours.
Limit your palette to three
Choose one dominant neutral, one accent material, and one metallic finish. Any more and the space starts to fragment visually, especially in small bathrooms where every surface is close together.
Layer your textiles
One bath mat is not a textile strategy. A layered combination of a natural jute mat with a smaller cotton runner introduces depth and hospitality. Choose colour within your palette, not against it.
Photograph before and after
Take a clear “before” photo in natural light before any project. Beyond the satisfaction of the comparison, it helps you evaluate whether each change is genuinely improving the space or just adding noise.
Respect humidity limits
Every material you introduce needs a humidity rating. MDF warps, some paints peel, and certain adhesives fail in high-moisture environments. Always buy products rated specifically for bathrooms or wet areas.
Respect humidity limits
Every material you introduce needs a humidity rating. MDF warps, some paints peel, and certain adhesives fail in high-moisture environments. Always buy products rated specifically for bathrooms or wet areas.
Long-Term Strategy & Sustainability
The most common mistake in DIY home decor is thinking project-by-project rather than system-by-system. A more sustainable approach is to establish a design language for your bathroom first one or two key materials, a consistent finish for hardware, a colour anchor and then make each subsequent project serve that language. This is how interior designers work, and it’s why their spaces look cohesive rather than accumulated.
From a sustainability standpoint, the best DIY bathroom projects are those that extend the life of existing materials rather than replacing them. Framing a mirror instead of buying a new one, painting existing tiles rather than tiling over them, and reupholstering or refinishing cabinetry rather than ripping it out these approaches are better for the environment and often produce more interesting, characterful results than brand-new substitutes.
Maintenance matters as much as installation. Seal natural wood, stone, and terracotta surfaces correctly from the start, and re-seal annually. A project that takes five minutes of maintenance per year will last 15 years; one that’s ignored will degrade in 18 months and need to be redone. The long-term return on time invested in prep and sealing is significant.
Future Predictions & Innovations
What’s coming in bathroom desig
AI-powered home design tools are already beginning to influence DIY planning. Apps that let you visualise a paint colour or tile pattern on a photo of your actual bathroom before purchasing are reducing the costly mistakes that have historically put people off ambitious bathroom projects. Expect these tools to become standard in the way online room planners did a decade ago.
Material science is producing bathroom-grade versions of previously inaccessible finishes. Tadelakt a traditional Moroccan waterproof plaster has historically required specialist plasterers. New pre-mixed consumer formulas are bringing it within reach of confident DIYers. Similarly, poured concrete countertops and terrazzo-style resin floors are being reformulated for home application without professional equipment.
The intersection of wellness culture and home design will intensify. Infrared lighting panels, chromotherapy shower systems, and sound-dampening bathroom panels are moving from luxury hotels into consumer product ranges. Within five years, a DIY-installed wellness bathroom is likely to be as achievable as a DIY-tiled bathroom is today.
Common Mistakes & Hidden Gaps
What beginners and intermediate DIYers get wrong
- Buying decor before establishing a design language: resulting in a space that looks “decorated” rather than designed.
- Using regular interior paint in a bathroom: it begins peeling within months. Always use a specific bathroom or kitchen paint with a mould-resistant formula.
- Choosing plants based on appearance rather than compatibility: succulents and cacti die in humid bathrooms; moisture-loving tropicals thrive.
- Ignoring scale: a tiny mirror in a large bathroom, or a hulking shelf in a compact one. Everything should be proportional to the space it occupies.
- Over-accessorising: adding items without removing an:. Good styling requires curation, not accumulation.
- Skipping the planning stage: jumping to execution without considering the overall palette, material choices, and finish consistency leads to a disjointed result even when individual elements are well-made.
- Using warm and cool lighting simultaneously: mixing a 3000K bulb over the mirror with a 5000K overhead creates colour temperature clashes that make everything look slightly off. Commit to a single temperature throughout.
- Neglecting the floor: the floor is one of the most visually dominant surfaces in a bathroom, yet it’s often the last thing people change. Even a new bath mat or a painted floor (a surprising and reversible technique) dramatically shifts the overall feel.
FAQ’S About DIY Bathroom Decor Ideas
How do I decorate a bathroom on a tight budget?
Start with the highest-impact, lowest-cost changes: swap hardware (towel rings, toilet roll holder), add a floating shelf above the toilet, and frame your existing mirror. These three projects combined typically cost under £60 and produce a dramatic visual shift. Add plants and a styled tray for under £20 more.
Can renters do DIY bathroom decor?
Yes. Peel-and-stick tiles, plug-in sconces, freestanding ladders, and framed mirrors are all reversible or removable. Avoid anything that requires drilling into tiles without permission, and always check your tenancy agreement before applying any adhesive products.
How do I make a small bathroom feel bigger?
Use a large-format mirror (or multiple mirrors), light colour palettes, vertical storage (tall cabinets, wall-mounted shelves), and clear glass accessories rather than opaque ones. Avoid busy patterns on large surfaces and limit decorative clutter to a single styled area.
What plants work best in a bathroom with no natural light?
Pothos, ZZ plants, peace lilies, and cast iron plants all tolerate low-light conditions remarkably well. If there’s truly no natural light, consider a small grow light on a timer a full-spectrum LED strip is both effective and inexpensive.

Rameen Zara is the founder of Clarity Nooks, bringing over five years of experience in home décor and interior styling. She shares simple yet practical design ideas that suit real homes and everyday living. Her approach focuses on cozy aesthetics, soft color palettes, and natural textures that create warm, inviting spaces.


