

Smart DIY Bathroom Tile Ideas to Make Any Bathroom Look Bigger
Your bathroom is the one room you visit a dozen times a day and it might be the one room you’ve been ignoring for a decade. Cracked grout, builder-grade beige tiles, that one spot where the glaze has worn through.
The good news? You don’t need a contractor, a massive budget, or a degree in design to fix it. DIY bathroom tile projects have evolved dramatically in the last few years, and the materials, tools, and adhesive technologies available today make professional-looking results genuinely accessible to determined homeowners.
This guide covers nine detailed, experience-backed DIY bathroom tile ideas from the beginner-friendly to the genuinely ambitious. Each idea includes real-world context, practical setup tips, and honest insight into what goes wrong (and how to avoid it). Whether you’re refreshing a rental or renovating your forever home, you’ll find something here worth starting this weekend.
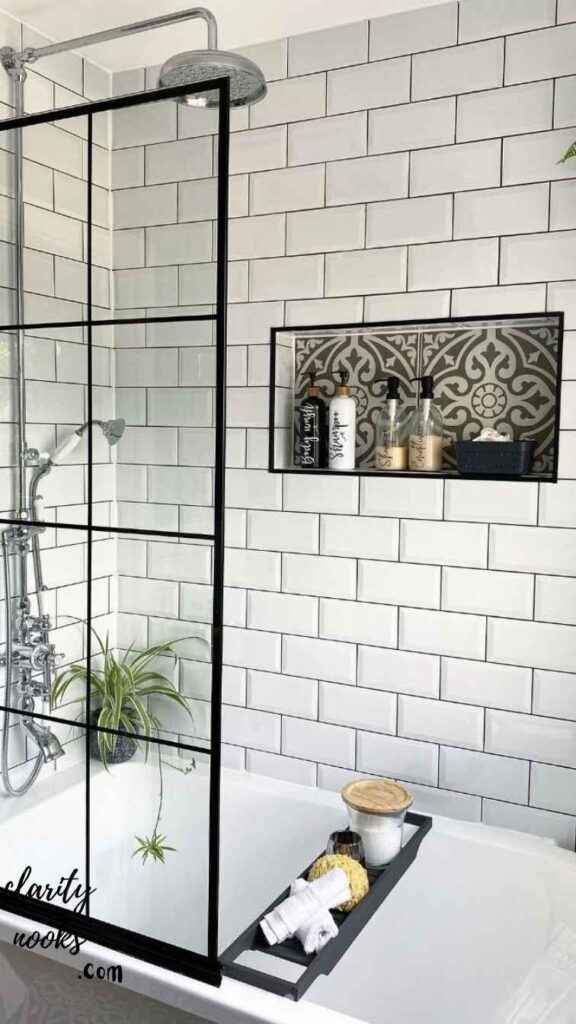
Subway Tile Feature Wall with Colored Grout
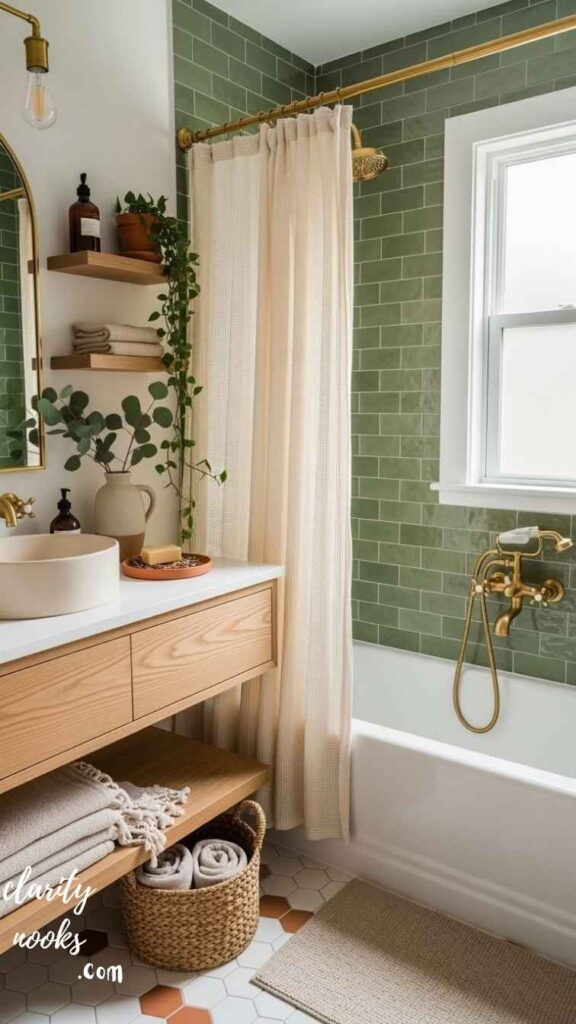
Classic white subway tile has been a bathroom staple since the early 1900s but the version most people have in their homes is predictable and lifeless. The upgrade that’s transforming bathrooms right now is simple: keep the subway tile, change the grout color. Dark charcoal, sage green, or even terracotta grout completely redefines the visual tone of the same tile.
This is one of the most beginner-friendly DIY bathroom tile ideas precisely because the technique is straightforward. You’re still laying 3×6 tiles in a running bond (offset) pattern, which is forgiving of minor alignment errors. The magic happens in the grout stage. Color-sealed or pigmented unsanded grout in a contrasting shade turns the grid lines from background noise into a deliberate design feature.
A homeowner in Portland, Oregon replaced their builder-grade shower surround with white subway tile and chose a deep slate-gray grout. Total material cost: $340 for an 8×5 ft wall. The result photographed so well that multiple design blogs mistook it for a professional renovation. The key decision that made it work? She used a tile leveling system $28 at any hardware store to ensure perfectly flush tile faces, which is what separates amateur from professional-looking results.
Featured Snippet Answer
Subway tile with colored grout is a beginner-friendly DIY bathroom tile idea that costs $3–$8 per square foot in materials. You’ll need tile adhesive, notched trowel, tile leveling clips, pigmented grout, and grout sealer. The whole project for a typical accent wall takes one weekend.
Pro Setup: What most tutorials skip
Most guides tell you to start from the center of the wall. That’s correct but they don’t explain why you should dry-lay your tiles first. Doing a full dry run without adhesive lets you spot awkward cuts at the edges before you’ve committed to anything. On a standard 60-inch shower wall, you almost never end up with equal cuts on both sides unless you adjust your starting point slightly. Take the extra hour to dry-lay. You’ll thank yourself later.
Must Read: Modern DIY Backyard Bar Ideas to Transform Your Outdoor Living Space
Peel-and-Stick Tile Transformation
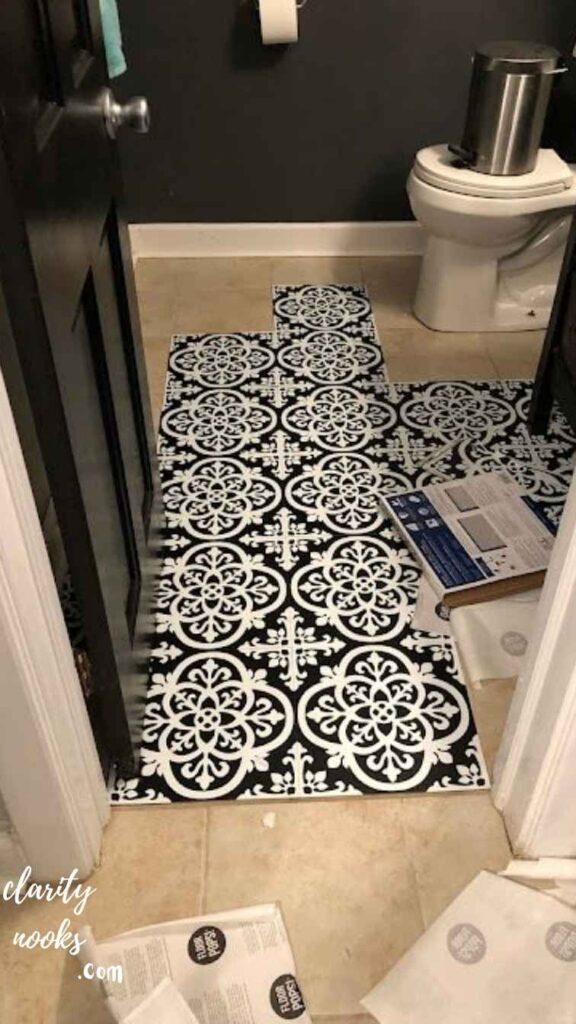
Let’s be direct about peel-and-stick tiles: they’re not a permanent solution for wet shower walls. But for bathroom floors, vanity backsplashes, and accent areas in lower-moisture zones, the modern generation of peel-and-stick tiles has become genuinely impressive. Brands like Aspect, Smart Tiles, and Stickgoo now offer options that convincingly mimic real stone, ceramic, and glass mosaic textures.
The biggest advantage isn’t the price it’s the reversibility. If you’re renting, or if you’re the kind of person who gets bored of a design in three years, peel-and-stick lets you experiment without consequences. The installation is also truly beginner-proof: a utility knife, a measuring tape, and a credit card for smoothing edges are your entire toolkit.
Real-Life Scenario
A renter in Chicago covered a hideous orange ceramic vanity backsplash with white marble-look peel-and-stick tiles. Total cost: $60. When she moved out two years later, they came off cleanly without damaging the original tile underneath and her landlord never knew.
The surface prep factor people underestimate
The number one reason peel-and-stick tiles fail (peel at corners, lift after a few months) is surface contamination. Soap residue, grease from hair products, and even the oils from your fingertips during installation are enough to compromise the adhesive bond. Clean the surface with isopropyl alcohol not just a damp cloth and let it dry fully. For extra security in higher-humidity areas, run a thin bead of clear silicone along the grout lines after installation.
Read More: DIY Baby Nursery Ideas for Boys: Budget Decor That Looks Expensive
Herringbone Floor Tile Pattern
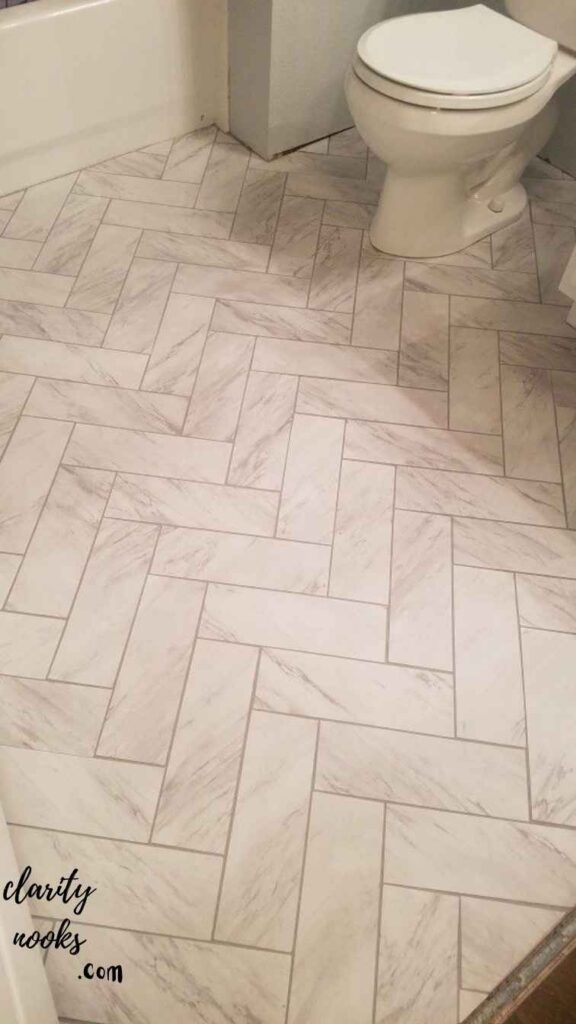
The herringbone pattern where rectangular tiles are laid at 45-degree angles in a V-shape adds visual movement and architectural interest to even the smallest bathroom floor. It’s a design trick that makes narrow rooms feel wider and longer rooms feel more dynamic. The pattern works beautifully with wood-look porcelain, white marble tiles, or even simple matte ceramic in earthy tones.
For DIYers, the honest challenge here is the angle cuts. You’ll need a wet saw with a diamond blade, and you should expect roughly 15% waste from cuts so always buy extra material. The setup time is longer than straight-lay tile, but the visual payoff is significant. A herringbone floor in a 5×8 ft bathroom takes about two full days to lay, grout, and seal properly.
To lay herringbone bathroom tile: mark the center of the room, snap chalk lines at 45°, start laying tile from the center outward, and use a wet saw for edge cuts. Allow 15% overage for waste. Suitable for intermediate DIYers with access to a wet saw.
The “starting line” technique for herringbone success
Professional tile setters use a technique called “establishing the field.” Before a single tile goes down with adhesive, they lay two full rows across the diagonal center, check for level, make adjustments, and then build outward from that anchor. This prevents the accumulating drift that causes herringbone patterns to look “off” by the time you reach the wall edges. It’s extra work upfront, but it’s the difference between a pattern that reads clearly and one that looks slightly chaotic.
Don’t Skip: Easy DIY Dining Table Decor Ideas for Everyday Elegance at Home
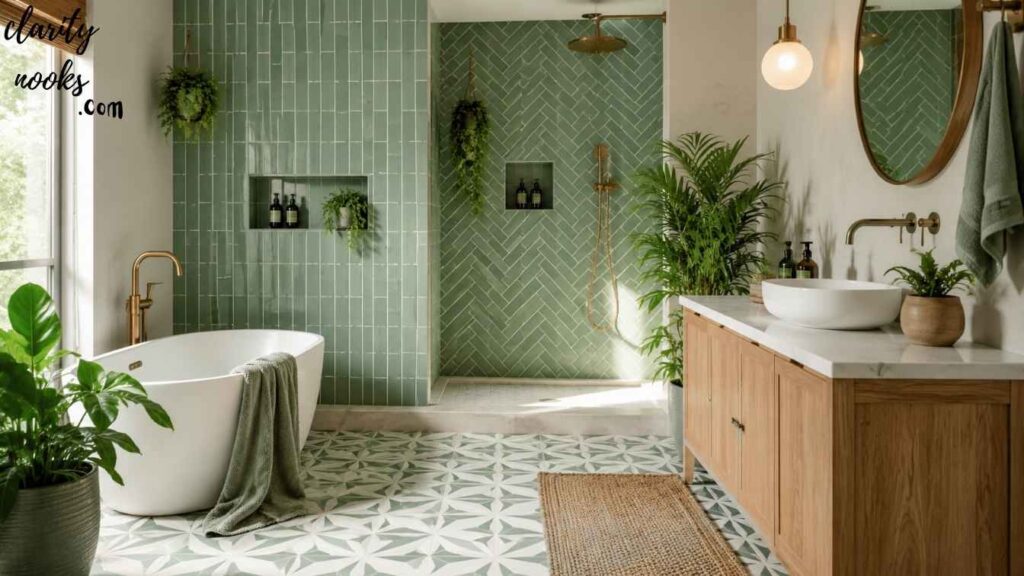
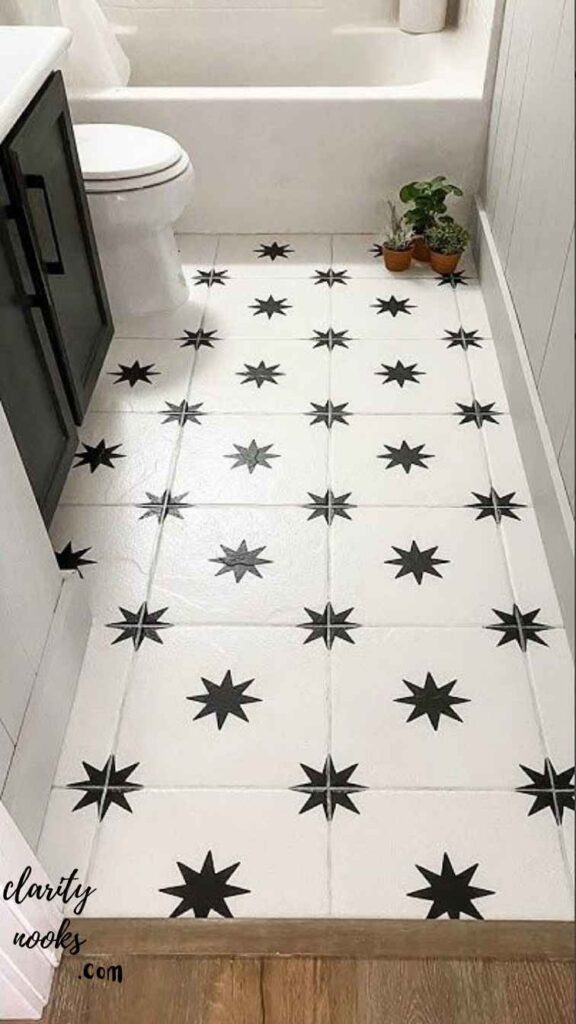
Moroccan-Inspired Cement Tile Accent
Cement tiles with geometric, arabesque, or star-and-cross patterns have moved from specialty boutique to mainstream availability and they’re one of the most impactful DIY bathroom tile ideas for creating a “designer” look on a modest budget. A single accent wall or a fully tiled floor in a bold Moroccan pattern immediately elevates the perceived value of the entire room.
Cement tiles require different handling than ceramic or porcelain. They’re porous, heavier, and more fragile during installation. You cannot use standard wall tile adhesive you need a white polymer-modified thin-set mortar. More critically, cement tiles must be sealed before grouting and again after grouting, or they will permanently stain. This extra step is what separates successful DIY installs from ruined ones.
A bathroom renovation in Austin, Texas: used star-pattern cement tiles for the bathroom floor (48 sq ft) paired with white subway tile walls. The homeowner sourced the tiles from a Mexican importer at $4.50 per tile roughly $216 total for materials. After a YouTube deep-dive on cement tile sealing (two coats before, one after grouting with a penetrating sealer), the floor still looks pristine three years later.
Pattern matching: the challenge no one warns you about
Cement tiles are handmade, and the pattern repeat isn’t always perfectly consistent. Before installation, always lay out the entire batch in the room to check for color variation and pattern alignment. Sort tiles by shade if you notice variation, and distribute them throughout the floor rather than clustering all the darker ones in one corner. This is a critical step that tile professionals do instinctively, but most online guides skip entirely.
Also Read: Trendy DIY Mini Bar Ideas for a Beautiful Home Upgrade
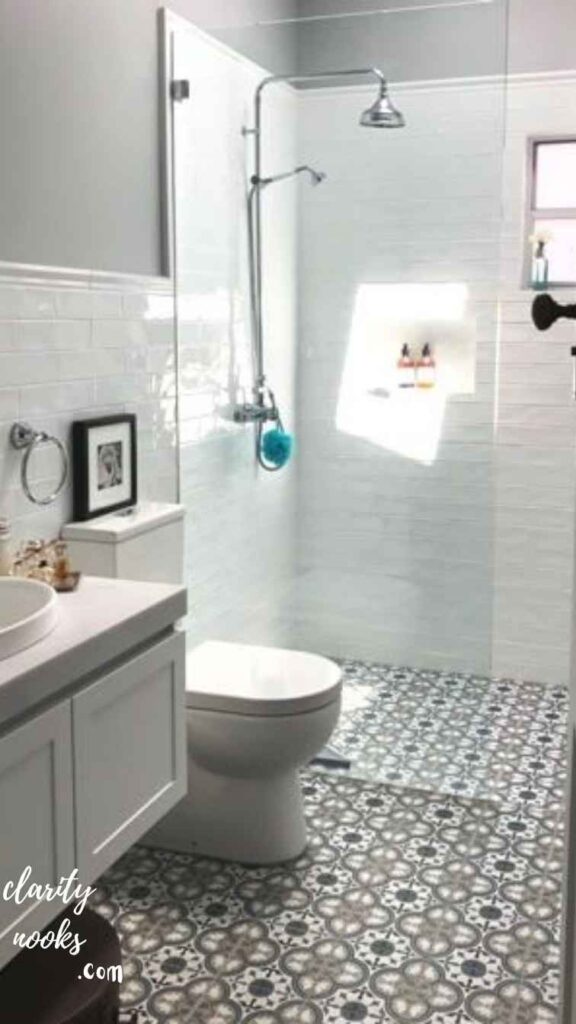
DIY Shower Niche with Mosaic Tile
A recessed shower niche that built-in alcove for shampoo and soap is one of those features that makes a bathroom feel custom-designed rather than builder-spec. The great news is that DIYers with basic framing skills can install one. Pre-framed foam niches from brands like Schluter (Kerdi-Board) or Redi-Niche have made this dramatically easier, eliminating the need to cut between studs and custom-frame the opening.
Where mosaic tile comes in: the interior back wall of the niche is a natural showcase for small-format decorative tile. Glass mosaic, penny round tile, or a contrasting stone mosaic in the niche creates a focal point every time someone steps into the shower. It’s a small surface area typically 12×24 inches which means even expensive mosaic tile stays affordable for this purpose.
Why This Works Psychologically: Design research consistently shows that small, well-executed focal points create a “halo effect” people perceive the entire space as higher quality because of one standout detail. A beautifully tiled niche makes the rest of the shower look intentional, even if the surrounding tile is simple.
Waterproofing: the step you absolutely cannot skip
A shower niche that leaks behind the wall causes mold damage that costs thousands to remediate. Before tiling a niche, the foam backer must be fully waterproofed with a membrane system RedGard, Schluter Kerdi, or similar. Pay special attention to corners and seams. Apply two coats, let each dry fully, and inspect for pinholes. This isn’t where you rush. A properly waterproofed niche should last 20+ years without moisture issues.
Large-Format Porcelain Tile
(Faux Marble Look)
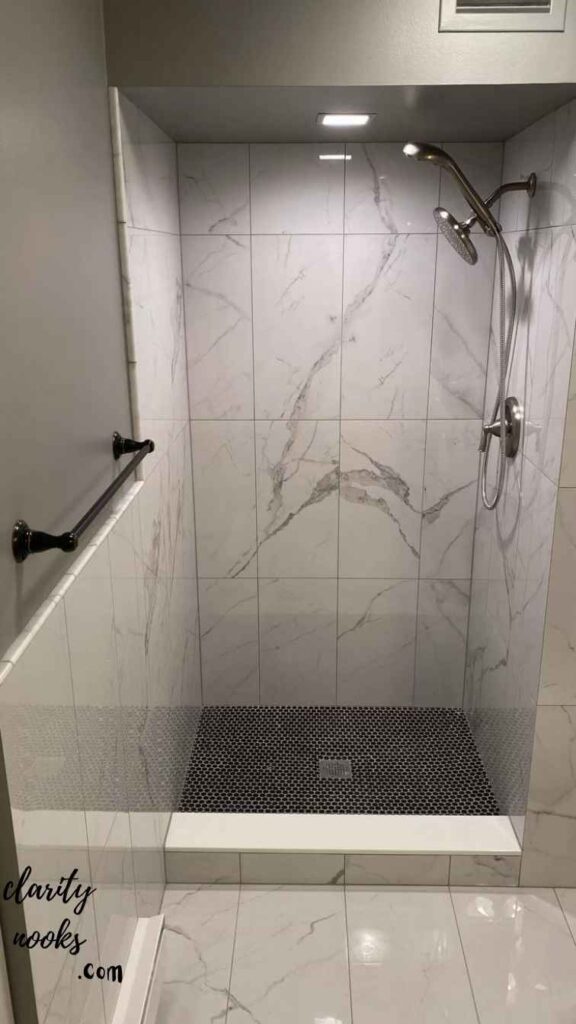
Large-format porcelain tiles typically 24×24 inches or larger with veined marble patterns have become one of the biggest trends in bathroom design. The visual effect is luxurious, and modern inkjet printing technology has made the patterns so convincing that even design professionals do double-takes. More importantly for DIYers: porcelain is far more durable, water-resistant, and stain-proof than real marble, and it costs a fraction of the price.
The installation challenge is real, though. Large tiles are heavy, require a perfectly flat substrate (any flex in the subfloor causes cracking), and demand a larger notched trowel (3/8″ V-notch or larger) with back-buttering technique. The “lippage” problem where tile edges don’t sit flush is more visible on large tiles than small ones, so a tile leveling system is essential, not optional.
The substrate test that saves expensive tiles
Before laying any large-format tile, perform the “deflection test”: press firmly in the center of each subfloor section and check for bounce or flex. Large porcelain tiles need a subfloor deflection of less than 1/360 of the span. If your floor flexes, add a layer of cement backer board screwed at 6-inch intervals before tiling. Skipping this step on a bouncy subfloor will crack your tiles within six months a costly and frustrating outcome.
Painted Tile with Tile-Specific Paint
Painting existing tiles divides the design community purists hate it, pragmatists love it. Here’s the honest reality: done correctly with the right products, painted tile can look polished and hold up for several years in low-moisture areas like the vanity backsplash or lower wall tiles. Done incorrectly with generic wall paint, it peels within weeks and looks terrible.
The products that actually work are epoxy tile paints (Rust-Oleum Tub & Tile, Benjamin Moore’s alkyd enamel) and two-part epoxy coatings designed specifically for bathroom surfaces. Surface preparation is 80% of the result: thorough degreasing, light sanding with 220-grit to create a mechanical bond, and a coat of adhesion primer before the topcoat. Skipping any of these steps causes failure.
When painted tile makes sense:
This approach makes the most sense in rental properties (with landlord permission), temporary fixes before a full renovation, or for tiles in areas that don’t receive direct water spray. For shower tiles or floor tiles with regular foot traffic, it’s not a long-term solution.
Creating a pattern with paint: the stencil technique
Rather than painting tiles a solid color, consider using tile stencils to add a decorative pattern. Moroccan-inspired stencils on plain white tiles applied with a dense foam roller in a contrasting color mimic the look of expensive patterned tile for about $25 in materials. The key is using a very small amount of paint on the roller (“almost dry”) and working in light layers to prevent bleeding under the stencil edges.
Wood-Look Tile for Bathroom Flooring
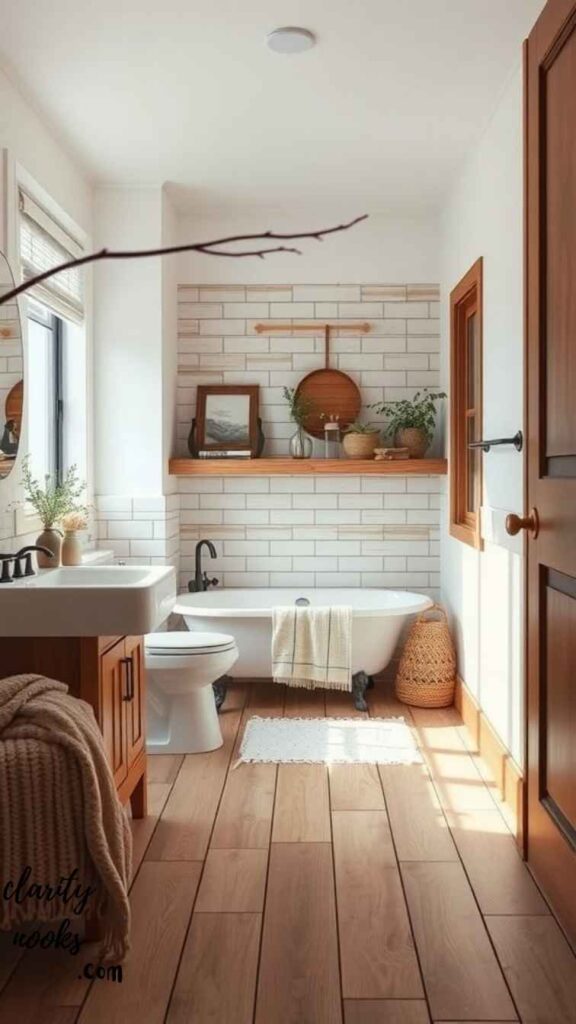
Wood-look porcelain tile is arguably the smartest flooring decision you can make in a bathroom. It gives you the warmth and organic texture of hardwood with the complete water resistance of porcelain no warping, no swelling, no mold issues that plague real wood in humid environments. The category has exploded in quality over the last five years, with tiles now available in realistic oak, walnut, teak, and weathered barn wood finishes.
The installation approach that makes wood-look tile look most convincing is the staggered joint layout also called running bond or brick pattern with a 1/3 offset (not 1/2) to avoid the “H-joint” that looks artificial. Grout color matters enormously here: choose a grout that closely matches the tile’s primary tone rather than contrasting with it. The goal is for the grout lines to visually disappear, making the floor read as continuous wood planks.
A Seattle homeowner replaced a cracked vinyl bathroom floor with 6×36 inch porcelain wood-look tiles in a light oak finish. She used a 1/3 staggered layout with matching light beige grout. The result was so convincing that houseguests consistently asked about the “hardwood floors” until they noticed the grout lines. Total cost: $420 in materials for a 45 sq ft bathroom.
Geometric Tile Backsplash Behind the Vanity
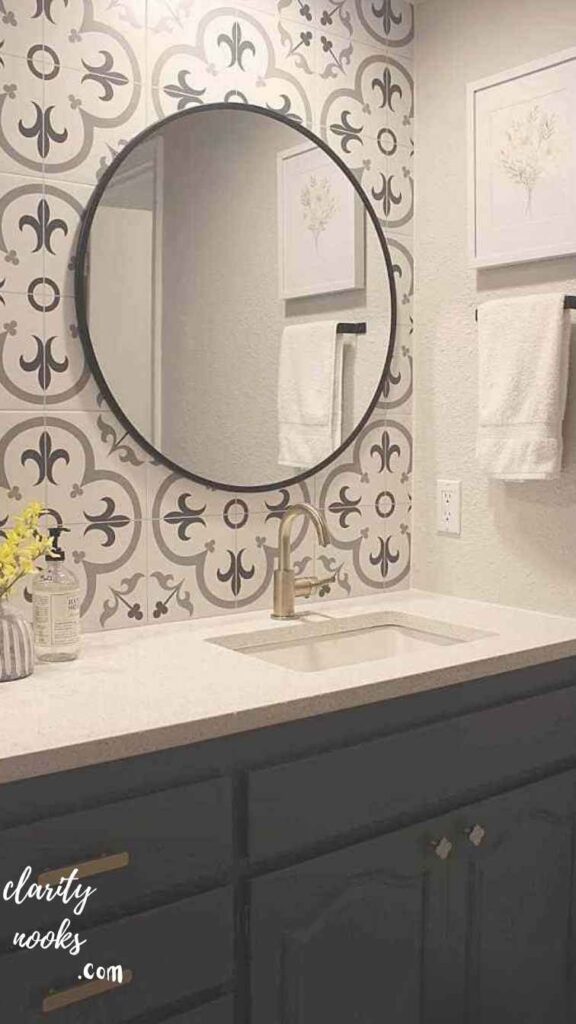
The area between the vanity countertop and the mirror is one of the most underutilized design opportunities in any bathroom. Most people leave it blank or tile it with the same material as the walls. A geometric tile backsplash here hexagon, diamond, or encaustic patterned creates a visual anchor for the entire room at eye level, which is exactly where design impact matters most.
This is also an ideal beginner project because the surface area is small (typically 2–4 square feet), which limits both cost and consequence. If a tile cracks or a grout line goes slightly off, fixing it doesn’t require tearing out an entire wall. It’s a low-risk, high-reward DIY bathroom tile idea that builds your skill confidence for larger future projects.
Design Principle: The Rule of Focal Zone
Interior designers consistently place the most visually complex tile in “focal zones” areas at eye level that draw your gaze immediately upon entering a room. The vanity wall is the primary focal zone in most bathrooms. A geometric backsplash here does more design work per square foot than any other location in the room.
Matching grout width to tile size
One mistake that ruins geometric tile installations is using the wrong grout joint width. Hexagon tiles typically need a 1/8″ joint, while larger geometric formats work better with 3/16″. Using too-wide grout joints on small geometric tiles makes the pattern look muddled, while too-narrow joints on larger tiles cause cracking as the tile expands and contracts with temperature changes. Check your tile manufacturer’s recommendations they’re usually printed on the box.
Conclusion
DIY Bathroom Tile Ideas can make your bathroom look fresh, clean, and modern without spending too much money. Simple tile patterns, soft colors, and creative designs can change the full style of your space. You can use these ideas for walls, floors, or shower areas. Small updates can give big results and make your bathroom feel more comfortable every day.
These DIY Bathroom Tile Ideas are easy to try and work well for both small and large bathrooms. Pick designs that match your home style and budget. With the right tiles and simple planning, you can create a beautiful bathroom that looks stylish and welcoming for your family and guests.
Trend Analysis: 2026 and Beyond
The DIY bathroom tile market is shifting in meaningful ways, driven by changes in both material technology and how homeowners approach home improvement in a post-pandemic context where spending on personal living spaces remains elevated.
Now · 2026
Quiet Luxury Tile Palettes
Warm taupes, greige, and off-whites are dominating over the cool gray that defined 2018–2022. Travertine-look and limestone-textured porcelain are the fastest-growing categories.
Now · 2026
Handmade & Imperfect Aesthetics
Machine-perfect uniformity is losing ground to tiles with intentional variation irregular edges, slight color shifts, dimpled surfaces. Japanese wabi-sabi influence is strong.
2027–2028
Biophilic Tile Patterns
Leaf, moss, and organic cloud patterns are moving from wallpaper to tile. Expect relief-textured tiles with organic motifs to enter the mid-market within 18 months.
2027–2028
Recycled & Low-Carbon Tile
Tiles made from recycled glass, post-consumer ceramic, and industrial byproducts are growing at 22% annually. Sustainability credentials are becoming a purchase driver.
User behavior is also shifting: searches for “bathroom tile DIY” have grown 38% year-over-year since 2023, and short-form video platforms have dramatically compressed the learning curve for intermediate tile-laying skills. What once required a weekend course can now be learned in a focused afternoon of video study and practice on a scrap piece of backer board.
Practical Expert Insights
- Always tile on a Thursday or Friday: Grout needs 24–72 hours of undisturbed curing. Starting mid-week means traffic and humidity from weekend showers can compromise the cure. Plan for a tile-free weekend.
- Buy 10–15% extra tile, always: Even if you think you’ve measured perfectly. Dye lots vary between production runs, and if you need to repair a cracked tile three years from now, matching the original batch is often impossible.
- Unsanded grout for joints under 1/8″. Sanded grout for 1/8″ and above: Using the wrong type causes either cracking (unsanded in a wide joint) or scratching of the tile surface (sanded in a narrow joint with polished tiles).
- Use a bucket of water and a barely damp sponge for grout cleanup: Too much water in the sponge dilutes the grout in the joints, weakening it and changing the color. Wring the sponge until it’s almost dry.
- Let the thin-set cure fully before grouting: Most thin-sets need 24 hours minimum. Grouting over uncured adhesive is the single most common cause of grout cracking in DIY tile jobs.
- Seal natural stone and cement tiles before AND after grouting: The grout can permanently stain porous tile surfaces during installation. Pre-sealing creates a barrier that wipes clean.
- Use back-buttering on all tiles 6″ or larger: Spread additional thin-set on the back of each tile before pressing it to the wall or floor. This ensures full coverage and prevents hollow spots that cause cracking over time.
Long-Term Strategy & Sustainability
When you’re investing time and money in a DIY bathroom tile project, it’s worth thinking beyond the immediate aesthetic result. The decisions you make today affect maintenance cost, longevity, and resale value for years to come.
Porcelain tile particularly full-body porcelain where the color runs through the material rather than just the surface glaze is the most durable and sustainable long-term choice. Unlike glazed ceramic, a scratch on full-body porcelain exposes matching material rather than a white undercoat. On a bathroom floor with regular foot traffic, this difference in durability becomes visible within five to seven years.
From a sustainability standpoint, tile is already an inherently long-life material a well-installed ceramic or porcelain tile floor can last 50+ years. The sustainability focus for modern buyers is increasingly on the production side: look for tiles certified by the Tile Council of North America (TCNA) for environmental standards, or choose manufacturers with published Environmental Product Declarations (EPDs). Locally manufactured tile also reduces transportation carbon significantly compared to imported options.
For resale value, data from the National Association of Realtors consistently shows that bathroom updates yield one of the highest returns of any home improvement project. A professional-looking tile installation even a DIY one can recoup 60–70% of its cost in increased home value, and significantly reduces buyer objections during the sales process.
Future Predictions & Innovations
The tile industry is undergoing quiet but significant technological change. Several developments over the next two to three years will directly affect how DIYers approach bathroom tile projects.
AI-assisted tile planning tools: are already emerging from brands like Cancos and Floor & Decor apps where you photograph your bathroom and instantly visualize different tile options with accurate scale. By 2027, augmented reality tile previewing will be standard on most retailer apps, eliminating much of the guesswork that leads to buyer’s remorse after installation.
Thin-set innovation: is reducing cure times dramatically. Products already in testing can reach structural cure in 4–6 hours rather than 24, which would allow a complete tile-and-grout installation in a single day. For DIYers who struggle to keep a bathroom out of commission for a full weekend, this is a transformative development.
Self-leveling large-format installation systems: currently professional-grade and expensive are expected to enter the consumer DIY market by 2028. These systems use adjustable pedestals and clip mechanisms to achieve flat, lippage-free installation without requiring perfect subfloor prep, democratizing large-format tile for amateur installers.
Common Mistakes & Hidden Gaps
Beginner Mistake
Not testing tile layout before adhesive goes down: Starting from a wall rather than the center, failing to dry-lay tiles first, and not accounting for out-of-square walls results in dramatically narrowing cuts at one end of the room.
The Fix
Always snap chalk lines from the true center of the space, dry-lay a full row or section, and adjust your starting point before any adhesive touches the surface.
Intermediate Mistake
Using the wrong adhesive for the application: Mastic adhesive (organic) is commonly sold but is inappropriate for wet shower areas it softens and fails when continuously exposed to moisture. Many intermediate DIYers use it anyway because it’s easier to work with.
The Fix
In wet areas (showers, tub surrounds, floor areas subject to standing water), always use a polymer-modified thin-set mortar. Only use mastic in dry or intermittently wet areas like vanity backsplashes.
Hidden Gap Competitors Miss
Not accounting for grout color shift when dry: Wet grout always looks darker than the finished dried result, often by 2–3 shades. DIYers regularly choose grout colors based on wet samples and end up with a much lighter finished product than intended.
The Fix
Always test grout color on a small section and let it dry completely (at least 24 hours) before committing to the full installation. Bring a dried sample home from the store if the retailer offers it.
Overlooked Step
Skipping expansion joints at room perimeters: Tiles expand and contract with temperature changes. A bathroom tiled wall-to-wall without any flexible perimeter joint will eventually crack, either in the grout or through the tile itself, as the field has nowhere to move.
The Fix: Leave a 1/4″ gap at all perimeter edges (walls, cabinets, tubs) and fill with color-matched silicone caulk rather than grout. This provides the necessary movement joint while staying nearly invisible in the finished installation.
FAQ’S About DIY Bathroom Tile Ideas
Can a complete beginner DIY bathroom tile?
Yes, with the right starting project. A peel-and-stick vanity backsplash or a small geometric accent wall are genuinely beginner-accessible. A full shower tile installation is intermediate-level and requires more preparation and attention to waterproofing. Start small, build skills, scale up.
How long does a DIY bathroom tile project take?
A small accent wall or backsplash: one weekend. A full bathroom floor (50–80 sq ft): two weekends. A complete shower surround including waterproofing: three weekends, spread across two weeks to allow proper curing between stages.
What tools do I absolutely need?
At minimum: a notched trowel (size matching your tile), tile spacers or a leveling system, a tile wet saw or snap cutter, a rubber mallet, grout float, bucket and sponge, and a spirit level. For large-format tile, add back-buttering tools and a larger trowel.
How do I know if I need to waterproof first?
Any surface that will be directly in the shower spray zone, or any floor area in a wet room, requires a waterproofing membrane before tile. Dry areas like vanity backsplashes and accent walls outside the shower zone typically don’t require it.

Rameen Zara is the founder of Clarity Nooks, bringing over five years of experience in home décor and interior styling. She shares simple yet practical design ideas that suit real homes and everyday living. Her approach focuses on cozy aesthetics, soft color palettes, and natural textures that create warm, inviting spaces.


