
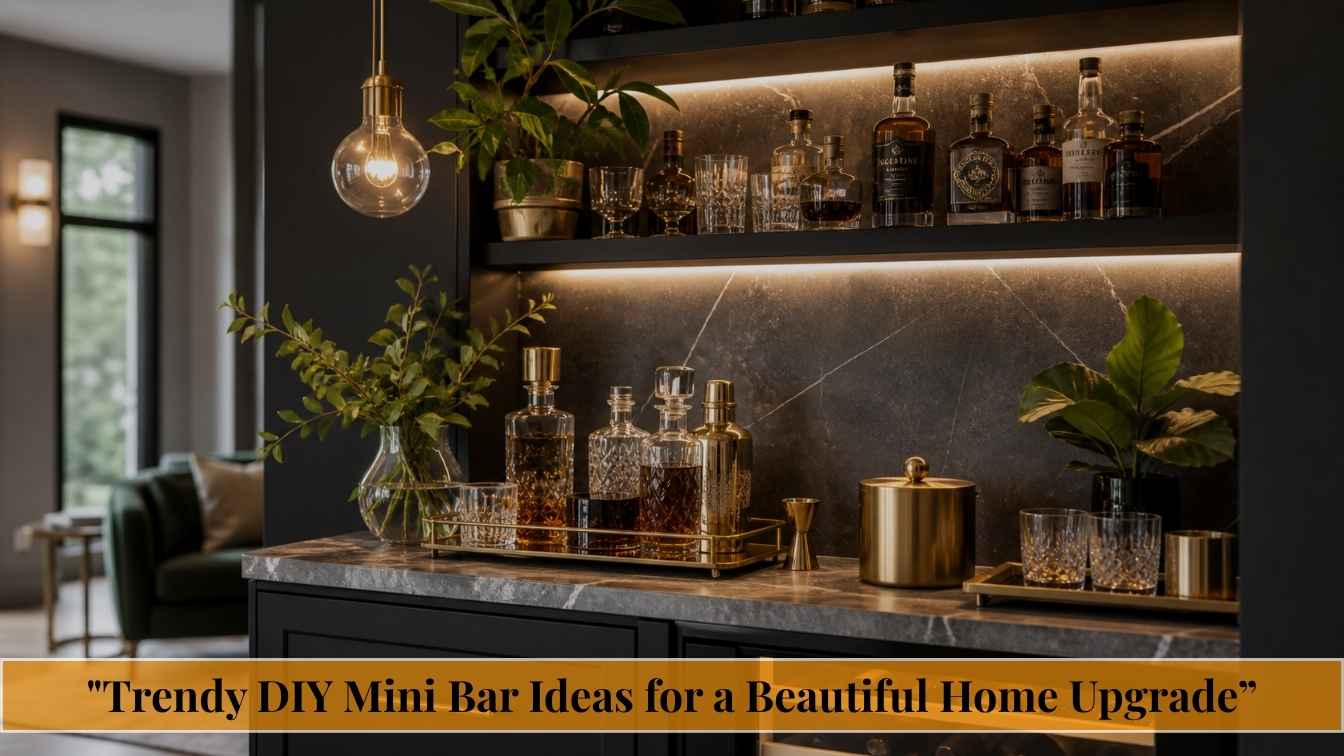
Trendy DIY Mini Bar Ideas for a Beautiful Home Upgrade
The truth is, a well-built DIY mini bar doesn’t need much square footage, a big budget, or advanced carpentry skills. It needs smart planning, the right inspiration, and a clear understanding of how people actually use a home bar. This guide delivers all three.
Whether you’re converting a forgotten corner, repurposing old furniture, or building a dedicated beverage station from scratch, these nine ideas cover every scenario, space type, and skill level. Each one is backed by real examples, practical decisions, and insights you won’t find in a generic listicle.
Repurposed Bookcase Bar
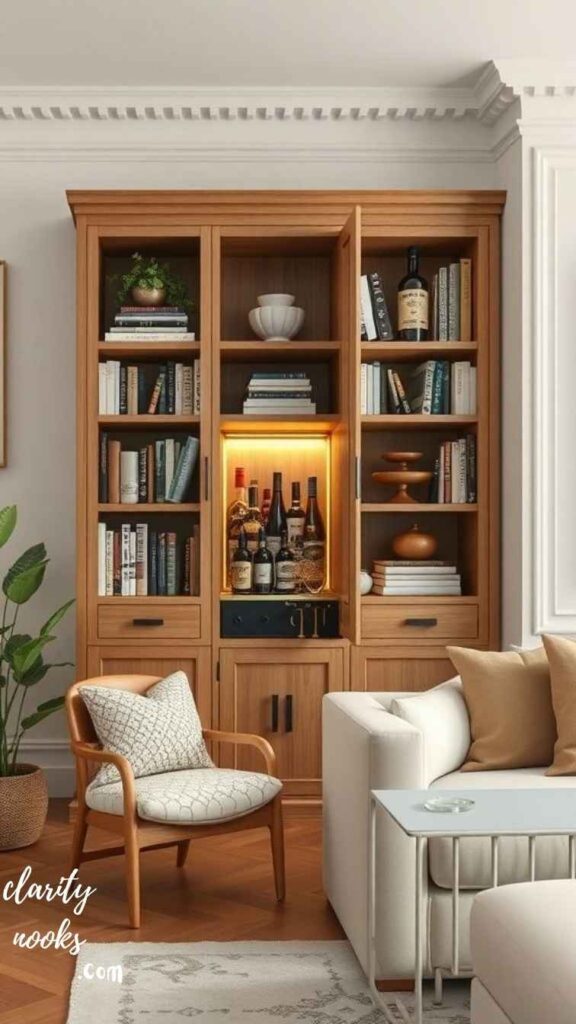
One of the most underrated DIY mini bar ideas hiding in your home is a bookcase you’re not fully using. A standard five-shelf bookcase think IKEA KALLAX or an old Billy unit becomes a fully functional bar with a few intentional modifications.
The key is treating each shelf as a zone. Dedicate the top shelf to display bottles at eye level. Use the middle shelves for glassware, a small ice bucket, and a cocktail shaker. Reserve the lower shelf for mixing tools, bar towels, and a small cutting board. Add LED strip lighting underneath the top shelf and suddenly it looks like something from a boutique hotel lobby.
You don’t need to paint or modify the unit structurally. A few contact-paper panels in a marble or wood grain finish, some brass hardware swaps, and open-front wine bottle holders (available for under $15 on most home goods sites) can take a $60 bookshelf and make it look like a $400 custom build.
Real-life scenario:
A couple in a 700 sq. ft. London flat converted a 1970s teak bookshelf they found at a charity shop. They added three open-circle wine holders, replaced the shelf pegs with brass pins, and lined the back panel with adhesive grass cloth wallpaper. Total investment: £34. Result: a vintage-inspired mini bar that guests frequently compliment and mistake for something custom-made.
What is the easiest DIY mini bar to make?
A repurposed bookcase bar is the easiest option it requires no building or structural changes. Simply zone the shelves for bottles, glassware, and tools, then upgrade aesthetics with contact paper, LED lighting, and new hardware.
Must Read: DIY Outdoor Kitchen Ideas for a Perfect Backyard Cooking Space
Rolling Bar Cart Station
A bar cart is the most flexible DIY mini bar solution available and the most popular among apartment dwellers for good reason. It moves where you need it, stores out of the way when you don’t, and requires absolutely zero installation. But most people style them wrong, which is why they often look cluttered rather than curated.
The rule is: work in odd numbers and create visual layers. Three bottles at the back, two glasses in the middle, one cocktail tool as a focal point at the front. Keep the lower shelf functional that’s for mixers, a small ice bucket, or a napkin holder. Use a small tray on the top shelf to contain loose items. The tray creates visual boundaries and makes the whole thing feel intentional rather than assembled in a rush.
For the DIY element, don’t buy a pre-finished cart if you can help it. Vintage metal carts from thrift stores are structurally identical to $200 retail options. Sand, prime, and spray-paint in matte black or brushed brass. Add a marble-contact-paper tray liner and you’ve built something that genuinely outperforms what most stores sell.
Pro tip: Add caster wheel locks to your bar cart if you’re placing it on hardwood floors. Unlocked wheels shift during use and make the whole setup feel unstable. A $6 set of locking casters from any hardware store solves this completely.
Read More: DIY Outdoor Patio Ideas That Make Small Backyards Look Amazing
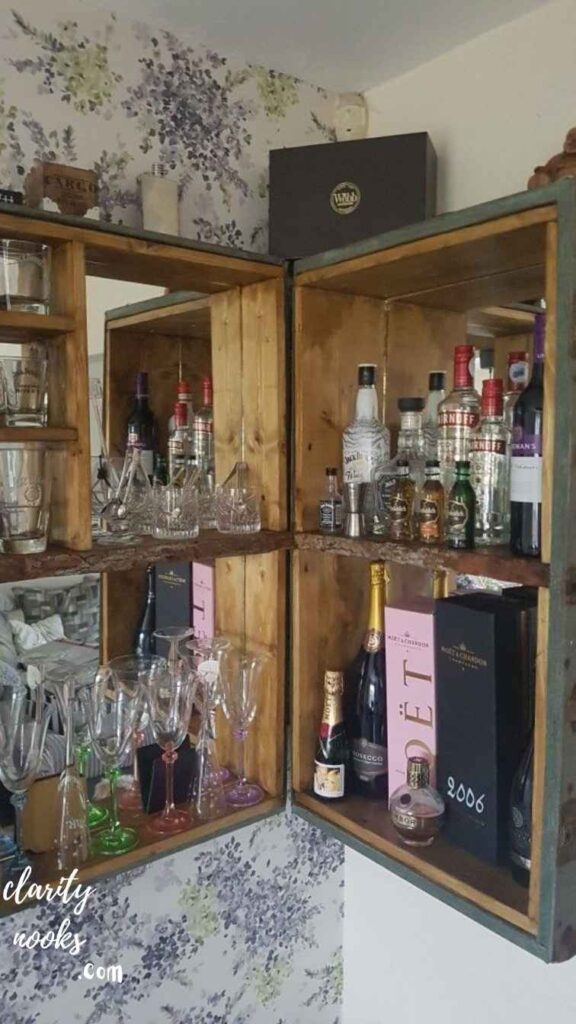
Converted Cabinet Bar
An old armoire, wardrobe, or sideboard is one of the best raw materials for a home bar build. The exterior keeps your bar out of sight ideal for shared living spaces or anyone who prefers a “closed when not in use” setup. Opening the doors creates an immediate reveal that feels theatrical and intentional.
The interior conversion involves three basic upgrades: bottle storage, glassware display, and a work surface. For bottles, install a wine rack insert or use wooden dowels at a 45-degree angle to cradle bottles horizontally. For glasses, mount a stemware rack under the top interior shelf. The work surface often the bottom panel can be upgraded with a thin butcher block cut, or simply covered with a waterproof, wipeable liner.
Lighting makes the biggest difference here. Battery-powered LED puck lights installed inside the door frame illuminate the interior the moment you open it, with zero wiring required. Stick a small power strip inside the base shelf with a single cable routed through the back for a compact countertop blender or mini fridge and you now have a fully self-contained bar station.
Real-life scenario:
A homeowner in Melbourne, Australia, converted a 1940s wardrobe she inherited into a cocktail cabinet bar. She painted the interior in deep navy, installed a $22 stemware rack, added peel-and-stick herringbone tile to the back panel, and wired in a small LED strip. The entire project cost under AUD $95 and took one Saturday. She now rents the house on Airbnb, and it’s mentioned in nearly every guest review.
Also Read: DIY Camper Interior Ideas: Creative Storage and Space-Saving Hacks
Closet Bar Nook
(Cloffice Concept Applied)
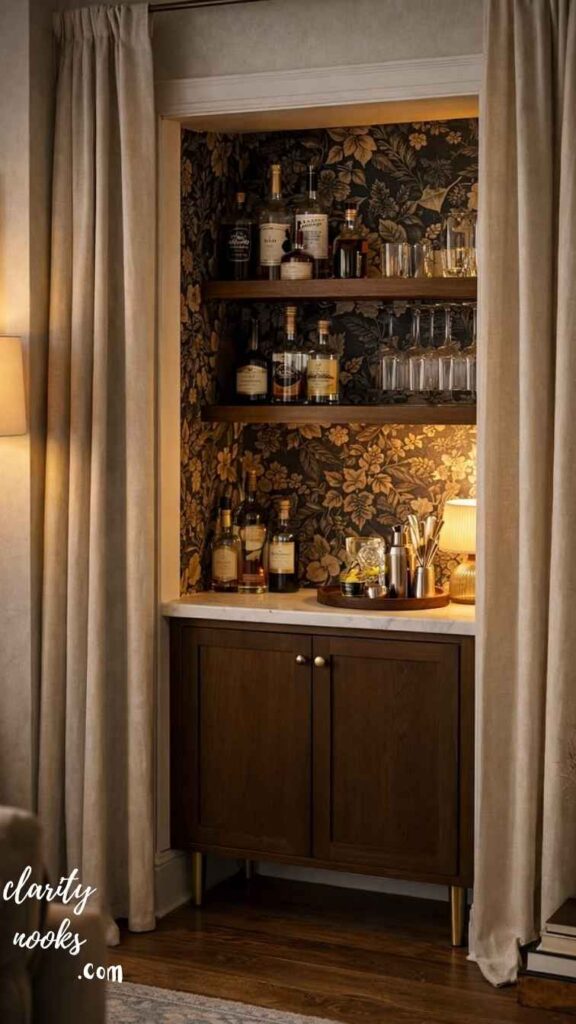
The “cloffice” trend converting a closet into a home office has a lesser-known cousin: the cocktail closet. A standard single-door closet (even a shallow one, 18–24 inches deep) has more than enough room to become a fully functioning mini bar. This approach is ideal for renters because it’s fully reversible and requires no permanent changes.
Remove the hanging rod and replace the standard shelf with a deeper custom-cut shelf at counter height (around 34–36 inches from the floor). This becomes your prep surface. Add floating shelves above for bottles and glassware. Install a tension rod across the top of the closet and hang glasses from S-hooks it’s space-efficient and looks intentional. Mount a small pegboard on one wall for tools, jiggers, and bottle openers.
The beauty of the closet bar is the door. You can paint the inside of the door in chalkboard paint and use it as a menu board. Or use peel-and-stick mirrored panels to add depth and bounce light. For smaller closets, a barn door slide-out modification can make the entire setup feel twice as large once opened.
A closet bar nook uses a standard bedroom or hallway closet converted with a counter-height shelf, floating shelves for storage, and decorative interior finishes. It’s fully reversible perfect for renters and can be assembled in a single afternoon.
Don’t Skip: DIY Dining Room Ideas to Create a Warm and Inviting Family Dining Space
Countertop Cocktail Corner
Not every DIY mini bar needs furniture. One of the most underappreciated ideas is carving a dedicated cocktail corner out of existing counter space in a kitchen, dining room sideboard, or even a large console table. The key difference between a messy cluster of bottles and a cocktail corner is containment and intentionality.
Use a wooden or marble serving tray as the anchor. Everything on the tray belongs to the bar; everything off it is standard kitchen. Within the tray, arrange three to four core spirits, a cocktail shaker, a small glass bottle of bitters, and a single garnish jar. Behind the tray, install a three-to-five bottle tiered display rack (widely available for $20–$35) to give the setup vertical dimension without requiring wall space.
The countertop approach works especially well in studio apartments where the kitchen is visible from the living area. A thoughtfully styled cocktail corner becomes a design feature rather than a functional afterthought. Choose vessels and tools that match your existing kitchen hardware brushed gold, matte black, or stainless and the whole thing looks like it was planned from day one.
Expert insight:
Interior stylists call this the “anchor and extension” method. One dominant tray (the anchor) grounds the display. Items that extend beyond it a cocktail book, a small plant, a slate label add life without creating visual chaos. The boundary is psychological but powerful.
Outdoor Pallet Bar
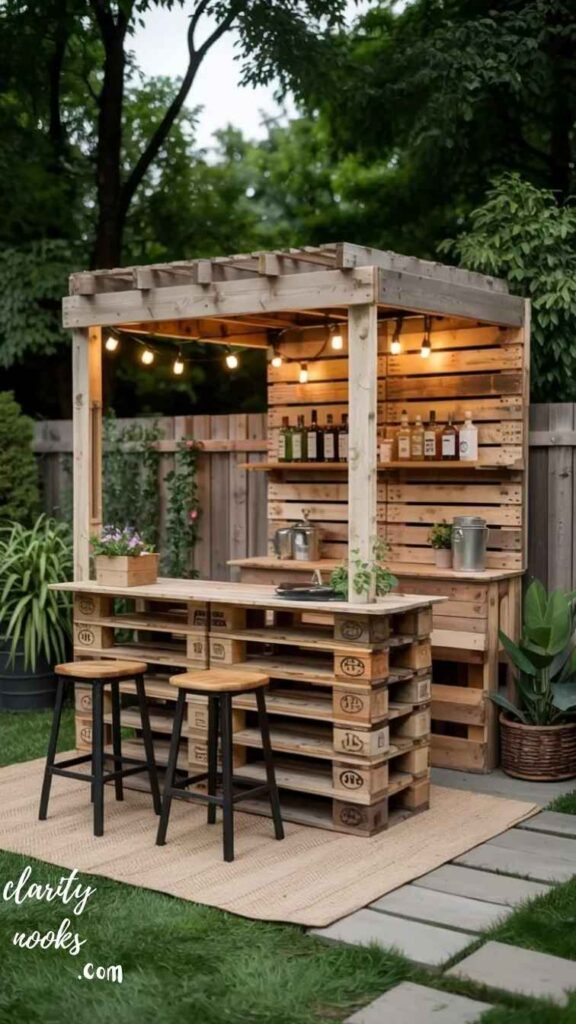
A pallet bar is the most searched DIY home bar project for good reason two standard pallets, stacked and screwed together, form the structural body of a bar counter that would cost hundreds if purchased new. Add a treated timber top (or a slab of outdoor-grade butcher block), sand, stain, and seal, and you have a weather-resistant outdoor bar that genuinely impresses.
The critical step most DIY guides skip: pallet selection. Not all pallets are safe for home use. Always look for HT (heat-treated) markings, never MB (methyl bromide) treated pallets, which are chemically unsafe. Heat-treated pallets are widely available from garden centers, furniture warehouses, and local sell-and-trade groups. Ask before you take.
To elevate the design beyond the standard pallet look, fill the gaps between the pallet slats with smaller timber strips and sand flush. This gives you a more polished surface. Add a foot rail from 1-inch pipe fittings (under $20 at most hardware stores), mount a bottle opener on one side, and hang a few hooks on the back face for towels and bottle brushes. You’ve now built something that retails for $600+ at outdoor furniture stores.
Real-life scenario:
A family in Texas built a full pallet bar for a covered porch using three pallets, a recycled barn wood top, and pipe fittings for the foot rail. Material cost: $68. They added string lights overhead and a vintage Coca-Cola crate as a bottle shelf. The project is now their most-used entertaining space, and they’ve hosted full neighborhood gatherings around it.
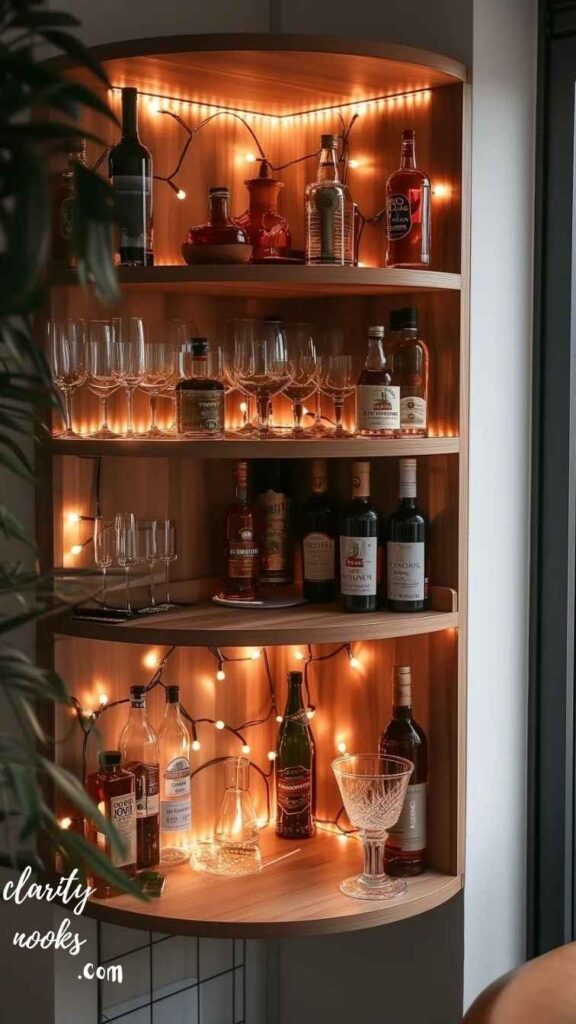
Floating Shelf Bar Wall
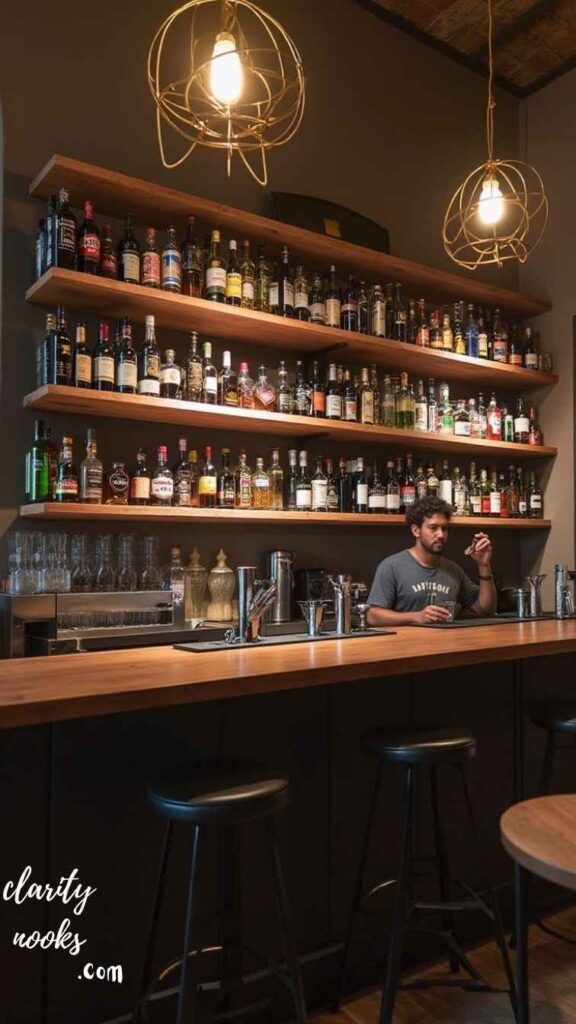
A floating shelf bar turns a blank wall into a statement. It’s the highest-impact visual approach in this list and when done well, it genuinely looks custom-built. The concept is simple: three to five staggered shelves at varying heights, each assigned a specific purpose, create a bar display that’s functional and architectural at once.
Placement matters more than the shelves themselves. The bottom shelf (around 50 inches from the floor) holds the work surface a thin cutting board or a strip of marble tile glued down. The middle shelves display bottles and glassware. The top shelf houses decorative items: cocktail books, a plant, a small framed menu card. Staggering the shelf lengths (longer at the bottom, shorter as you go up) creates a layered look that feels designed rather than assembled.
For hardware, avoid cheap plastic bracket mounts. Floating shelves with hidden steel rod supports are widely available and make the shelf appear to genuinely hover. Pair darker shelves (walnut, espresso) with a lighter wall for contrast, or white shelves against a dark or moody accent wall for drama. Either way, you’ll spend $80–$150 and create something that draws attention in the best possible way.
Best for small spaces
Floating shelves don’t occupy floor space, making them ideal for tight apartments or narrow hallways with dead wall space.
Cost range
3–5 floating shelves with hidden brackets typically run $80–$150 depending on material, finish, and shelf depth.
Vintage Suitcase Bar
This is the idea that consistently surprises people with how sophisticated it ends up looking. A large vintage hard-shell suitcase the kind you find at estate sales, flea markets, or antique shops for $20–$60 opens flat to reveal a custom-built bar interior. When closed, it doubles as a piece of luggage-inspired décor or a side table.
The DIY build involves lining the interior with velvet or felt fabric (glued in, no sewing required), then installing small wooden dividers cut to size for bottle slots on one side and a glassware compartment on the other. The lid interior can hold a mirror, a small wine rack panel, or a mounted bottle opener. Add a thin foam backing under the velvet for a luxurious, custom look.
What makes this idea exceptional for entertaining is its portability. You can carry your entire bar bottles, tools, glassware to a garden party, a rooftop, or a friend’s home. It also photographs exceptionally well, which makes it popular among people who host regularly and document their events. The combination of function, portability, and storytelling value puts this idea in a category of its own.
Content Gap
Most suitcase bar tutorials focus on the aesthetic but skip the weight distribution issue. Place heavier bottles directly over the hinges (the spine of the suitcase), not near the clasps. This prevents warping and ensures the case opens and closes smoothly for years.
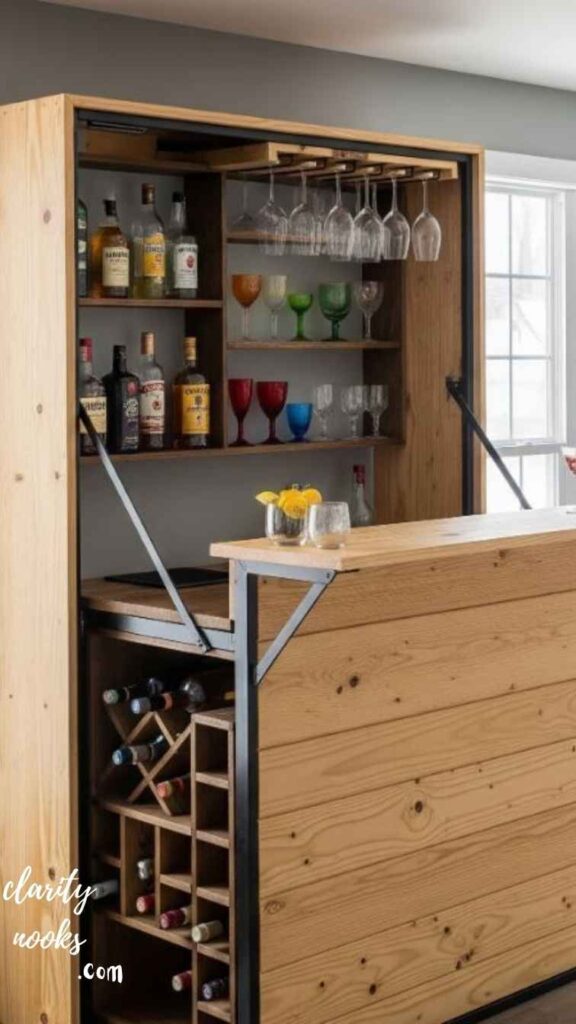
Murphy-Style Fold-Down Bar
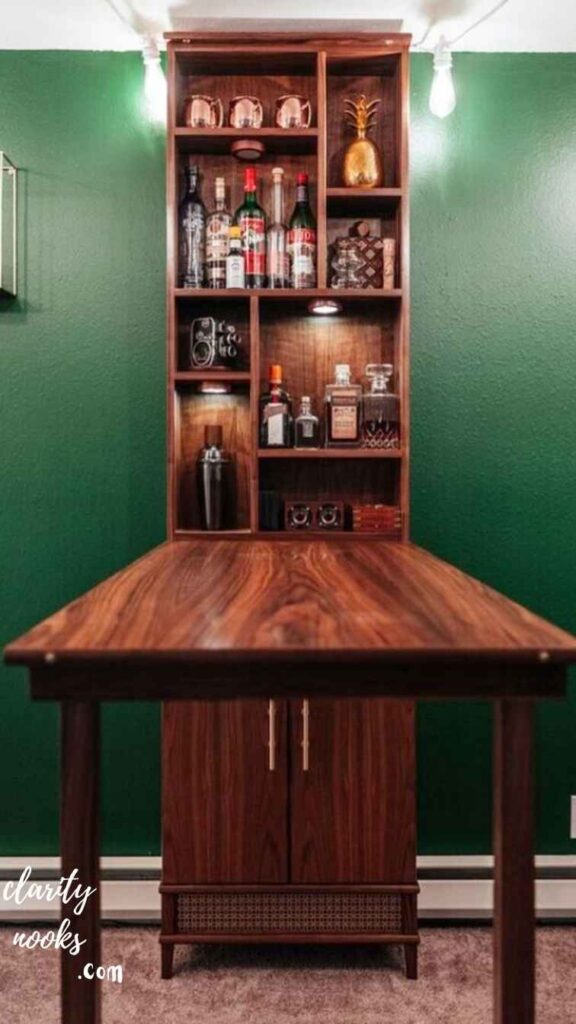
Inspired by Murphy beds, the fold-down bar is the smartest space-saving DIY mini bar concept for small homes and apartments. When closed, it looks like a standard wall-mounted cabinet or decorative panel. When opened, the front panel folds down on hinges to become a bar counter, revealing shelving, glassware storage, and tool hooks inside. It’s essentially a portable bar that lives in the wall.
The build requires basic woodworking: a plywood cabinet box, piano hinge, a piano-style drop-front support chain, and interior shelving. The counter surface is mounted to the inside face of the door. When it folds open, it rests horizontally, supported by the chain at 90 degrees. Finished in paint, veneer, or reclaimed wood, it blends into almost any room aesthetic until it’s opened for use.
This is the most technically demanding build on this list but far from impossible for anyone with a basic power drill and an afternoon. Pre-built flat-pack versions have started appearing from Scandinavian and Japanese furniture brands in the $250–$450 range for those who want the function without the build time. Either way, for apartments under 600 sq. ft., this is the highest value-per-square-foot bar solution available.
Pro tip:
Use a piano hinge (also called a continuous hinge) rather than standard cabinet hinges for the fold-down bar front. It distributes weight across the full width of the door and prevents sagging or warping over time especially important if your counter surface holds bottles.
Conclusion
DIY Mini Bar Ideas make it easy to create a stylish and useful space at home. You can use simple materials and small areas. A good plan helps you save money and time. You can choose a design that fits your taste. Add lights, shelves, and neat storage. This makes your mini bar look clean and inviting. Even a small corner can become special with the right setup.
DIY Mini Bar Ideas also help you enjoy time with family and friends. You can change the style anytime you like. Try new colors or add decor items. Keep it simple and organized for best results. Your mini bar can match your home style. With a little effort, you can build something unique and personal.
Trend Analysis
DIY Mini Bar Trends: 2026 and the Next Three Years
The DIY home bar space has shifted dramatically from “functional project” to “lifestyle statement.” Google search data and home décor trend reports consistently show rising searches for home bar ideas year over year since 2020, with no sign of a plateau. But the shape of what people want is changing fast.
What’s Driving the Market Right Now
In 2026, the dominant trend is sober-curious and low-ABV entertaining. Mini bars are no longer exclusively spirits-forward. More home bars now feature dedicated mocktail stations, kombucha on tap, and premium non-alcoholic spirits alongside traditional bottles. Designing your DIY mini bar with a visual section for NA options isn’t just inclusive it reflects how modern hosts actually entertain.
The Japandi aesthetic a fusion of Japanese minimalism and Scandinavian warmth is dominating bar styling in 2026. Think natural linen, raw ceramics, low-profile matte black fixtures, and curated negative space. If you’re building or styling a home bar now, this direction has the longest shelf life of any current trend. It doesn’t date quickly.
2027–2029 Projections
By 2027, expect to see integrated smart home features enter DIY bar builds. Bluetooth-enabled LED systems that shift color temperature based on time of day, voice-activated cocktail recipe displays, and built-in wireless charging pads on bar surfaces will move from novelty to standard inclusion in high-end DIY builds.
Mini countertop ice makers and sous vide cocktail tools currently considered niche appliances are expected to become mainstream small-bar inclusions by 2028. Space planning for these micro-appliances should factor into your design from the start, even if you don’t purchase them immediately. Leaving one outlet-accessible shelf free now saves a redesign later.
Expert Practical Tips
Practical Insights From Real Build Experience
- Build for the worst-case spill: Every surface that might contact liquid needs either a waterproof finish, a liner, or easy replaceability. Sealed butcher block and contact paper are your friends.
- Proportion before aesthetics: The most common styling mistake is buying glassware, bottles, and tools before checking they physically fit the space. Measure shelf depth and height before purchasing stemware holders or bottle racks.
- Lighting is 40% of the result: A well-lit bar at night looks like a completely different and dramatically better setup than the same bar in flat daylight. Warm white LED strips (2700K) are the most flattering for spirits and glassware.
- Use the rule of three: Every vignette on your bar bottles, tools, decorative objects looks best in groupings of three at varying heights. It’s a visual rhythm borrowed from photography composition.
- Plan your “hero bottle: Every great bar display has one visually dominant bottle a tall, striking label or an interesting decanter that anchors the whole display. Design the arrangement around it.
- Don’t over-stock the display: A mini bar with 15 bottles on display looks like a shop storeroom. Limit display bottles to five to seven. Store the rest in a cabinet below or elsewhere. Restraint is the hallmark of a curated bar.
Long-Term Strategy
Building a Mini Bar That Grows With You
The most common regret among DIY bar builders is thinking too small at the start. Not in terms of physical size but in terms of modularity. The bars that last five to ten years are the ones built with expandability in mind from the beginning.
Choose a modular system wherever possible. KALLAX shelving units, for example, can add vertical stacks as your collection grows. A pallet bar can have a second unit added alongside. Floating shelf arrangements can extend sideways or upward with matching brackets and wood. Avoid one-off, fixed builds unless you’re certain of your long-term spatial needs.
Also think about the transition from renter to owner. If you’re renting now, prioritize freestanding and removable builds bar carts, cabinet conversions, suitcase bars. When you own, you can commit to wall-mounted or built-in designs. Don’t over-invest in a rented space with permanent installations unless your lease explicitly allows it.
Sustainability Considerations
The most sustainable DIY mini bar is built from repurposed materials: salvaged wood, thrift store furniture, and vintage hardware. Beyond the environmental dimension, these materials tend to have better character, aging, and visual interest than flat-pack alternatives. Reclaimed barnwood or pallet timber patina beautifully over time. MDF and cheap veneer do not.
If you’re purchasing new materials, look for FSC-certified timber and water-based finishes. Many premium bar-look stains and sealers are now water-based with no meaningful compromise in durability or finish quality compared to solvent-based alternatives from a decade ago.
Future Predictions
What’s Next for DIY Home Bars
AI is already entering the home bar space not through the bar itself, but through the build process. AI-powered interior design tools now allow you to photograph your room and generate photorealistic renderings of bar configurations before you buy a single item. This is eliminating the “I didn’t realize how it would look” problem that causes most DIY regrets.
Expect to see dedicated bar-design apps emerge in the next two years, similar to how kitchen design tools evolved. These will let you input room dimensions, lighting conditions, and aesthetic preferences to receive customized DIY build plans with specific material lists and step-by-step instructions.
On the product side, expect expansion in the mini appliance category specifically designed for home bar use: countertop carbonation units, precision cocktail scales with app connectivity, and magnetic modular bar tool organizers that mount to any surface without drilling. The design language for these products is increasingly aligned with premium home aesthetics they’re built to be displayed, not hidden.
Common Mistakes & Hidden Gaps
What Goes Wrong (And How to Avoid It)
- Beginner Buying everything before measuring: Glassware holders, wine racks, and bottle rails all have fixed dimensions. Purchasing them before confirming shelf depth and clearance height is the number one reason DIY bars get abandoned mid-build. Measure twice and then measure the items too.
- Beginner Ignoring load-bearing limits on floating shelves: A standard 1-inch thick floating shelf with wall anchor bolts can hold 30–50 lbs safely. Spirits bottles weigh roughly 3 lbs each six bottles plus glassware is already 25 lbs. Verify your hardware ratings before loading up.
- Intermediate Using interior paint in a moisture-exposed setup: Standard latex wall paint is not waterproof. Bar surfaces that contact condensation, spills, or ice will show water damage within months if left with a standard paint finish. Use polyurethane topcoat, epoxy, or a dedicated bar-top finish instead.
- Intermediate Over-designing for a fictional version of yourself: A lot of people build elaborate bar setups with 20 bottles and a full cocktail station, then use two bottles regularly. Build for how you actually entertain not your aspirational vision. A curated five-bottle setup used weekly beats a 20-bottle setup that feels like a chore.
- Hidden Gap No plan for glassware washing proximity: Most guides show beautiful bars without addressing the cleanup question. Where will you wash glasses? If your bar is far from the kitchen sink, you’ll end up with a trail of sticky glasses across your home every night. Plan a “dirty glass station” a tray near the bar designated for glasses waiting to be washed to prevent this.
- Hidden Gap Forgetting electrical access for lighting and appliances: LED strip lighting, mini fridges, and countertop appliances all need power. Many DIY bars are built beautifully, then look amateurish because a visible extension cord runs across the floor. Plan for a power outlet within reach before finalizing your bar location.
FAQ’S About DIY Mini Bar Ideas
How much does it cost to build a DIY mini bar?
DIY mini bar costs range from $30 to $300 depending on the approach. A repurposed bookcase or bar cart build typically costs $30–$80. A pallet bar runs $60–$120. A fold-down Murphy-style bar is the most expensive DIY option, usually $100–$300 in materials.
What is the best DIY mini bar idea for a small apartment?
The best options for small apartments are the rolling bar cart (no floor space commitment), the closet bar nook (converts unused closet space), and the fold-down Murphy bar (zero footprint when closed). All three are renter-friendly and fully reversible.
Do I need carpentry skills to build a home bar?
Most DIY mini bar ideas on this list require no carpentry skills they involve repurposing, styling, and modifying existing furniture. The fold-down bar and pallet bar require basic woodworking (a drill and saw), but no advanced skills. Most home improvement stores will also cut lumber to size for free.
What should a mini bar include?
A functional mini bar should include three to five core spirits, mixers, a cocktail shaker, a jigger, a strainer, a bar spoon, glassware (at minimum rocks glasses and highballs), a cutting board, and a garnish container. Ice access is the most overlooked necessity plan for it from the start.

Rameen Zara is the founder of Clarity Nooks, bringing over five years of experience in home décor and interior styling. She shares simple yet practical design ideas that suit real homes and everyday living. Her approach focuses on cozy aesthetics, soft color palettes, and natural textures that create warm, inviting spaces.


