

DIY Camper Interior Ideas: Creative Storage and Space-Saving Hacks
Living on the road feels better with smart design and comfort. DIY Camper Interior Ideas help you change a simple van into a cozy home with easy steps. They use low cost materials and creative thinking for better space use. DIY Camper Interior Ideas focus on storage, layout, light, and comfort. These ideas support simple living and clean design. They make travel more relaxing and organized. Small changes can create a big impact. A well planned camper improves daily routine and gives a peaceful travel experience.

DIY Camper Interior Ideas include many practical upgrades for small spaces. You can add shelves, hidden storage, and foldable beds. Soft lights create a calm feeling inside the camper. Light colors make the space look bigger and fresh. Clean layout helps you move easily and stay organized. These ideas improve comfort during long trips. They support a simple and functional lifestyle. A good camper setup saves time and reduces stress. With careful planning, your camper becomes a warm and useful place for every journey.
Space-Saving Murphy Bed System
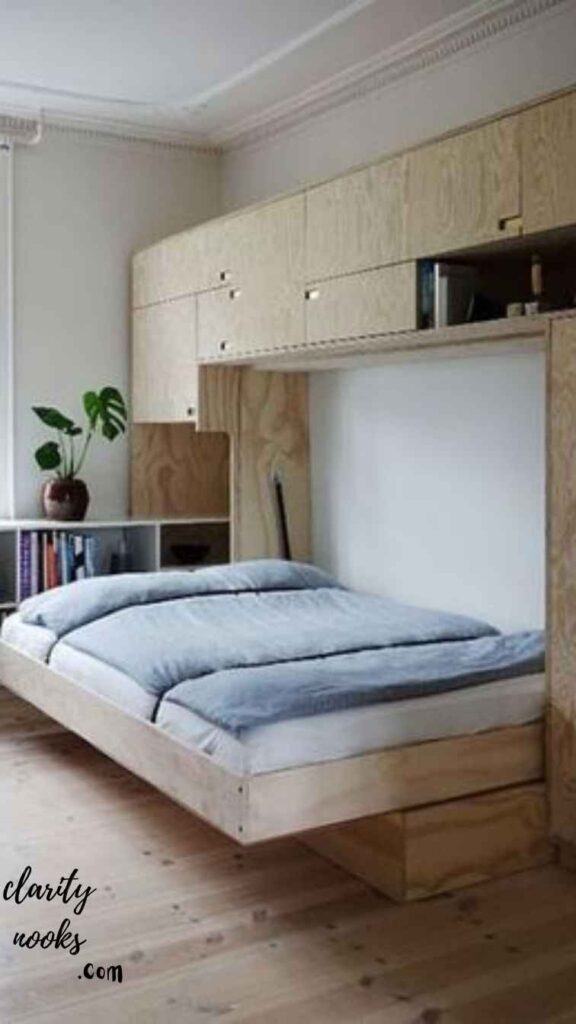
A Murphy bed or wall-fold bed is one of the highest-ROI moves in any DIY camper interior build. During the day, it folds up flat against the wall, freeing your entire floor for yoga, remote work, or rainy-day hangouts. At night, it drops down in seconds into a full sleeping platform.
The DIY version uses a simple piano hinge system with wooden legs that swing out for support. Pair it with a 4-inch memory foam mattress that folds with the bed, and you’ve got a comfortable setup that adds almost zero weight. Budget builds run $80–$200 in materials from a hardware store.
Real Build Example
Van-lifer Jess N. (Instagram: @dustyroadlife) built a Murphy bed in her Ford Transit using 3/4″ plywood and two $12 piano hinges. Her bed folds flat in under 30 seconds, and her floor becomes a fully functional home office during the day a setup she’s used for two years of continuous travel.
Pro tip: Add lip edges around the mattress to prevent sliding when folded vertically. A simple 1-inch wooden trim rail solves this permanently.
Must Read: DIY Dining Room Ideas to Create a Warm and Inviting Family Dining Space
Shiplap or Peel-and-Stick Wood Paneling
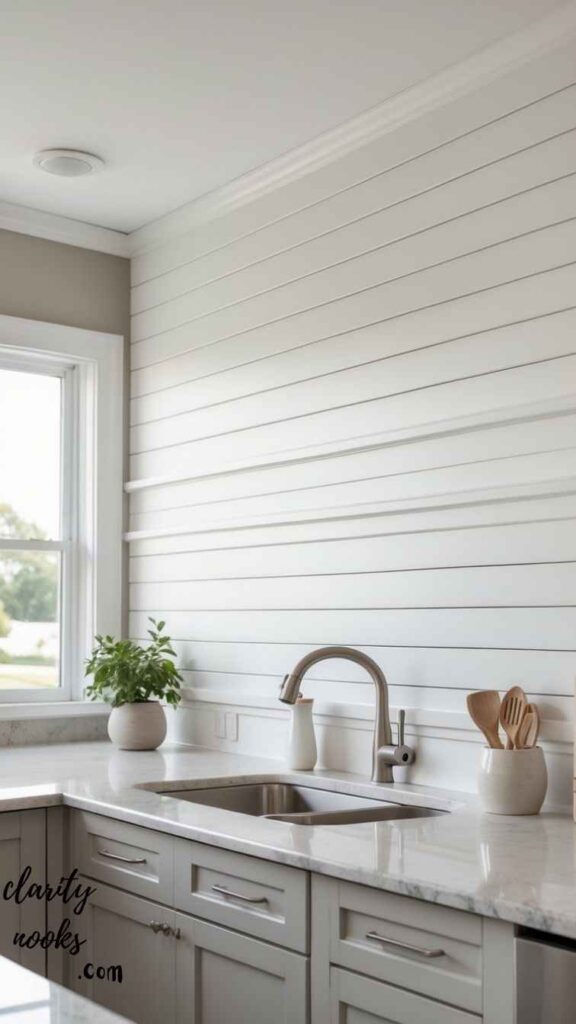
Nothing transforms a camper interior faster than wall paneling. Bare metal screams “cargo van.” Wood-paneled walls whisper “cabin in the woods.” The most popular options are real shiplap (thin pine boards, stained to your preference) or modern peel-and-stick wood veneer panels, which apply in minutes and weigh almost nothing.
For weight-conscious builds like sprinter vans, peel-and-stick panels from brands like Stikwood are a favorite. They can be applied directly over a foam insulation layer without fasteners. Real shiplap gives a more premium look and is worth it for anyone staying stationary longer than a weekend.
What is the best wall material for a DIY camper interior?
Lightweight peel-and-stick wood veneer panels are ideal for van builds (under 1 lb/sq ft), while 1/4″ pine shiplap boards work best for RVs and larger campers where extra weight isn’t a concern. Both options provide warmth and character at low cost.
Read More: DIY Party Decor Ideas That Add Color and Style to Any Celebration
Fold-Down Convertible Dining Table
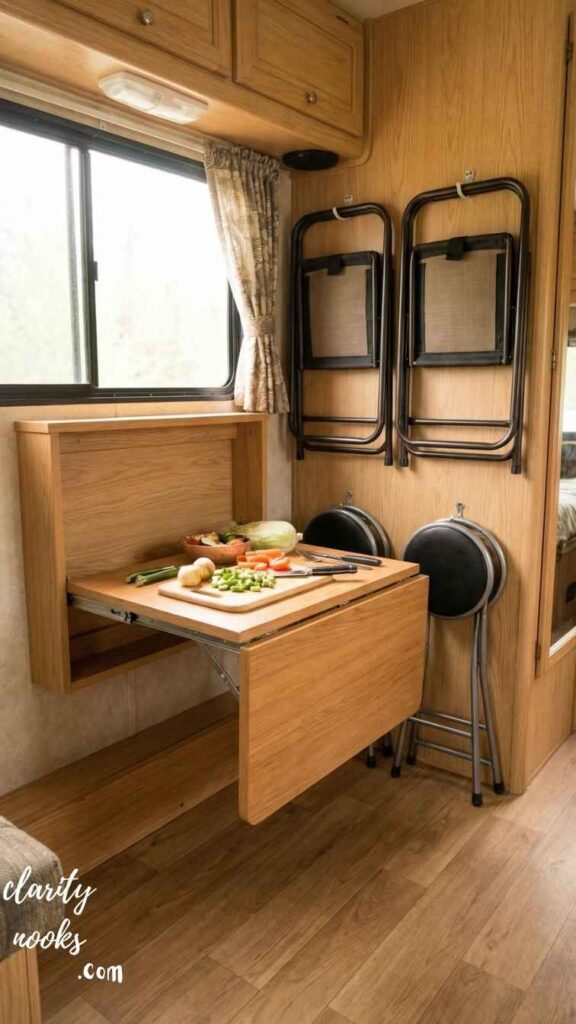
A fixed dining table is one of the biggest space-wasters in camper interior design. A fold-down wall-mounted table solves this completely. When not in use, it hangs flat against the wall (just 2–3 inches of depth). When you need it, it drops into position and locks with a simple support leg. Total cost: $30–$80 in materials.
The key to making this feel premium is the surface material. A piece of butcher block or a thick bamboo cutting board makes a beautiful, functional table top that doubles as an actual food prep surface. Sand it, oil it, and it becomes one of the most-touched surfaces in your build make it worth looking at.
Real-Life Scenario
Remote worker Tomás R. built a dual-position fold-down table in his Dodge Promaster. At 28 inches, it’s a dining table. At 40 inches (with a secondary fold-out extension), it becomes his standing desk. He estimates he spends 6+ hours a day at it making this the single most-used feature in his entire build.
Read Also: DIY Gaming Room Ideas for Small Spaces: Maximize Comfort & Style in Your Setup
DIY Under-Bed Storage Drawers
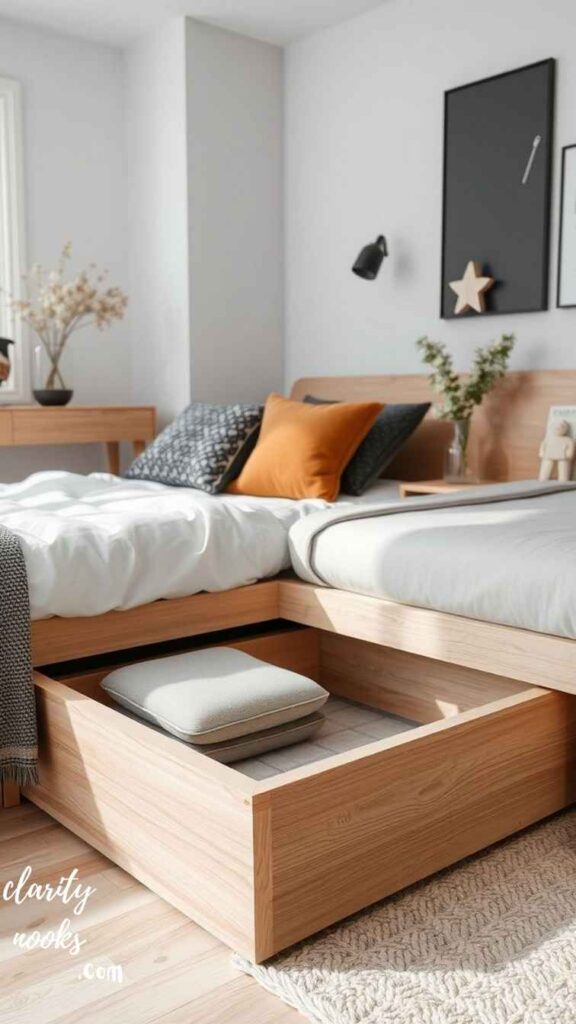
The space under your sleeping platform is prime real estate. Most DIY camper builds waste it with awkward open cubbies that let gear slide everywhere. Full-extension drawer slides the kind used in kitchen cabinets change everything. With two or three wide drawers under the bed, you can organize clothes, tools, and food supplies with surgical precision.
Build the drawer boxes from 1/2″ plywood, install 20-inch full-extension slides ($12–$20 per pair), and add simple pull handles. Finish with a coat of chalk paint for a clean look. This setup can hold 200+ liters of organized storage in a space that would otherwise be dead air.
Expert Insight
Van-build expert Nate Murphy of FarOutRide recommends placing your heaviest gear (tools, batteries, water jugs) in the under-bed drawers rather than overhead shelves. It lowers your camper’s center of gravity, improving stability on mountain roads and tight turns.
Don’t Skip: Modern DIY Terrace Design Ideas for Comfortable Outdoor Living
Modular Kitchen Build with Butcher Block Countertop

Your camper kitchen doesn’t need to feel like a sad afterthought. A DIY galley-style kitchen built from pre-cut plywood boxes with a butcher block top can rival studio apartment kitchens for functionality. The layout typically includes a 2-burner propane stove, a sink with a small water pump, and 3–4 lower cabinets for dry goods and cookware.
The modular approach is key: build each component (stove cabinet, sink cabinet, storage cabinet) as an independent box. This makes installation easier, and if something needs replacing, you can swap just that module. Keep the depth at 18 inches to maintain aisle space for moving around comfortably.
How much does a DIY camper kitchen cost?
A full DIY camper galley kitchen including stove, sink, pump, and cabinets typically costs $300–$800 in materials, compared to $2,000–$5,000 for a professionally installed RV kitchen system.
LED Lighting Zones for Ambiance and Function
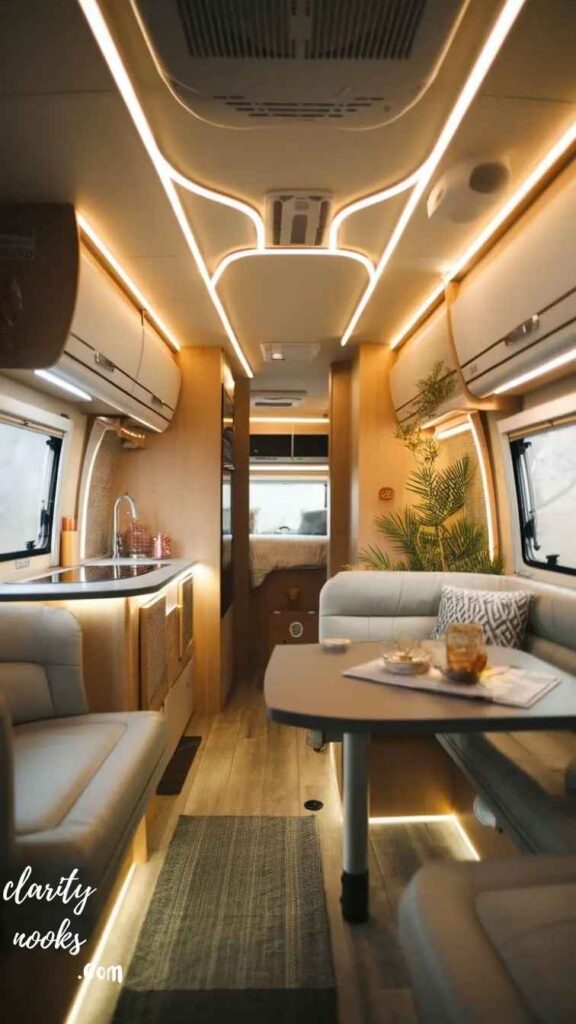
Lighting is the secret weapon of professional-looking camper interior ideas. Most DIY builders install one overhead light and call it done. Smart builders create lighting zones: a warm recessed puck light over the kitchen workspace, a cool strip behind the cabinets for reading, and a warm amber strip along the ceiling edge for evening ambiance. The difference is staggering.
LED strip lights (12V, CRI 90+) connect directly to your van’s electrical system and draw minimal power an entire lighting system might draw 3–5 amps total. Use a dimmer switch for each zone. The total cost for a full camper lighting setup: under $80. The effect: something that looks like an Airbnb, not a cargo van.
Real-Life Example
Full-time van lifer Priya S. uses three separate lighting circuits in her Toyota Hiace build: task lighting for the kitchen (5000K cool white), reading lights over the bed (4000K neutral), and ambient strips under the cabinets (2700K warm amber). She says the layered system helped cure the “cave feeling” that plagued her first, single-light build.
Insulation That Actually Works
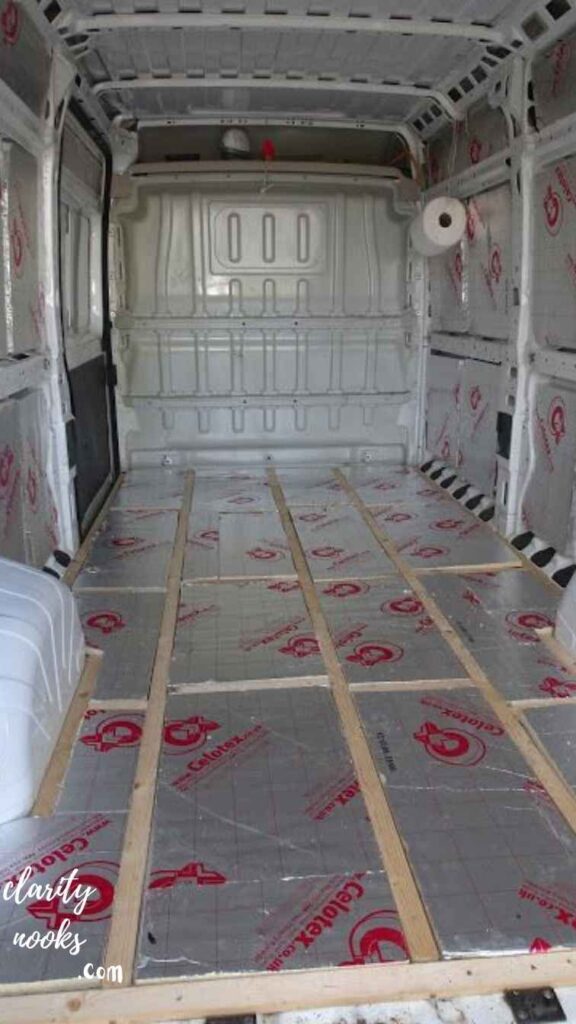
Insulation is the foundation of every livable DIY camper interior, yet it’s the one most beginners underfund. Properly insulated vans stay 20–30°F warmer in winter and meaningfully cooler in summer dramatically reducing heating and cooling needs. The best results come from a hybrid approach: 1/2-inch closed-cell spray foam directly on the metal (for condensation control), followed by rigid Polyiso boards for the main cavity.
Don’t forget thermal bridges the metal ribs in a van’s walls conduct cold aggressively. Covering them with foam tape or Thinsulate fabric before your wall panels go up can drop interior temperature loss by 15–20%. This hidden 2-hour step is one of the highest-value moves in any van build.
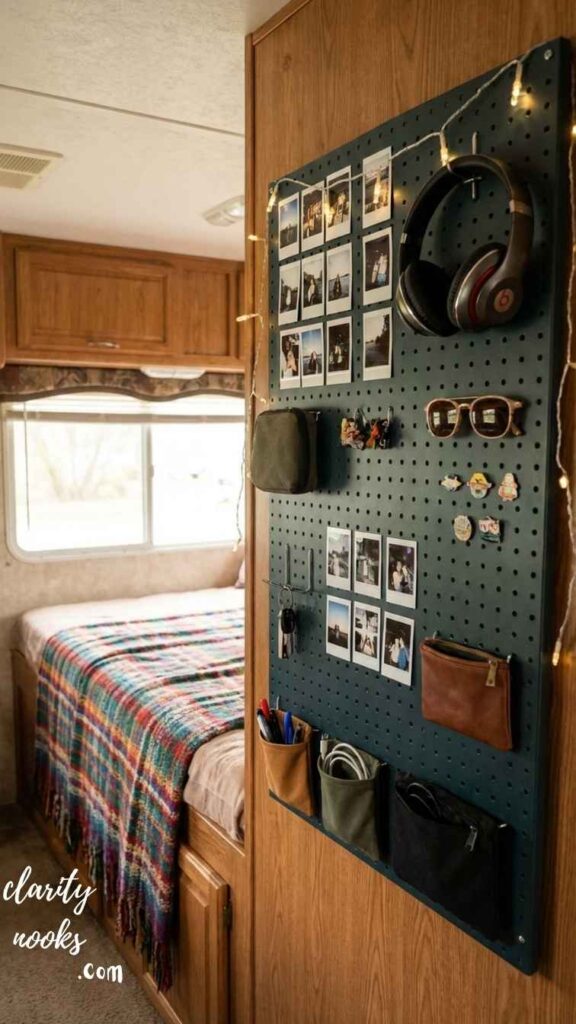
Vertical Wall Storage and Pegboard Systems
In a small camper, the floor is precious. Every item that lives on the floor should be relocated upward. A painted pegboard panel mounted on the kitchen wall can hold utensils, cutting boards, spice containers, and small pots completely freeing the countertop. A magnetic knife strip handles knives. Hooks inside cabinet doors hold measuring cups and lids.
IKEA’s SKÅDIS pegboard system (designed for offices) is beloved by van-lifers because it’s lightweight, cheap, and accepts dozens of accessories. With some 3M adhesive strips or small screws into a backing board, it mounts securely even on a moving vehicle. The full setup board, accessories, and mounting runs under $35.
Ceiling Treatments That Add Character
Most camper builds treat the ceiling as an afterthought, covering it in white vinyl or basic carpet headliner fabric. Instead, consider thin cedar or pine tongue-and-groove planks running the length of the vehicle. The result is a sauna-like warmth that makes the space feel curated and intentional, not manufactured. Cedar is also naturally antimicrobial a real benefit in a small, enclosed space.
For lower budget builds, white-painted beadboard panels give a fresh, cottage-like aesthetic with minimal weight. Slat the panels perpendicular to the vehicle’s length to visually widen the interior. Paired with LED strip lighting running along the peak, this is a combination that regularly stops people in their tracks at camper meetups.
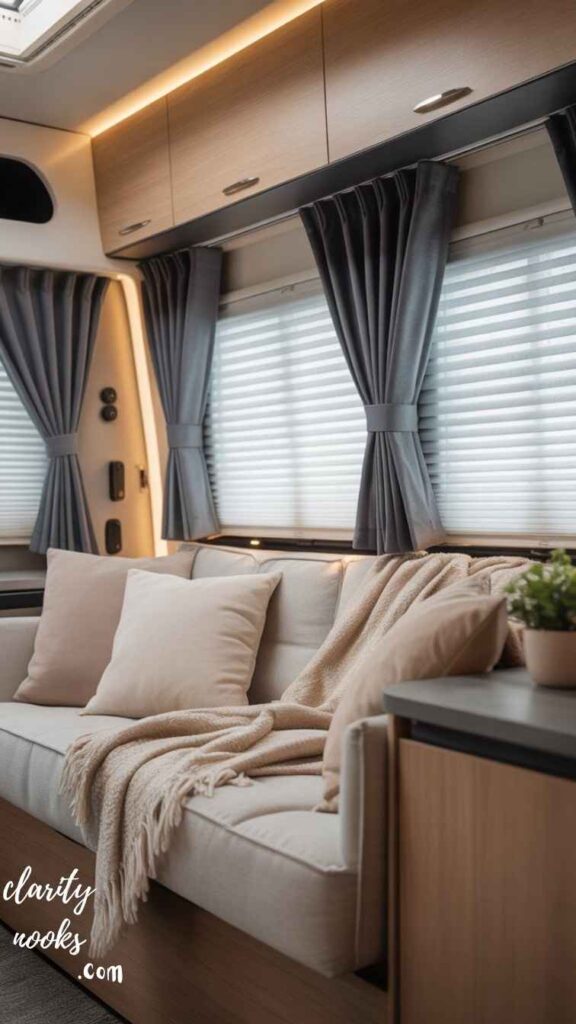
Bench Seat with Hidden Storage
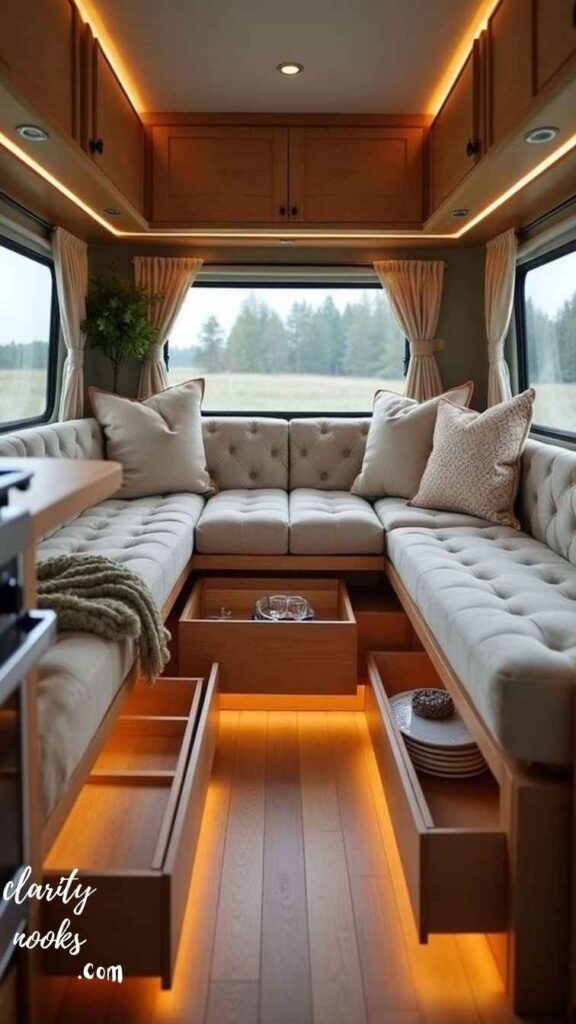
A bench seat along the side wall of your camper typically 18–20 inches deep and 16–18 inches high is one of the most multifunctional additions you can make. It creates seating, serves as a daybed or secondary sleeping spot for guests, and when built with a hinged top, hides a massive storage cavity beneath. Think: seasonal gear, extra water, bedding, or tools.
Upholster the top cushion with marine-grade vinyl (waterproof, cleanable, durable) in a color that ties your interior palette together. A simple $20 piano hinge makes the lid easy to lift. This single piece of furniture can solve storage, sleeping, and seating in one 60-inch long box.
Camper Bathroom: Wet Bath vs. Dry Bath DIY
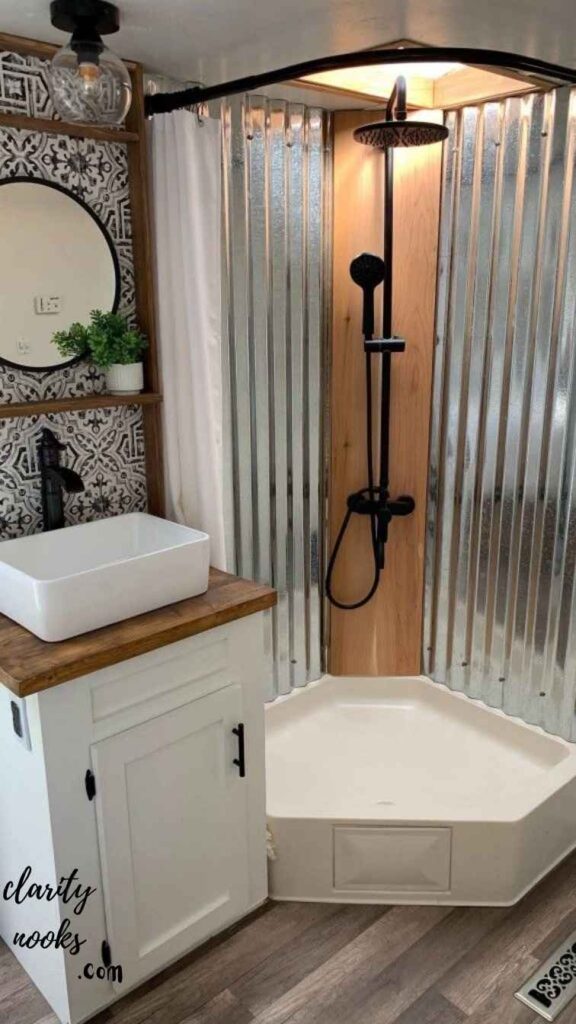
A wet bath means the shower and toilet share the same waterproofed space (common in RVs and larger van builds). A dry bath separates the toilet from the shower with a small partition. For most van builds under 20 feet, a simple corner wet bath 30×30 inches is all the space needed for a functional, spray-down shower with a composting toilet.
The DIY-friendly version uses a pre-formed fiberglass shower pan, aluminum corner posts, and a simple PVC curtain track overhead. A 12V RV showerhead pump and a 7-gallon fresh water tank handles two showers per fill. The entire build fits in a corner and can be completed in a weekend for $250–$450 in parts.
Do I need a bathroom in my camper van?
Not necessarily. Most van-lifers combine a portable composting toilet (like Nature’s Head) with gym memberships or campground showers for a cost-effective solution. A full wet bath is worth the space only if you’re traveling in remote areas regularly.
Window Covers and Privacy Curtains
Reflectix window inserts cut to the exact shape of each window are the most versatile investment in any DIY camper interior. They block light for sleeping in bright parking lots, reflect summer heat, and retain warmth on cold nights. Cut them from a roll, add a fabric cover on one side, and they become clean-looking, professional inserts that pop in and out in seconds.
For a more permanent, elevated look, fabric curtain panels on a tension rod across the cab area separate the sleeping zone from the driver’s area visually and thermally. Choose a heavy linen or blackout-lined canvas in a neutral tone. This simple $30 addition makes a van feel like two rooms instead of one long tunnel.
Solar-Ready Electrical Panel Setup
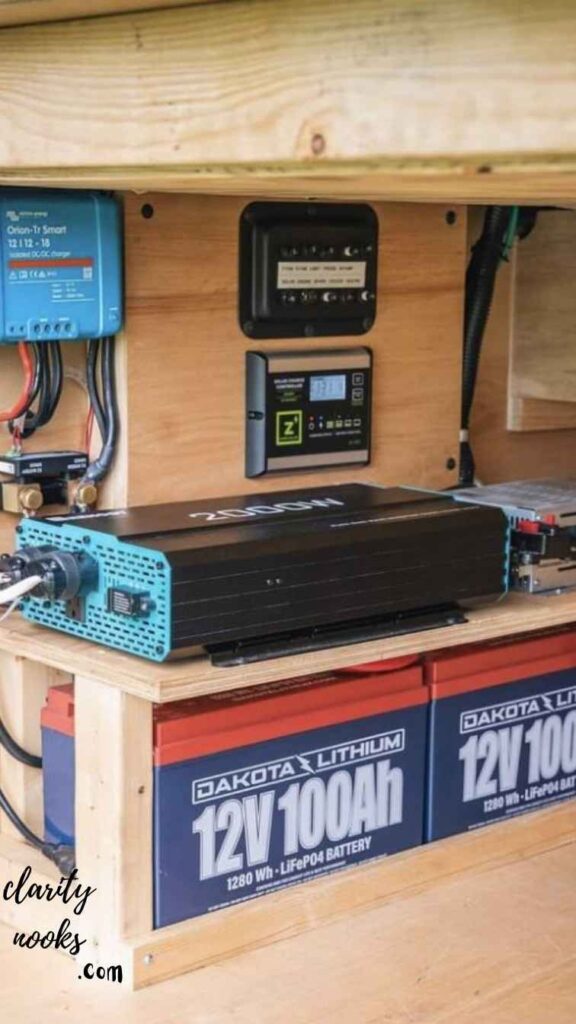
A DIY electrical system built around a 100Ah–200Ah lithium battery, a solar charge controller, and one or two 200W roof panels is now accessible to non-electricians with pre-wired kits from brands like Victron, Renogy, or EcoFlow. Plan your system before your build begins run wiring conduits behind the wall panels before they close up.
The solar-ready panel setup includes a distribution box with clearly labeled circuits: lighting, fridge, USB charging, inverter. This modular approach makes troubleshooting simple and allows you to upgrade individual components over time. An entry-level system powers lights, phone charging, a 12V fridge, and a laptop indefinitely in moderate sun the baseline for comfortable off-grid living.
Interior Flooring That Handles Real Life
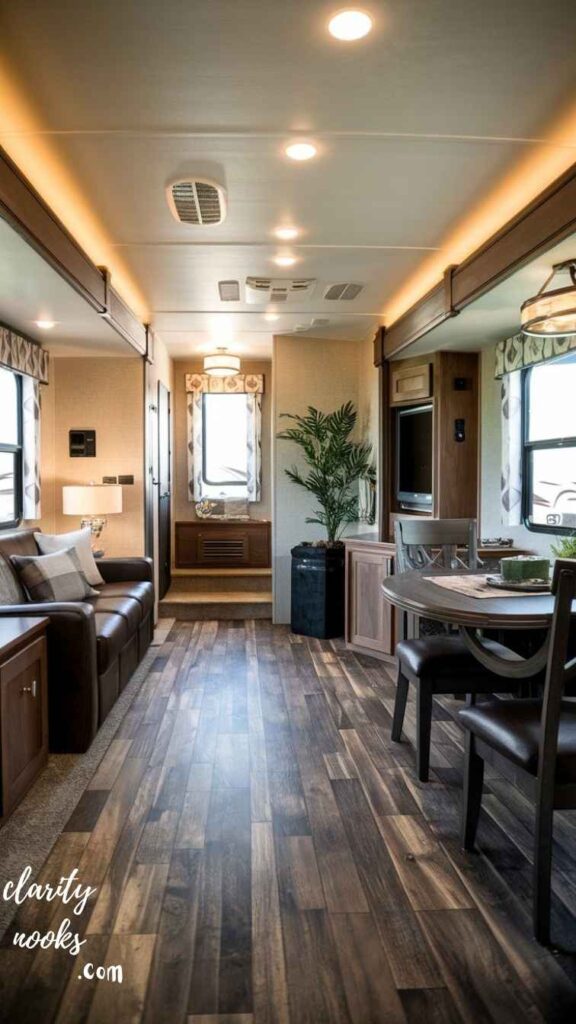
Vinyl plank flooring (LVP) is the near-universal choice among experienced van-lifers for one reason: it survives everything. Mud, water, dropped pans, wet dogs, and constant foot traffic LVP handles it all, looks great, and floats (meaning no adhesive required) over a thin foam underlayment. It’s also the easiest DIY install of any flooring type. A full camper van floor takes 2–4 hours.
Install it over a thin sheet of 1/4″ plywood subfloor (which raises the floor slightly but adds rigidity and insulation value). Choose a click-lock LVP rated for bathrooms the waterproof core matters when wet gear comes in the back door. Total material cost for a standard van floor: $60–$150. It will outlast almost everything else in the build.
Conclusion
DIY Camper Interior Ideas can turn any small camper into a cozy and useful space. Simple changes like better storage, soft lights, and clean layouts make a big difference. You do not need a big budget to create comfort. With smart planning, your camper can feel like a real home on wheels. These ideas help you enjoy every trip more and stay organized on the road.
In the end, DIY Camper Interior Ideas are all about comfort, style, and smart use of space. Try designs that match your needs and travel style. Keep things simple and easy to manage. Small details can improve your daily life while traveling. With time and effort, your camper will become a warm and happy place for every journey.
Trend Analysis
Where DIY Camper Interiors Are Heading (2026–2028)
Current Trends in 2026
The van-life movement has matured significantly. Where early builds prioritized “functional minimalism” get the essentials in and go 2026 builds increasingly prioritize design quality, sustainability, and smart integration. Buyers of high-roof sprinters are now approaching builds with the same mindset they’d bring to a kitchen renovation.
Shift Toward Biophilic Design
Natural materials are dominating: cork flooring, live-edge wood shelves, linen fabrics, and rattan baskets. The visual language has moved from “industrial” to “Scandinavian cabin.” This reflects a broader trend in interior design where people want their spaces to feel restorative, not just utilitarian.
Smart Electrical Systems (2026–2028)
Victron Energy’s smart BMS, Bluetooth-connected inverters, and apps like VictronConnect are making fully monitored electrical systems accessible to DIYers. Expect AI-assisted energy management (auto-adjusting fridge temperature, predictive load management) to become standard in off-grid builds within 2 years.
Modular Build Kits
Companies like Thule, Sortimo, and newer startups are beginning to offer pre-engineered modular component systems essentially “LEGO blocks” for camper interiors. By 2027–2028, expect fully configurable modular systems for common van platforms (Transit, Sprinter, Promaster) that DIYers can order, customize, and install without a single custom cut.
Practical Expert Insights
Weight Distribution Matters More Than You Think
Keep heavy items (battery bank, water tank, tool storage) low and centered ideally between the front and rear axles. A poorly weighted van handles badly, fatigues the driver, and can affect fuel economy by 8–12%. Most amateur builds stack weight too far rearward.
Build in Order
Always follow this sequence: insulation → electrical rough-in → flooring → walls → ceiling → cabinetry → fixtures. Every experienced builder who skipped a step has paid for it usually by dismantling completed work to add forgotten wiring.
Leave Maintenance Access Points
Build access panels into cabinet bases near your water pump, electrical fuse block, and inverter. You will need to reach these and you’ll be grateful for the access panel at 11pm in a parking lot in the rain.
Ventilation is Non-Negotiable
A Maxxair or Fan-Tastic roof fan is not optional for comfortable van living. Cooking steam, body moisture, and rain create condensation that destroys wood builds from the inside. An always-on, low-speed exhaust fan while sleeping prevents 90% of condensation problems.
Long-Term Strategy & Sustainability
The most sustainable camper build is the one you don’t have to redo. Beginners often make the mistake of building “for right now” then tearing everything out 18 months later when their needs change. Building for longevity means a few key principles:
- Use quality hardware: Blum drawer slides over $3 alternatives. Stainless screws over zinc-coated. Marine-grade fittings in wet areas.
- Design for modularity: Cabinets that bolt together rather than glued assemblies are far easier to modify or relocate.
- Choose sustainably sourced wood: FSC-certified pine, reclaimed barn wood, or bamboo composites reduce environmental impact without sacrificing appearance or durability.
- Waterproof your woodwork: Two coats of Rubio Monocoat or Osmo Polyx on all wood surfaces prevents the swelling, warping, and mold that ends many builds prematurely.
A well-built camper interior holds and even gains value over time. Documented builds with quality materials regularly command $5,000–$20,000 premiums on van resale markets making the DIY investment financially strategic, not just creatively satisfying.
Future Predictions & Innovations
AI-Assisted Build Planning
By 2027, expect AI spatial planning tools that let you drag and drop virtual furniture into a 3D scan of your van’s interior automatically calculating weight distribution, wiring runs, and material quantities. Early versions already exist in beta through companies like Roamerica and Outside Van.
Electric Vehicle Camper Conversions
As electric commercial vans (Ford E-Transit, Mercedes eSprinter, Stellantis RAM ProMaster EV) become mainstream, DIY camper builds will adapt. The elimination of the engine bay noise and heat simplifies some build elements, while managing charging logistics on the road becomes the new primary challenge.
Prefab Wall Panel Systems
Think IKEA-meets-van-build: pre-finished, pre-wired wall panel systems sized to specific van models. Hook them in, connect three plugs, and your walls are insulated, paneled, and lit. This innovation is likely 2–3 years from mainstream availability but prototypes exist today.
Closed-Loop Water Systems
Greywater filtration and recirculation systems already in RVs are being miniaturized for van applications. Combined with composting toilets, a future van could operate with zero water waste for weeks, making even desert camping fully off-grid viable.
Common Mistakes and Hidden Gaps
Buying Cheap Drawer Slides
$2 drawer slides from generic suppliers fail within months of road vibration. Full-extension, ball-bearing slides rated 75+ lbs are the only sensible choice.
Forgetting Ventilation in the Design
A beautiful build with no roof fan becomes a sauna in summer and a mold incubator in winter. Plan the fan location before cutting walls.
Ignoring Wheel Arch Geometry
Many first-time builders plan layouts on paper, forgetting the wheel arches eat 8–12 inches of floor space on each side. Measure the actual interior in 3D.
Building Before Planning
Starting the build before finalizing the layout. Moving a cabinet that’s already glued down costs twice the time and half your motivation.
Skipping the Vapor Barrier
Not sealing metal edges before insulating creates cold bridges and condensation that rots wood from the inside out invisible damage until it’s serious.
Buying Cheap Drawer Slides
$2 drawer slides from generic suppliers fail within months of road vibration. Full-extension, ball-bearing slides rated 75+ lbs are the only sensible choice.
FAQ’S About DIY Camper Interior Ideas
How much does a complete DIY camper interior build cost?
A functional but modest DIY van build (bed, kitchen, lighting, insulation) typically costs $1,500–$4,000 in materials. A premium build with quality wood, lithium battery, solar, and full bathroom can reach $8,000–$15,000 still far below a factory-built RV of comparable quality.
How long does it take to build a camper van interior?
Most first-time builders take 4–12 weeks of part-time work. Professional builders can complete a standard build in 2–3 weeks. Budget more time than you expect there’s always a problem that costs a weekend.
What tools do I need for a DIY camper build?
Circular saw, jigsaw, drill/driver, measuring tape, level, rivet gun (for metal-to-metal), and a multimeter (for electrical). A pocket hole jig (Kreg) dramatically speeds up cabinetry work. Most of this list can be borrowed, rented, or sourced used for under $200.
Do DIY camper builds require permits?
In most countries, converting a van for personal use doesn’t require building permits. However, adding propane systems may require inspection in some jurisdictions, and registering as an RV for insurance or registration purposes requires meeting specific space standards. Check your local vehicle authority’s guidelines.

Rameen Zara is the founder of Clarity Nooks, bringing over five years of experience in home décor and interior styling. She shares simple yet practical design ideas that suit real homes and everyday living. Her approach focuses on cozy aesthetics, soft color palettes, and natural textures that create warm, inviting spaces.


