

DIY Outdoor Kitchen Ideas for a Perfect Backyard Cooking Space
You’ve spent thousands making your home beautiful inside. But every summer evening, you carry plates through the patio door, juggle hot dishes in the heat, and miss half the outdoor fun because your grill is nowhere near the prep area. It doesn’t have to be this way.
A DIY outdoor kitchen is one of the highest-ROI home improvement projects you can tackle. According to home remodeling data, a well-built outdoor kitchen can return 100–200% of its cost in home value while giving you an outdoor cooking and entertaining space you’ll use for decades.
This guide covers 12 carefully chosen DIY outdoor kitchen ideas from a $500 weekend build to a full-featured $15,000 outdoor culinary suite. Each idea includes real-world context, budget breakdowns, and practical tips that most guides skip entirely.
Featured Snippet Answer:
What is a DIY outdoor kitchen?
A DIY outdoor kitchen is a self-built, permanent or semi-permanent outdoor cooking and entertaining area that typically includes a grill, countertops, storage, and optional features like a sink, refrigerator, or pizza oven built without hiring a full contractor.
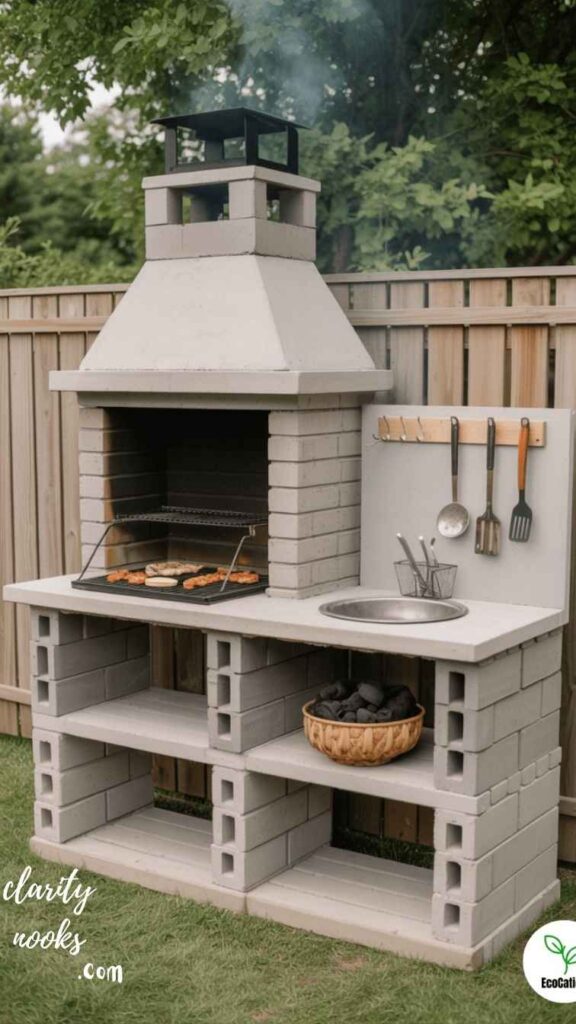
Modular Block Kitchen
Best for Beginners
Click Here 👈
Budget: $800–$2,500 | Skill Level: Beginner | Weekend Build
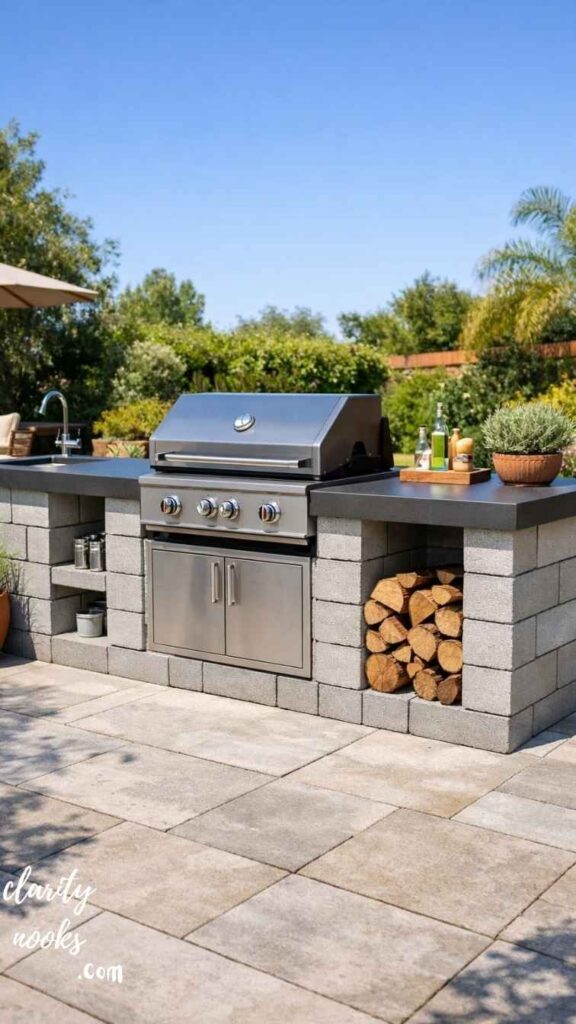
Concrete cinder blocks (CMU blocks) are the unsung heroes of outdoor kitchen construction. They’re fireproof, weatherproof, inexpensive, and require zero masonry experience. You stack them dry or mortar them, top them with a poured concrete or tile countertop, and you’ve got a professional-looking kitchen base in a weekend.
A homeowner in Austin, Texas, built a 10-foot cinder block kitchen for $1,100 total including a recessed grill, two storage doors, and quartz countertops. The secret? He used dry-stack blocks with construction adhesive (no mortar needed), which anyone can do with basic tools.
Key materials: Standard 8x8x16 CMU blocks ($1.50–$2.50 each), Liquid Nails for projects construction adhesive, cement board for the top, and your choice of countertop material. Always use a level at every course. The first row determines everything.
💡 Expert Tip:
Orient your cinder block kitchen so the grill faces away from prevailing wind. In most of the US, that means facing east or north. Smoke and heat management dramatically improves the cooking experience.
Must Read: DIY Outdoor Patio Ideas That Make Small Backyards Look Amazing
Pallet & Reclaimed Wood Kitchen
Best for the Eco-Conscious Budget Builder
Click Here 👈
Budget: $200–$700 | Skill Level: Beginner | Weekend Build
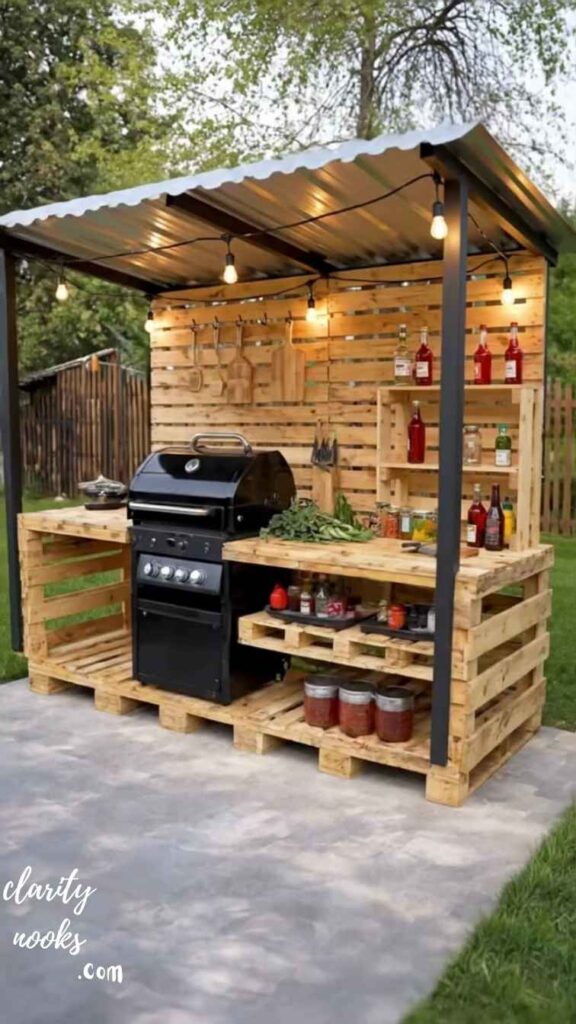
If you want the lowest-cost DIY outdoor kitchen possible, reclaimed wood and pallets can get you started. This approach works best for a dry climate or a covered patio, since untreated wood doesn’t stand up to rain and moisture without sealing or shelter. The aesthetic, however, is stunning raw, rustic, and completely unique.
A chef in Portland built a covered pallet kitchen island for $320. He sourced heat-treated pallets (look for the HT stamp not MB, which means methyl bromide treated and is toxic), sealed them with exterior-grade polyurethane, and finished with a poured concrete countertop. He’s been using it for three years with only minor touch-ups.
Critical caveat:
Never use pallet wood as a countertop surface. Use it for the structural base only. Top it with concrete, tile, or steel for a food-safe, heat-resistant surface. Also, always check local fire codes open flame near wood structures has specific clearance requirements.
Read Also: DIY Camper Interior Ideas: Creative Storage and Space-Saving Hacks
L-Shaped Corner Kitchen
Best for Maximizing Small Spaces
Click Here 👈
Budget: $3,000–$8,000 | Skill Level: Intermediate | 2–3 Weekend Build
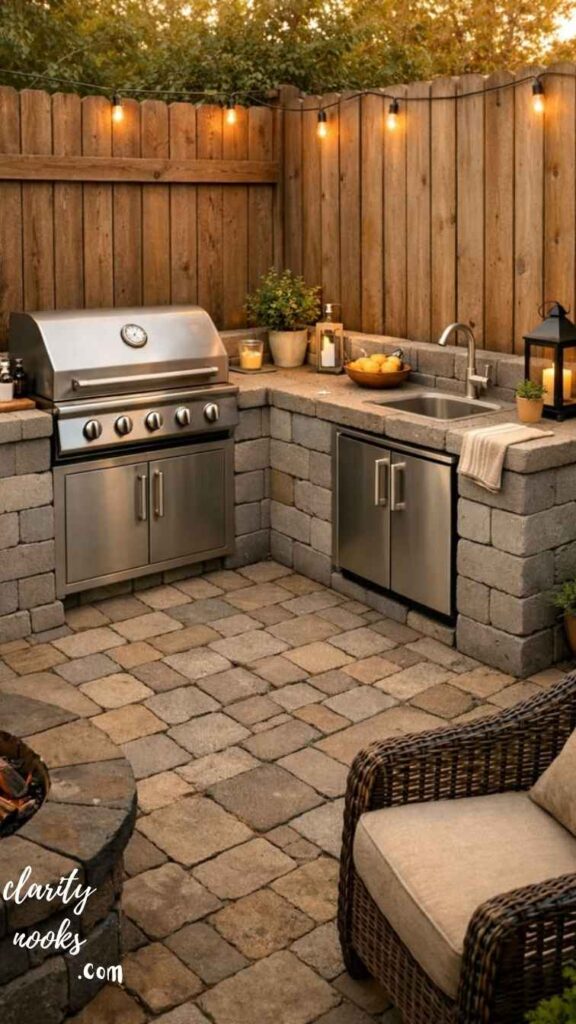
An L-shaped outdoor kitchen is the most efficient layout for backyard cooking and entertaining. It creates a natural workflow triangle between the grill, prep area, and serving zone the same principle professional kitchen designers use indoors. It also defines space without building a wall.
Think of it this way: a straight run gives you one working face. An L-shape gives you two, which means one person grills while another preps without getting in each other’s way. For families that actually cook together, this layout is transformative.
Build tip:
Position the grill at the corner end of the L where ventilation is maximum. Run the longer leg as your prep and serving counter, and use the shorter leg for a built-in refrigerator, sink, or bar. This corner-to-corner design also makes excellent use of an overlooked backyard corner.
More Read: DIY Dining Room Ideas to Create a Warm and Inviting Family Dining Space
Standalone Island with Built-In Grill
Classic and Timeless
Click Here 👈
Budget: $2,500–$6,000 | Skill Level: Intermediate | 2 Weekend Build
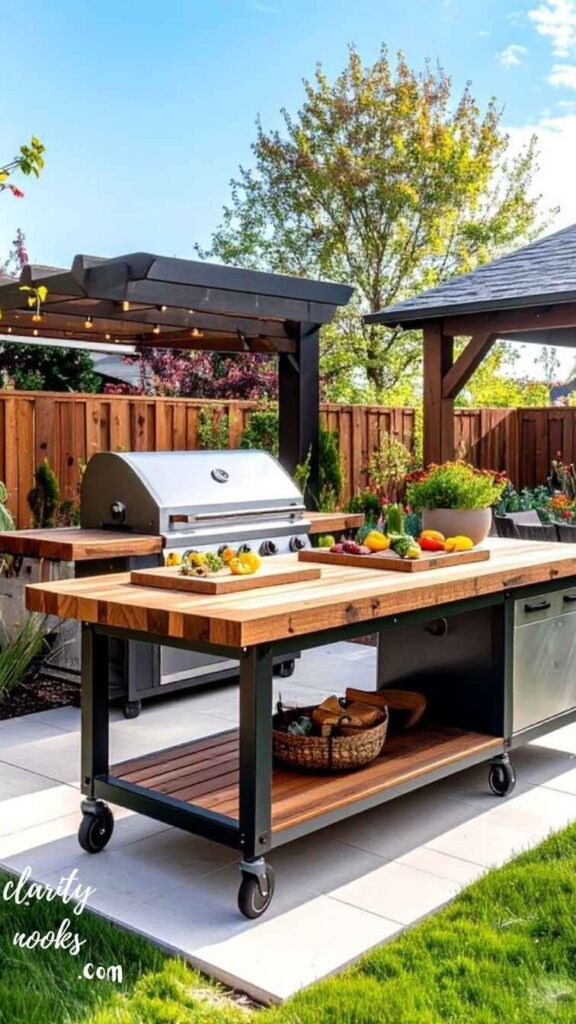
A standalone grill island is the most popular DIY outdoor kitchen design and for good reason. It’s self-contained, portable (if built on a steel frame), and works in any backyard layout. You can access it from all four sides, which makes entertaining easy and food service efficient.
The key structural decision is your frame. Steel stud framing (the same material used in commercial construction) is the professional’s choice. It’s fireproof, doesn’t rot, and won’t warp. You cover it with cement board, tile, or stucco, then add your grill cutout, countertop, and doors. Total build time: about two weekends for a first-timer.
Real-world scenario:
A family in Georgia built a 6-foot grill island with a drop-in grill, two access doors, and a tile countertop for $3,200. They did it over two weekends. The mistake they made? Not accounting for the grill’s side burner needing a gas line. Always finalize your appliance list before you frame retrofit plumbing or gas is expensive.
Don’t Miss: DIY Party Decor Ideas That Add Color and Style to Any Celebration
Pizza Oven Kitchen
For the Serious Home Cook
Click Here 👈
Budget: $4,000–$12,000 | Skill Level: Advanced | 3–5 Weekend Build
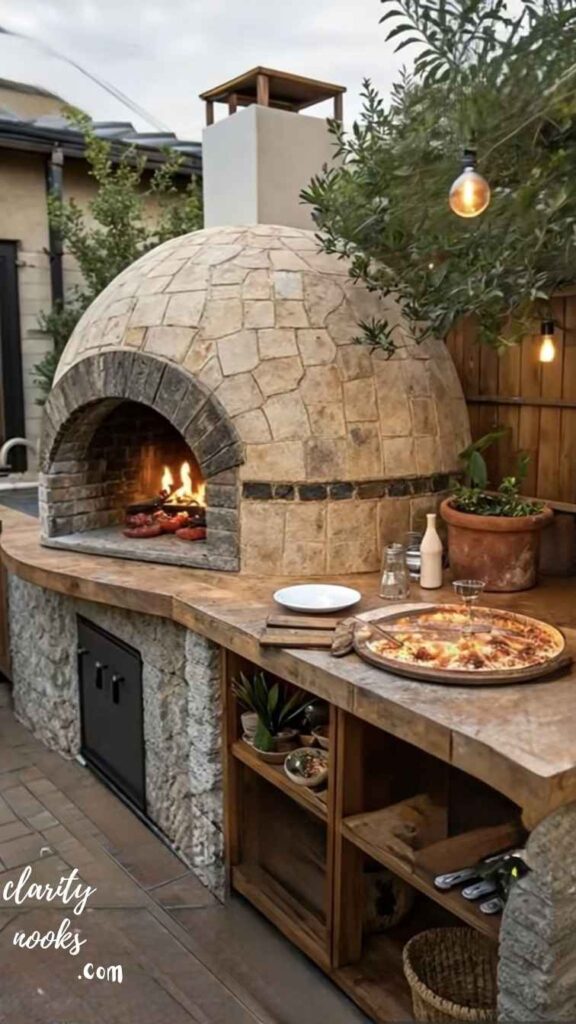
A wood-fired pizza oven transforms an outdoor kitchen from a grill station into a genuine culinary destination. Neapolitan-style pizza cooked at 800–900°F in a wood-fired oven cannot be replicated by any indoor appliance. Once you’ve tasted it, you’ll understand why Italian nonnas have been fighting over oven techniques for centuries.
You have three main options: build a traditional brick dome oven from scratch (the most labor-intensive), purchase a refractory concrete core kit and build around it (the sweet spot for most DIYers), or buy a standalone modular pizza oven and integrate it into a countertop surround. The kit option typically costs $1,200–$2,500 for the oven core, then $500–$1,500 to build the base and surround.
Case study: A homeowner in New Jersey integrated a Forno Bravo Primavera kit oven into a cinder block surround with a tile countertop and dedicated prep area for $5,800 total. He runs a pizza night every Friday for neighbors. His biggest lesson: build the base 42 inches high (not the standard 36), since loading a hot oven at counter height saves your back after years of use.
Pro Tip:
Always include a covered roof or pergola over a pizza oven kitchen. Rain on a hot oven causes thermal shock and can crack the refractory material. A simple cedar pergola with a metal roof panel directly over the oven costs $400–$800 and protects your entire investment.
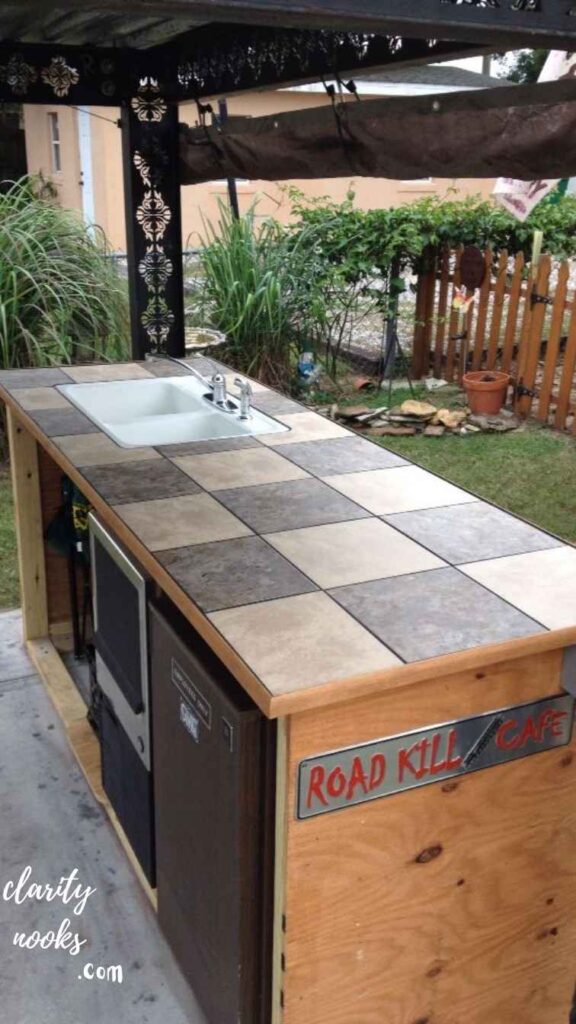
Budget Smoker Station
For the BBQ Enthusiast
Click Here 👈
Budget: $400–$1,500 | Skill Level: Beginner–Intermediate
You don’t need a full outdoor kitchen to dramatically improve your backyard cooking experience. A dedicated smoker station a purpose-built countertop and storage area around your offset smoker or pellet grill solves the biggest problem most BBQ enthusiasts face: nowhere to put anything while you cook.
A good smoker station includes: a heat-safe side counter (concrete or metal), a lower shelf for wood storage, hooks for tools, and ideally a built-in trash can enclosure. You can build this with basic lumber, cement board, and tile for under $600 and do it in a single weekend.
This approach is also perfect for renters or anyone who isn’t ready to commit to permanent construction. Build it on a base of pavers no concrete footings required and it’s technically movable. When you buy your next house, it goes with you.
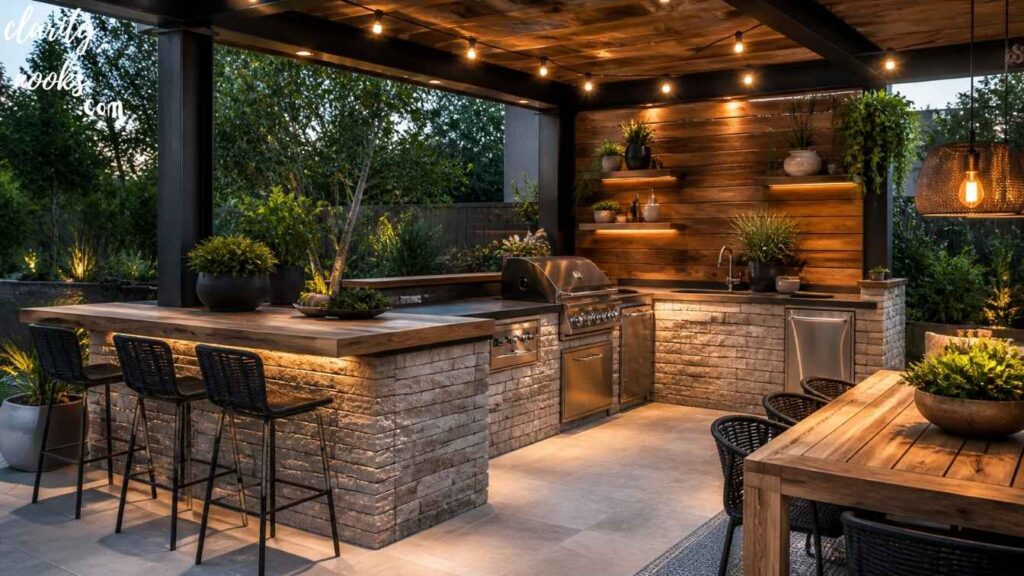
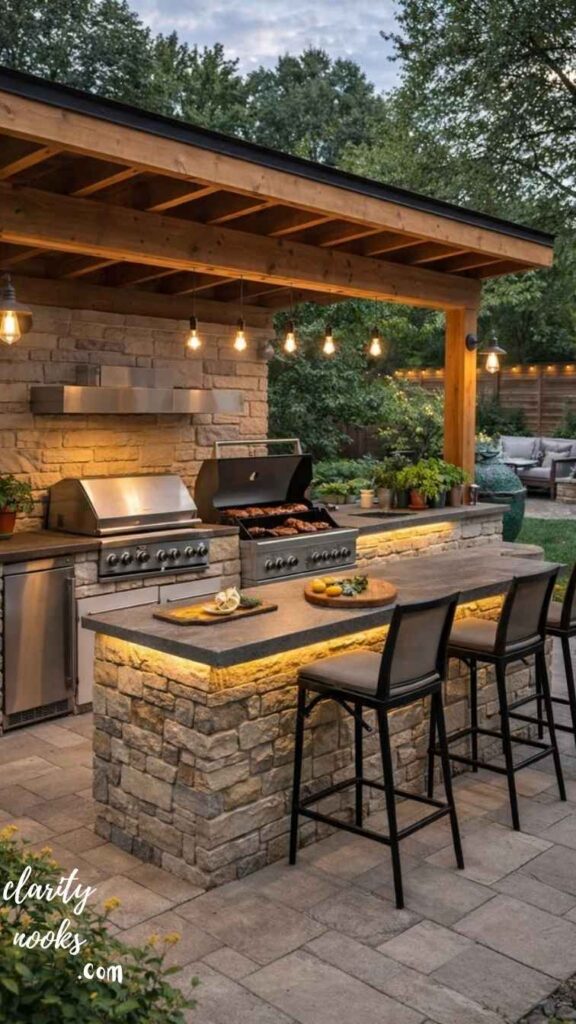
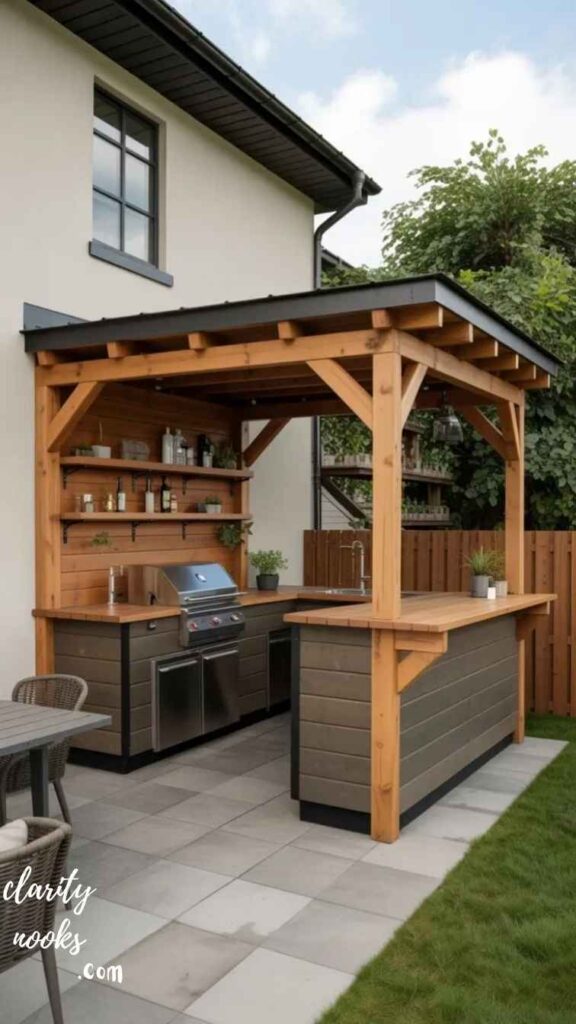
Covered Outdoor Kitchen with Pergola
Four-Season Entertaining
Click Here 👈
Budget: $6,000–$20,000 | Skill Level: Advanced | Multi-Week Project
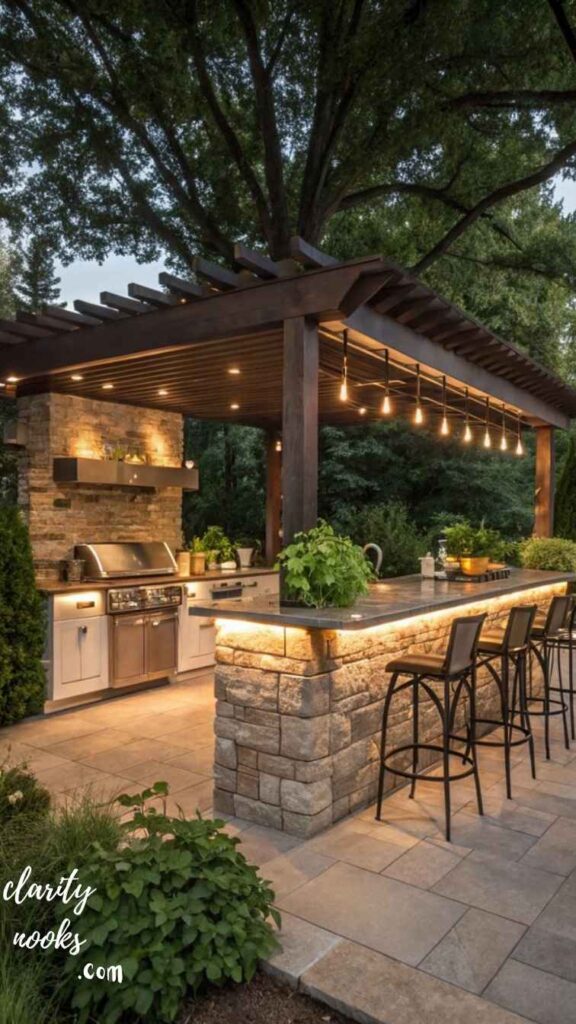
The single biggest upgrade you can make to any outdoor kitchen is covering it. A pergola or covered structure extends your usable season by months, protects your appliances from weather damage, and creates a defined room-like space that dramatically improves the aesthetic. It’s the difference between a grill station and an outdoor room.
DIY pergola kits have improved dramatically. Companies like Pergola Depot and Forever Redwood sell pre-cut, pre-drilled kits that a homeowner can assemble in a weekend with basic tools. Pair a pergola with a metal roof panel (standing seam steel or corrugated metal) for true weather protection. Add string lights, a ceiling fan rated for outdoor use, and you’ve built a space your family will use year-round.
Structural note:
If you’re in an area with heavy snow loads or high wind zones, a covered outdoor structure typically requires a building permit. Always check with your local municipality before building anything with a permanent roof. The permit process protects you legally and ensures safe construction especially important when running gas lines underneath a covered structure.
Outdoor Bar & Beverage Center For the Entertainer
Click Here 👈
Budget: $1,500–$5,000 | Skill Level: Intermediate
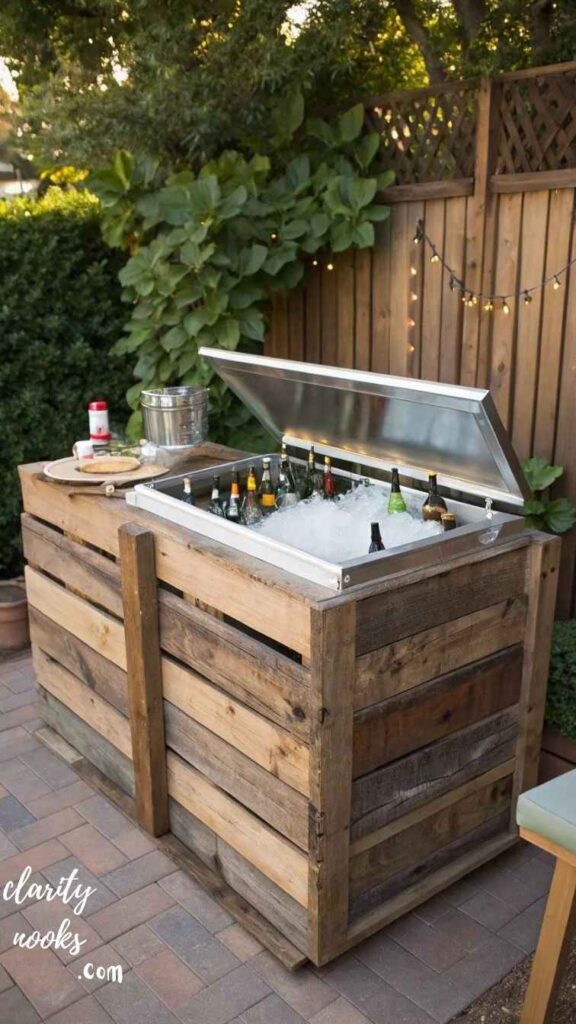
An outdoor bar is often the most-used feature of any backyard entertaining area yet most people don’t think to include one when planning an outdoor kitchen. A dedicated bar section with an undercounter refrigerator, a kegerator or wine cooler, and a raised bar top creates a natural gathering point that keeps guests away from the cooking zone.
The most effective design: build a standard-height (36-inch) prep counter that transitions into a raised bar height (42–44 inches) bar section. Add four to six bar stools on the guest-facing side and a drop-in sink on the bartender side. This keeps the drinks flowing without the cook needing to play server.
For the refrigeration: outdoor-rated refrigerators are not optional they’re mandatory. Indoor refrigerators are not designed for temperature swings from 20°F to 110°F, and they’ll fail within two summers. True, Perlick, and Bull make reliable outdoor-rated units. Expect to pay $600–$1,500 for a quality under counter outdoor fridge. It’s the one place not to cut corners.
Sink & Plumbing Integration
The Upgrade That Changes Everything
Click Here 👈
Budget: $500–$2,000 additional | Skill Level: Intermediate–Advanced
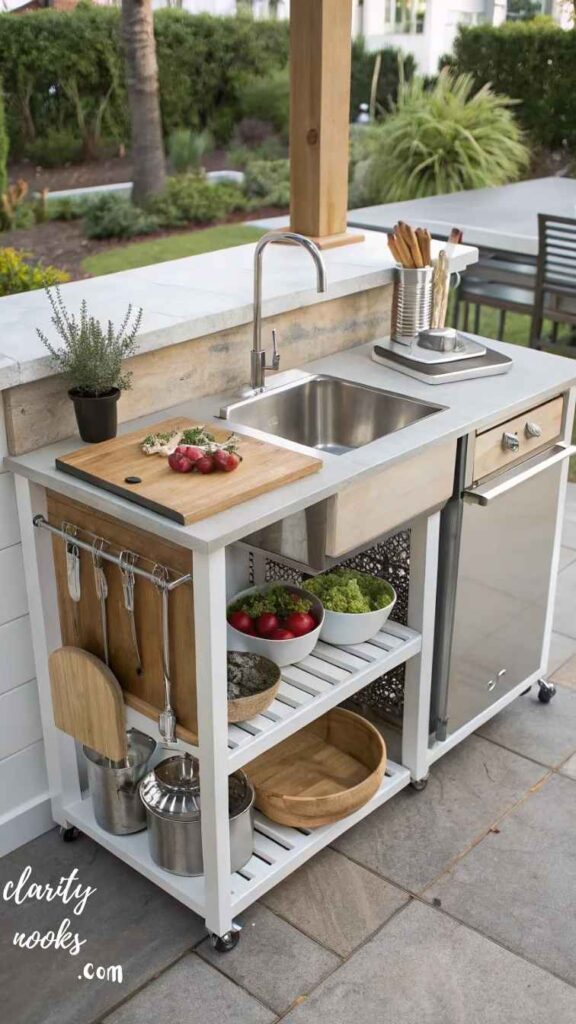
Running water to your outdoor kitchen is the single upgrade that separates a good outdoor kitchen from a great one. The ability to wash your hands, rinse produce, fill pots, and clean surfaces without going inside completely changes how you use the space and how long guests stay outside.
There are two approaches: connect to your existing home plumbing (requires a licensed plumber for supply lines in most jurisdictions, costs $500–$1,500 in labor) or use a standalone outdoor sink connected to a garden hose (no permits, costs $150–$400). The garden hose approach works for cold water only and drains onto the ground or into a French drain fine for most situations.
Winter preparation matters enormously. If you live in a freezing climate, you need a shutoff valve inside the heated space (or a frost-free hose bib) to drain the outdoor line before winter. Burst outdoor pipes are a $1,000–$3,000 disaster that’s completely preventable with a $15 shutoff valve and two minutes of fall maintenance.
Countertop Material Deep Dive
Choosing What Actually Lasts
Click Here 👈
Budget Impact: $200–$3,000+ depending on material
The countertop decision is where most DIY outdoor kitchen builders make expensive mistakes. Not all countertop materials are created equal outdoors. Your indoor quartz or granite installer may not mention that standard residential quartz is not rated for direct UV exposure and can fade, warp, or delaminate within two to three years outdoors.
| Material | Outdoor Rating |
| Poured Concrete | Excellent (seal annually) |
| Outdoor Granite | Excellent |
| Quartzite (natural) | Excellent |
| Porcelain Tile | Excellent |
| Stainless Steel | Excellent (no staining) |
| Outdoor Quartz (rated) | Good (check specs carefully) |
Poured concrete countertops are the DIY champion: inexpensive ($3–$8/sqft in materials), completely customizable in color and texture, and genuinely excellent outdoors when sealed with a penetrating concrete sealer once a year. They develop a beautiful patina over time. The learning curve is moderate but manageable dozens of YouTube tutorials cover the process in detail.
Avoid:
standard indoor porcelain tile (it can crack with freeze-thaw cycles), unsealed natural stone (it stains and absorbs grease), and any composite wood product near a heat source. The outdoor environment is more demanding than any indoor space material selection is not the place to economize.
Outdoor Kitchen Lighting Plan Safety, Ambiance & Functionality
Click Here 👈
Budget: $300–$1,500 | Skill Level: Beginner–Intermediate
Outdoor kitchen lighting is almost universally underplanned. Most people install one overhead fixture and call it done. But a well-lit outdoor kitchen needs three layers: task lighting (for safe cooking), ambient lighting (for atmosphere), and accent lighting (for aesthetics). Skipping any layer means either squinting over a hot grill at dusk or sitting in a bland, harshly lit box.
Task lighting essentials: under-counter LED tape lighting illuminates your prep surface perfectly. Grill area lighting should come from a dedicated grill light (many grills have integrated ones) or a directional outdoor-rated LED downlight positioned to eliminate shadows directly over the cooking surface. Safety is the priority sharp knives and hot surfaces at night require proper illumination.
For ambiance:
low-voltage LED path lights along the perimeter, string lights overhead (connect them to a smart outdoor switch so you can control them from your phone), and landscape lighting aimed at nearby plantings dramatically elevate the entire outdoor space. Budget: $400–$800 for a comprehensive lighting plan that you install in a single afternoon.
Storage-First Kitchen Design
The Detail Pros Always Include
Click Here👈
Budget: $300–$1,200 for storage components
Every outdoor kitchen design eventually confronts the same problem: where does everything go? Grilling tools, propane tanks, cleaning supplies, extra charcoal, spice collections, serving platters outdoor cooking generates a surprising amount of equipment, and outdoor kitchens are routinely under-designed for storage.
The professional approach: plan for 30–40% more storage than you think you need. Include at minimum two to four access door compartments (sized to fit propane tanks and standard storage bins), a dedicated drawer run for tools and small items, and at least one pullout trash/recycling cabinet. Stainless steel access doors ($80–$150 each) are the industry standard they’re outdoor-rated, lockable, and genuinely weatherproof.
Hidden storage opportunity most people miss: the kick space under your countertop (the 4-inch toe kick area) can be converted into a full-width storage drawer for flat items like cutting boards and baking sheets. This is standard in professional outdoor kitchen design but almost never mentioned in DIY guides. Build it with a simple plywood drawer on full-extension slides and you’ve gained 4–6 square feet of storage from space that was previously wasted.
📌 Voice Search Optimization:
How do I build a cheap outdoor kitchen?
What is the easiest outdoor kitchen to build?’, and ‘How much does a DIY outdoor kitchen cost?’ This article directly answers all three.
Conclusion
Building a DIY outdoor kitchen is one of the most rewarding backyard projects you can take on. With the right plan, the right materials, and a clear sense of how you’ll actually use the space, you can create an outdoor cooking and entertaining area that adds real value to your home and real joy to your life. These 12 DIY outdoor kitchen ideas cover every budget, every skill level, and every backyard scenario so there’s no reason to keep eating inside when the weather is perfect.
Start small if you need to even a simple cinder block grill island is a transformative upgrade. Then expand from there. The best outdoor kitchen is the one you actually build.
Trend Analysis
DIY Outdoor Kitchens in 2026 and Beyond
The outdoor kitchen market has shifted dramatically since 2020. The pandemic-era backyard renovation boom never fully reversed it evolved. Homeowners who built basic setups during lockdowns are now upgrading to fully featured outdoor culinary suites, and first-time builders are starting with higher expectations and larger budgets than ever before.
Current Trends (2026)
- Modular outdoor kitchen systems (pre-built components that snap together) are growing rapidly, with brands like Coyote, Summerset, and Napoleon capturing buyers who want DIY price points with professional aesthetics.
- Pellet grill integration has replaced propane as the default for new outdoor kitchen builds among BBQ enthusiasts, driven by the rise of Traeger, Pit Boss, and Weber SmokeFire.
- Outdoor pizza ovens continue their explosive growth standalone gas pizza ovens from Ooni and Gozney have introduced the category to a mainstream audience that then upgrades to built-in wood-fired versions.
- Sustainability focus: reclaimed materials, drought-tolerant landscaping integration, and solar-powered outdoor kitchen lighting are becoming common design elements.
Near-Future Predictions (2026–2028)
- Smart outdoor kitchen appliances with Wi-Fi connectivity (smart grills, app-controlled pizza ovens, outdoor refrigerators with temperature monitoring) will become the expectation, not the exception.
- Prefabricated outdoor kitchen modules similar to modular bathroom vanity systems will disrupt the market, allowing full kitchen installations in hours rather than weekends.
- AI-assisted backyard design tools will allow homeowners to generate photorealistic renders of proposed outdoor kitchens from a smartphone photo of their backyard, accelerating the planning-to-building cycle.
Practical Tips & Expert Insights
From Builders and Outdoor Kitchen Specialists
- Always over-engineer your foundation. The most common outdoor kitchen failure point is settling or cracking from an inadequate base. A 4-inch reinforced concrete slab or a properly compacted gravel base is never overkill.
- Run electrical first, before you build walls around it. Retrofitting a 20-amp GFCI circuit after framing is complete costs three times more than roughing it in before.
- Buy your appliances before you finalize your design. Cutout dimensions, BTU requirements, gas line sizing, and ventilation requirements all depend on the specific units you choose. Designing around a grill you haven’t purchased yet is a recipe for expensive modifications.
- Use a licensed plumber for any gas line work. Natural gas and propane lines require pressure testing, proper fittings, and in most jurisdictions, a permit and inspection. This is not a DIY shortcut area.
- Protect your investment with covers. High-quality stainless steel or vinyl covers for your grill, appliances, and countertops can triple the lifespan of your outdoor kitchen. Budget $200–$500 for covers and use them every time.
Long-Term Strategy & Sustainability
Think of your outdoor kitchen as a platform, not a project. The smartest DIY outdoor kitchen builders design for future expansion from day one. This means: running conduit for electrical even if you’re not wiring it yet, blocking for a future TV mount, leaving space for an additional appliance, and building your countertop longer than your current needs.
Maintenance matters more than most guides admit. An outdoor kitchen exposed to weather, grease, and temperature extremes requires a basic annual maintenance protocol: re-seal concrete countertops, clean and lubricate grill burner ports, inspect and re-caulk any joints between countertops and appliances, test all gas connections with soapy water, and clean undercounter refrigerator coils.
Resale value consideration: a professionally finished outdoor kitchen (even if DIY-built) adds measurable value in markets where outdoor living is prized the Sun Belt, Pacific Coast, and warm-climate regions consistently show strong returns. In cold-weather markets, a covered outdoor kitchen (usable nine months a year) outperforms an uncovered one dramatically in terms of appraised value.
Future Predictions & Innovations
The next five years will see outdoor kitchen technology converge with smart home systems in meaningful ways. Expect to see outdoor kitchen appliances that connect to your home’s energy management system grills that fire up automatically when a meal is scheduled, refrigerators that send alerts when temperatures drop dangerously in winter, and outdoor lighting that integrates with Google Home or Alexa.
Material science is also advancing rapidly. Sintered stone surfaces (like Dekton and Neolith) are becoming the preferred outdoor countertop material among design professionals they’re impervious to UV, frost, heat, and staining, and require zero maintenance. Their cost ($60–$120/sqft) will decrease as production scales, making them accessible to mainstream DIY builders by 2027.
Sustainability will shift from a trend to a standard. Outdoor kitchen builds using reclaimed materials, passive cooling designs (proper orientation to reduce afternoon sun load), and battery-powered outdoor appliances (powered by residential solar storage) will become the expectation for eco-conscious homeowners and a selling point in real estate listings.
Common Mistakes
Hidden Gaps Most Guides Never Mention
Beginner Mistakes
- Underestimating weight: A 10-foot cinder block kitchen with concrete countertops can weigh 3,000–5,000 pounds. Building on an insufficiently thick or reinforced concrete slab causes settling and cracking within one to two years.
- Skipping the building permit: Many permanent outdoor structures require permits. Building without one can complicate your home sale, create insurance liability, and in some cases require you to demolish the structure.
- Buying the wrong grill for a built-in application: Freestanding grills are not designed for built-in installation they lack the required ventilation clearances. Always use a grill specifically rated for built-in installation.
Intermediate Mistakes
- Under-lighting the space: Installing only overhead ambient lighting without task lighting creates a dangerous cooking environment and an atmosphere that feels flat and uninviting after dark.
- Not accounting for drainage: Water from rain, sink use, and appliance condensation needs somewhere to go. Build a slight countertop slope toward a drain, or install a channel drain in the floor in front of the kitchen.
- Choosing aesthetic over function in layout: The most visually striking design is often not the most functional. Always prioritize workflow (grill-to-prep-to-serve) over symmetry or appearance.
The Gap Competitors Miss
Almost no DIY outdoor kitchen guide discusses the social dynamics of kitchen placement. Your outdoor kitchen should be positioned so the cook faces the guests not their backs. This seems obvious, but the majority of outdoor kitchens are built against a fence or wall with the grill operator staring at a wall while everyone else has the party. Design it like a performance kitchen: the cook is the host, facing the crowd.
FAQ’S About DIY Outdoor Kitchen Ideas
How much does a DIY outdoor kitchen cost?
A basic DIY outdoor kitchen starts at $500–$1,500 for a simple cinder block grill island. Mid-range builds with built-in appliances, sinks, and tile countertops typically run $3,000–$8,000. Full-featured outdoor kitchen suites with pizza ovens, full refrigeration, bars, and covered pergolas can reach $15,000–$30,000, still significantly less than hiring a contractor for the same result.
What is the cheapest way to build an outdoor kitchen?
The cheapest method is a dry-stack cinder block frame with a concrete countertop poured in place. Materials cost $800–$1,500 for a complete 8–10 foot kitchen. No mortar, no specialized tools, and no contractor required. Add a drop-in grill ($300–$600) and you have a functional outdoor kitchen for under $2,000.
Do I need a permit to build an outdoor kitchen?
It depends on your location and what you’re building. Freestanding structures under a certain square footage typically don’t require permits. Structures with permanent roofs, gas lines, or electrical connections usually do. Always check with your local building department before starting the permit process protects you legally and ensures safe construction.
What is the best material for an outdoor kitchen countertop?
Poured concrete (sealed), natural granite, quartzite, and porcelain tile are the top performers for outdoor use. Stainless steel is the most durable and maintenance-free option. Avoid standard indoor quartz, laminate, or any composite wood product near heat sources. The outdoor environment demands materials that handle UV, temperature extremes, and moisture simultaneously.

Rameen Zara is the founder of Clarity Nooks, bringing over five years of experience in home décor and interior styling. She shares simple yet practical design ideas that suit real homes and everyday living. Her approach focuses on cozy aesthetics, soft color palettes, and natural textures that create warm, inviting spaces.


