

Modern DIY Walk In Closet Ideas for Organized and Elegant Storage
” You open the door. Clothes are piled. Shoes have gone rogue. That cardboard shelf you bought three years ago is sagging in the middle. If your closet feels like a game of Tetris you’re always losing you’re not alone, and you’re not out of options. A well-designed DIY walk in closet doesn’t require a renovation budget or a professional organizer. It requires the right plan, the right storage systems, and a weekend of focused effort. “
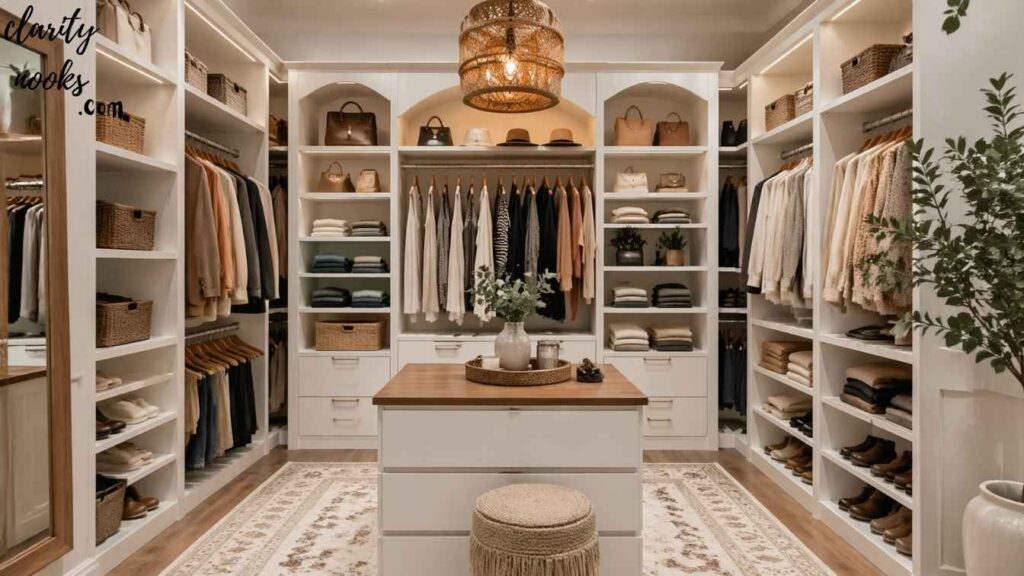
The global closet organizer market was valued at over $12 billion in 2025, and the fastest-growing segment? DIY modular systems. Homeowners are ditching expensive custom installs and building closets that are just as functional and sometimes far more personalized on their own. Whether you’re converting a spare bedroom, upgrading a builder-grade reach-in, or tackling a large walk-in that’s become a dumping ground, this guide gives you eight fully developed ideas with real-world applications and smart cost breakdowns.
The ideas below aren’t surface-level tips like “use baskets.” Each one is a complete strategy you can implement from start to finish, tailored for different space sizes, budgets, and organizational styles. Let’s build something you’ll actually love opening every morning.
73%
of homeowners report closet clutter is their #1 daily stress
$400
avg. DIY walk-in closet budget vs. $3,500+ for custom install
2–3×
more usable storage after a proper DIY closet redesign
What is a DIY walk-in closet?
A DIY walk-in closet is a custom-designed wardrobe space built without professional contractors, using modular shelving systems, freestanding units, wall-mounted rods, and organizational accessories. It can be created in a spare room, large reach-in, or underused corner of a bedroom, typically at a fraction of the cost of a custom closet build.
Start With a Zone Map, Not a Shopping Cart

The single biggest mistake in DIY closet projects is buying storage products before planning your zones. A zone map divides your closet into functional areas based on how often you use items and what types of clothing you own. This sounds basic, but it’s the foundation that separates a functional closet from a beautiful mess.
Divide your space into three zones: active (daily wear at eye level and within easy reach), secondary (weekly or seasonal items on upper shelves or in lower drawers), and archive (rarely worn pieces in back corners or high shelves). A typical 8×10-foot walk-in closet has more linear feet of wall space than most people realize around 36 feet when all walls are used. Mapping your zones lets you allocate that space intelligently instead of guessing.
🏠
Real-Life Scenario
Sarah from Austin, TX, converted a 9×9 spare bedroom into a walk-in closet. Her biggest win wasn’t new shelving it was mapping her zones first. She realized 40% of her clothes were seasonal items she’d been storing at eye level. Moving those to upper shelves freed up prime space for her everyday wardrobe, and she didn’t need to buy a single new shelf unit to feel the difference.
Pro Tip
Use blue painter’s tape on your walls to mock up shelf and rod positions before installing anything. Live with the mock layout for 24 hours you’ll often find you want to adjust heights or swap zones entirely.
Also Read: DIY Laundry Room Ideas: Easy Makeovers for a Clean, Functional Space
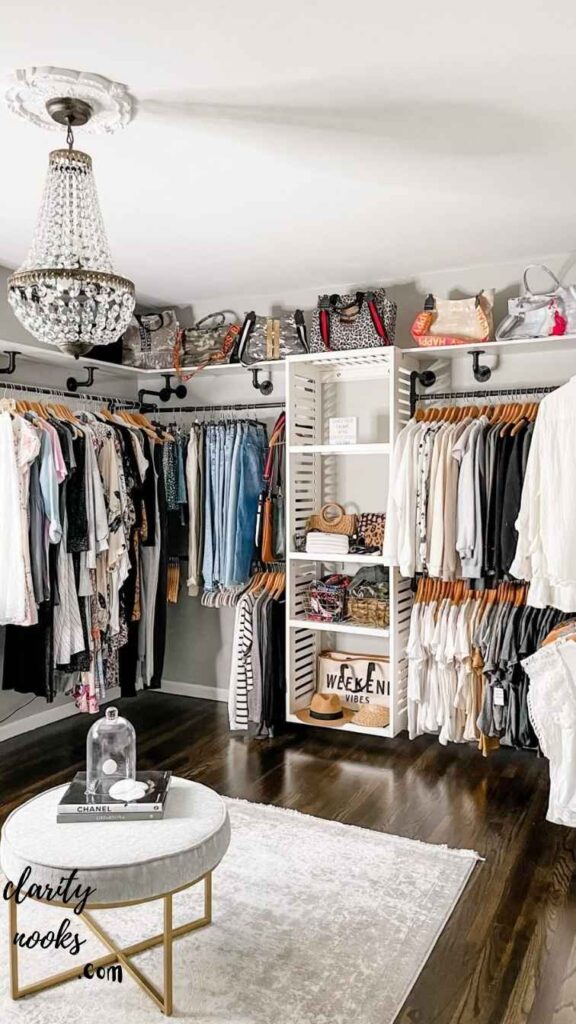
Build Around a Modular Shelving System
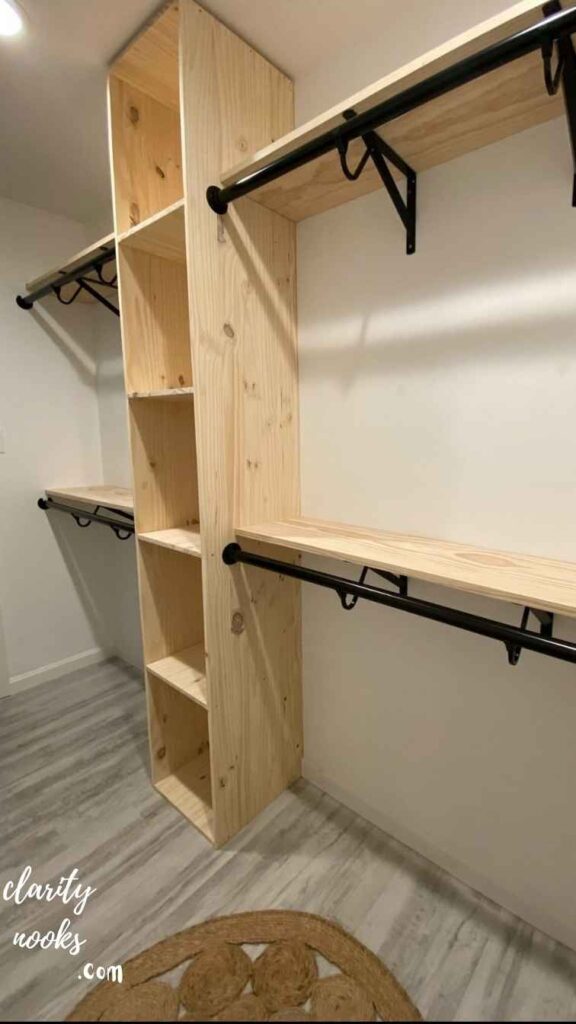
Modular shelving systems like IKEA PAX, Closet Maid, or Rubbermaid FastTrack are the backbone of most successful DIY walk-in closets. They’re adjustable, expandable, and far more affordable than custom carpentry. The key is choosing a system that uses a common rail or mounting standard, so you can add components over time without starting from scratch.
IKEA PAX units remain the most popular choice among DIY closet builders in 2026, and for good reason. A full-width wardrobe wall with double hanging, drawers, and shelving can be built for $300–$700 depending on configuration. The frame is sturdy, the accessories are interchangeable, and dozens of online “PAX hacks” let you customize the look. For larger closets, mixing unit widths (50cm and 75cm frames) gives you flexibility to fit non-standard wall lengths precisely.
For a 10-foot wall:
Two 75cm units + one 50cm unit = ~9.8 feet. Use the remaining gap for a full-length mirror panel or a pull-out valet rod. Cost estimate: $420–$580 including internal fittings.
If IKEA isn’t your style, wire shelving systems (Rubbermaid, ClosetMaid) are even cheaper and excellent for garage-style utility closets or laundry-adjacent spaces. They’re not as refined visually, but they maximize airflow, which matters for clothing longevity. For a more premium finish without a custom build, Elfa (from The Container Store) sits in the middle more expensive than IKEA but with a more refined aesthetic and excellent wall-track flexibility.
Must Read: DIY Dressing Table Ideas for a Cozy and Functional Bedroom Makeover
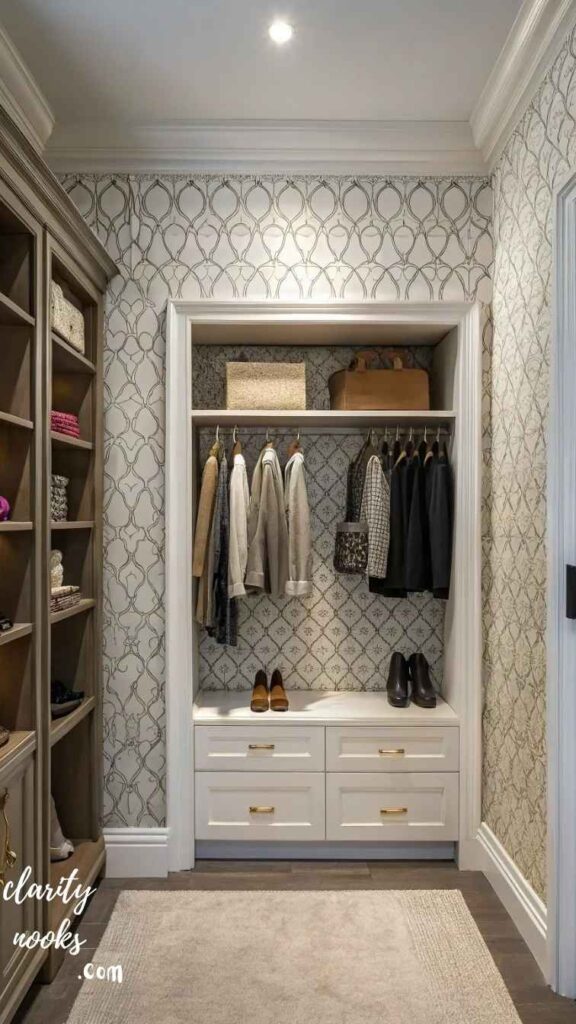
Double Your Hanging Space With Strategic Rod Placement
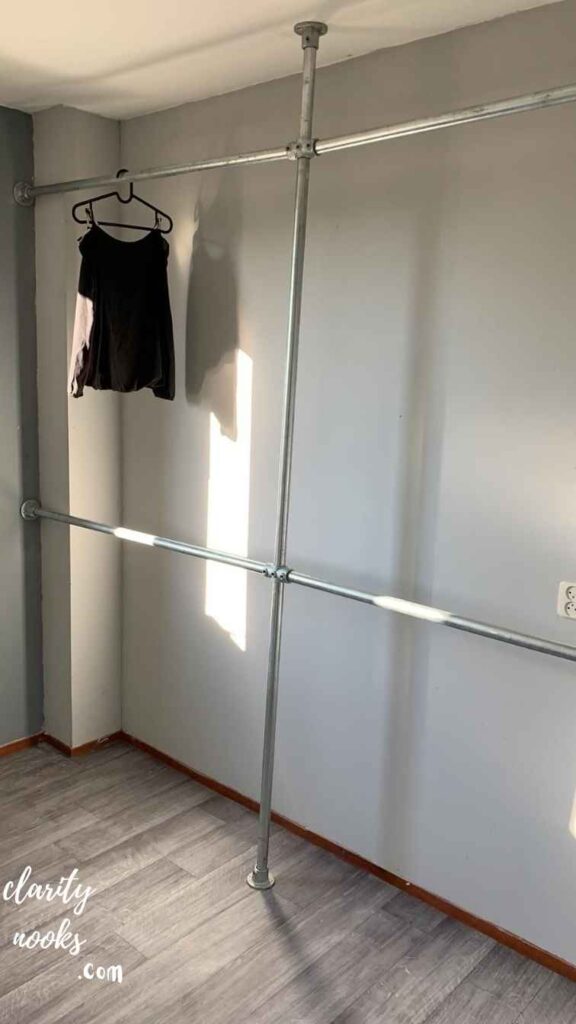
Most people use one long rod at standard height. This is the least efficient use of vertical space in any closet. The better approach is double-hanging two rods stacked vertically which immediately doubles your hanging capacity for shirts, blazers, folded pants, and shorter items. The standard rule is 40 inches of clearance for the lower rod and 36 inches above it for the upper, with the upper rod sitting around 80–84 inches from the floor.
Not everything needs double hanging. Long dresses, full-length coats, and jumpsuits need a single full-height rod section. Plan for at least one section of your closet to accommodate floor-to-ceiling hanging. A common layout for a couples’ shared walk-in closet is: one person gets a full-length section, the other gets double-hanging, and a shared center island or tower of drawers sits between them.
Pro Tip
Install your upper rod first, then use it as a reference point to hang a plumb bob to find the perfect lower rod position. This ensures your rods are perfectly parallel without needing a helper or a level at awkward heights.
Don’t skip: DIY Library Room Ideas: Modern, Aesthetic & Functional Home Library Designs
Install Closet Lighting That Changes Everything
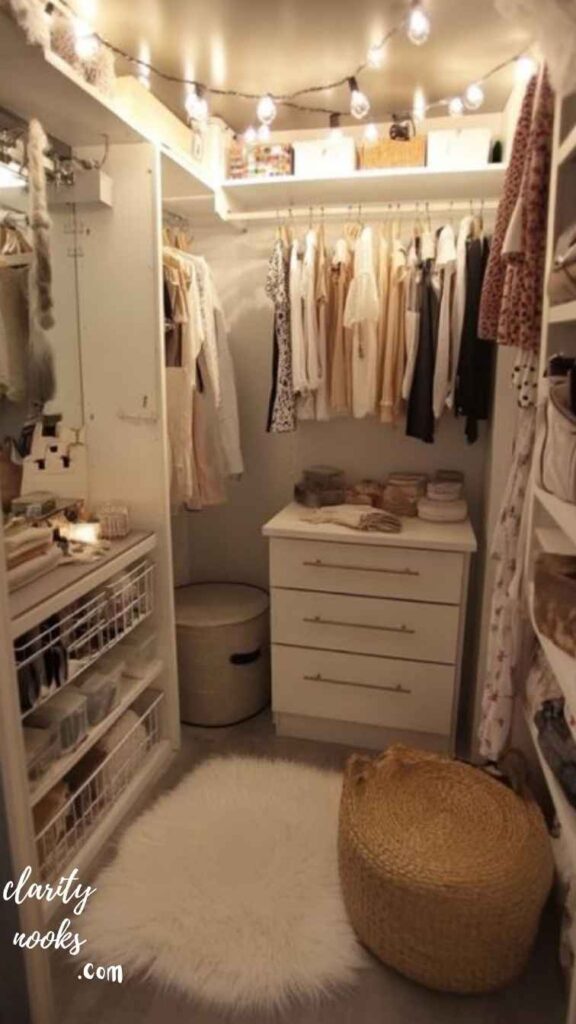
Lighting is the most underrated element in a DIY walk-in closet. Poor lighting makes a beautifully organized space feel dull, makes it hard to match colors, and turns every morning into a frustrating search. The good news: you don’t need an electrician for a dramatic lighting upgrade. Battery-operated LED strip lights and rechargeable puck lights have become genuinely high-quality alternatives to hardwired systems.
For the best results, layer your lighting. Use overhead light for general illumination, strip LEDs under shelves to eliminate shadows at eye level, and accent lighting inside display sections if you’re showing off bags, shoes, or accessories. Warm white LEDs (2700K–3000K) are ideal for closets they render clothing colors accurately without the harsh blue tone of cool-white LEDs. LIFX and Govee both make excellent battery-powered strip lights that can be mounted without any wiring.
🏠
Mini Case Study
Marcus in Chicago documented his closet lighting project on Reddit’s r/malelivingspace. He spent $85 on Govee LED strips under four shelves. “It looks like a boutique retail store now,” he wrote. “My morning routine is 10 minutes faster because I can actually see what I own.” His post received 12,000 upvotes proof that this upgrade punches far above its price tag.
Read More: DIY Flower Garden Ideas That Bring Natural Beauty to Any Home
Design a Dedicated Shoe Wall
(or Tower)
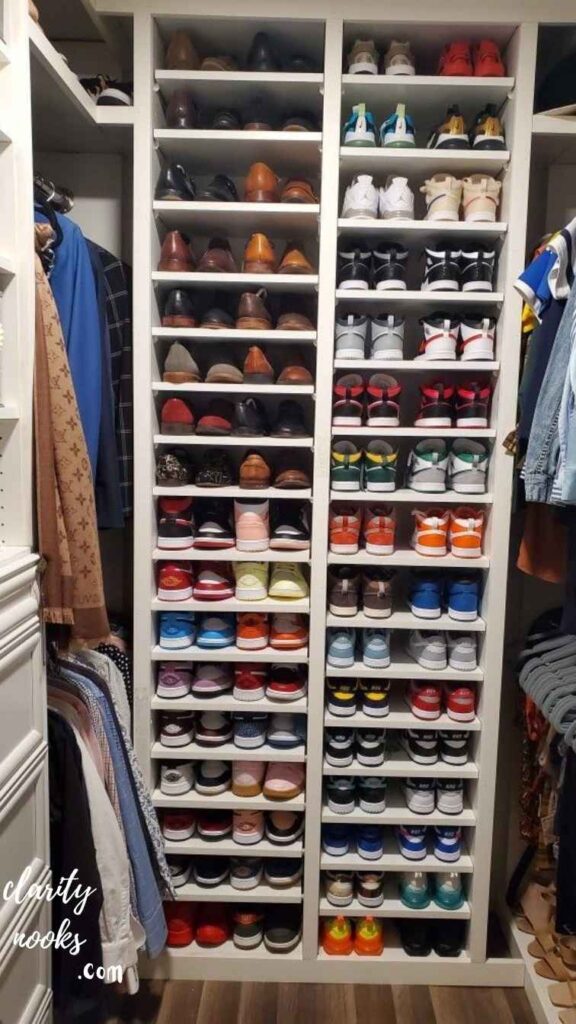
Shoes are the most space-inefficient items in any closet when stored improperly. Tossed in a pile, they consume floor space, get damaged, and are impossible to find quickly. A dedicated shoe storage system whether a wall of angled shelves, a pull-out tower, or a door-mounted rack transforms the floor of your closet from chaos to clarity.
The most effective DIY shoe storage for large collections is angled floating shelves set at 15–20 degrees. This angle shows the toe of each shoe, making selection visual and fast. Shelves should be spaced about 7 inches apart vertically for flats and sneakers, and 9–10 inches for boots and heels. A standard 6-foot wall with angled shelves from floor to ceiling can hold 40–60 pairs without feeling cramped.
📐
Budget-Friendly Alternative
IKEA KALLAX units on their sides, with each cubby holding 2–3 pairs, create an excellent and attractive shoe wall for around $80–$150. Add fabric drawer inserts for off-season pairs. It’s one of the most shared DIY closet hacks on Pinterest for good reason it works beautifully and costs very little.
Create a Functional Accessories Station

Accessories belts, ties, jewelry, watches, sunglasses, scarves are small items that cause disproportionate closet chaos when unmanaged. An accessories station is a dedicated section of your closet where these items live in visible, accessible organization. This is different from a jewelry box, which hides items. The goal here is visual inventory so you actually use what you own.
For jewelry: a wall-mounted felt display panel or a framed corkboard with small hooks creates a beautiful display that doubles as art. For belts and ties: a pull-out rod or dedicated hook rail in a drawer or behind the door. For watches and sunglasses: a shallow open drawer with a customized foam insert (cut to fit your specific pieces) protects items while keeping them visible. The total investment for a complete accessories station is typically $40–$120.
How do I organize accessories in a walk-in closet?
Dedicate one section (often behind the door or on a narrow wall) to accessories using hooks, pull-out rods, and shallow open drawers. Keep items visible rather than boxed to encourage daily use
Add a Statement Wall or Wallpaper Accent
Your walk-in closet doesn’t have to feel utilitarian. One of the easiest and most impactful ways to elevate the space is adding a statement back wall painted in a deep, moody color (deep green, charcoal, dusty rose), or covered with peel-and-stick wallpaper. This transforms the closet from a storage room into an actual room you enjoy spending time in.
Peel-and-stick wallpaper has improved dramatically in quality over the past few years. Brands like Tempaper, NuWallpaper, and Chasing Paper offer designs that look indistinguishable from traditional wallpaper. For a walk-in closet, choose a pattern you’d never commit to in your living room a bold floral, graphic geometric, or deep moody texture. The space is intimate and low-risk, which makes it the perfect place to experiment with your real aesthetic.
📸
Example
A dark hunter green back wall behind white floating shelves is one of the most pinned closet aesthetics on Pinterest right now. The contrast makes white shelving pop, creates a “boutique dressing room” effect, and costs under $50 in paint. It’s a high-visual-impact change for minimal effort and budget.
Convert a Spare Room or Closet Into
a Full Walk-In on a Budget
You don’t need a large dedicated space to have a walk-in closet experience. A standard 8×8-foot bedroom can become an incredible personal dressing room with the right storage density plan. The trick is maximizing all four walls and adding a small center bench or ottoman that doubles as a storage base. This configuration can hold an average adult’s entire wardrobe in a space smaller than most bathrooms.
Start by lining three walls with modular shelving, leaving the fourth wall for a door and mirror. Use the corners strategically: corner units, rotating carousels, or simply angled shelves can recover dead corner space that’s wasted in most closet designs. A single 8×8 room, fully fitted, typically runs $600–$1,200 for materials when DIY versus $4,000–$8,000 for a professional custom install. That’s a significant saving for a weekend of work.
🏠
Real-World Story
Elena in Brooklyn converted her smallest bedroom (7×8 feet) into a walk-in closet for under $800. She used IKEA PAX for two walls, painted the remaining two in deep charcoal, added LED strips under shelves, and bought a $150 upholstered bench for the center. “It’s the first room in my apartment I actually want to show people,” she told Apartment Therapy. Her total project time: one weekend.
Conclusion:
The best DIY walk in closet ideas aren’t about spending more they’re about planning smarter. When you start with a zone map, invest in adjustable systems, optimize your lighting, and design around your actual wardrobe (not your aspirational one), the result is a space that works for you every single day.
A well-executed DIY walk-in closet project can genuinely transform your mornings, reduce daily stress, and make you fall back in love with the clothes you already own. The materials are affordable, the skills required are minimal, and the payoff is immediate.
Pick one idea from this guide and start this weekend. You don’t need to tackle all eight at once. A single well-placed lighting upgrade or a dedicated shoe wall is enough to change how the space feels and once you see the difference, you won’t be able to stop.
Trend Analysis
Trend Analysis: Walk-In Closet Design in 2026 and Beyond
The DIY closet space is evolving fast. Here are the most significant trends shaping how people are designing and building walk-in closets right now and where the market is heading over the next two to three years.
2026 Now
Dressing Room Aesthetic
Closets are being designed like retail boutiques with ambient lighting, color-coordinated hanging arrangements, and curated display sections. Instagram and Pinterest are driving this shift heavily.
2026 Now
Sustainability-First Materials
Bamboo shelving, reclaimed wood accents, and low-VOC paints are increasingly preferred. Buyers are scrutinizing material sourcing even for personal spaces.
2027–2028
Smart Closet Integration
App-connected LED systems, RFID clothing tags, and smart mirrors with outfit-suggestion AI are entering the consumer market. Early adopters are already experimenting with prototype systems.
2027–2028
Minimalist Capsule Approach
As fast fashion faces backlash, closets are being designed for fewer, better items with intentional negative space, premium hangers, and display-quality storage becoming mainstream.
User behavior is also shifting: people are investing in closets before other rooms because they interact with the space daily. The ROI on a well-designed closet in time saved, stress reduced, and morning routine efficiency is arguably higher than any other home organization project.
Expert Insights & Practical Tips
These are the strategies that separate good DIY closet projects from great ones. Most are learned through experience rather than instruction manuals
- Audit before you build: Do a full clothing audit before installing any shelving. Remove everything, keep only what you love and actually wear. Your storage system should fit your real wardrobe, not an aspirational one.
- Plan for your worst day, not your best: Don’t design for when everything is perfectly put away. Design for a busy Tuesday morning when things need to be found in 10 seconds. This changes decisions like drawer depth, label placement, and rod heights.
- Use adjustable shelving everywhere you can: Your needs change. A fixed shelf for folded sweaters becomes useless if you switch to hanging everything. Pay a little more for adjustable systems upfront and save yourself a rebuild in two years.
- Install one more power outlet than you think you need: You’ll use it for a steamer, lighting, phone charging, or a mini-iron station. The cost to rough one in during a remodel is minimal. Retrofitting one later is not.
- Standardize your hangers immediately: Matching velvet hangers are a $20 investment that makes any closet look twice as organized overnight. The visual noise from mismatched plastic hangers is significant and easily solved.
- Consider the floor plan of your morning routine: If you get dressed on the left side of the bedroom, put your most-used items on the closet’s left wall. Micro-optimizing for your actual behavior patterns saves minutes that compound into significant time over a year.
Long-Term Strategy & Closet Sustainability
A well-built DIY walk-in closet should last 10–15 years without major overhauls. The key to long-term success is modular thinking: design every component to be moved, adjusted, or replaced independently rather than as a fixed unit.
Invest in quality for the elements that are hardest to change the wall-mounted tracks, the primary shelving frames, the lighting infrastructure. These are your load-bearing decisions. Spend less on the elements that are easy to swap: baskets, drawer dividers, hooks, and decorative accents. This approach means you can refresh the look of your closet for $50–$100 every year or two without touching the structure.
From a sustainability standpoint, buying quality modular systems keeps them out of landfill. IKEA PAX units, for example, have an active resale market. If you move or redesign, they can be disassembled and sold rather than discarded. This is both financially and environmentally smarter than cheap fixed shelving that ends up in a skip.
Future Predictions & Innovations
The next three to five years will see closet technology and design converge in ways that will feel remarkable in hindsight.
AI-assisted outfit planning: is moving from app to hardware. Smart mirrors LCD displays embedded in mirror glass will show outfit suggestions based on your calendar, weather, and past wear patterns. Several startups are already bringing sub-$500 smart mirror units to market, putting this technology in reach for everyday consumers.
RFID clothing organization: may sound futuristic, but the technology already exists and is being tested by early adopters. Tiny RFID tags sewn into garments communicate with closet sensors to tell you what you own, when you last wore each item, and what needs cleaning. For people with large wardrobes, this is transformative.
Modular closet ecosystems: where shelving, lighting, sensors, and ventilation are sold as an integrated smart system are coming from major players. IKEA has already tested smart home integration with PAX. Expect full closet ecosystem products from 2027 onward that make the current piecemeal approach feel antiquated.
Common Mistakes & Hidden Gaps
These mistakes are made constantly by beginners who rush in, and by intermediate DIYers who think they know better. Avoiding them will save you significant money, time, and frustration.
- Ignoring ceiling height: Most closet planning assumes 8-foot ceilings. If you have 9 or 10-foot ceilings, you’re leaving 12–24 inches of high-value storage completely unused. Install upper shelves on a sliding library ladder track to access them beautifully.
- Buying everything before measuring twice: The classic DIY mistake. Measure your room in three places horizontally (floor, mid-wall, ceiling) walls are rarely perfectly parallel. Even a 0.5-inch discrepancy can mean a unit doesn’t fit where you planned.
- Forgetting about ventilation: Clothes need airflow to stay fresh. Avoid fully enclosed cabinets for everyday items unless you add ventilation gaps or use wire-front doors. This is especially important in humid climates.
- Skipping the edit phase: Installing a beautiful system and then cramming it with everything you own defeats the purpose. The closet should have 20% empty space at all times. This is the buffer that keeps it functional.
- Using the same hanging height for everything: Short-sleeve shirts, long coats, and folded pants all need different clearances. One-size-fits-all rod height is one of the most common beginner mistakes.
- Underestimating the importance of a full-length mirror: A walk-in closet without a full-length mirror forces you to leave the space to check your appearance, breaking the workflow entirely. Even a $25 door-mounted mirror solves this completely.
FAQ’s About DIY Walk In Closet Ideas
How much does a DIY walk-in closet cost?
A basic DIY walk-in closet using wire shelving costs $150–$300. A mid-range project with modular units (IKEA PAX or similar) typically runs $400–$900. A premium DIY build with custom-look components, quality lighting, and accessories can reach $1,500–$2,500 still far below a professional custom closet install at $3,500–$10,000+.
What is the minimum size for a walk-in closet?
A functional walk-in closet needs a minimum of 5×5 feet (25 sq ft) to allow access on three walls. For a couples’ shared walk-in with a center island, 8×10 feet is considered the comfortable minimum. Anything smaller is typically a reach-in or a deep single-wall closet rather than a true walk-in.
Can I convert a spare bedroom into a walk-in closet?
Absolutely and this is one of the best uses of an underutilized spare bedroom. Line the walls with modular shelving, add appropriate lighting, and you’ll have more closet space than most custom homes. The key is ensuring the room has adequate ventilation and at least one power outlet for lighting and small appliances.
What shelving system is best for a DIY walk-in closet?
IKEA PAX is the most popular for its price-to-quality ratio, huge accessory range, and excellent resale value. Elfa from The Container Store is better for non-standard sizes and slightly more refined aesthetics. Rubbermaid FastTrack wire shelving is the most budget-friendly and easiest to install, ideal for utility-focused closets.

Rameen Zara is the founder of Clarity Nooks, bringing over five years of experience in home décor and interior styling. She shares simple yet practical design ideas that suit real homes and everyday living. Her approach focuses on cozy aesthetics, soft color palettes, and natural textures that create warm, inviting spaces.


