

DIY Laundry Room Ideas: Easy Makeovers for a Clean, Functional Space
“Your laundry room is probably the most neglected space in your entire home. It’s cramped, cluttered, and about as inspiring as a Tuesday morning. But here’s the thing a few targeted DIY upgrades can transform it into one of the most functional, even enjoyable, rooms you own. You don’t need a contractor. You don’t need $10,000. You need the right ideas.“

Most people spend an average of 8–10 hours per week in or around their laundry room. That’s more time than you spend in your formal dining room, yet it gets a fraction of the design attention. This guide covers 12 proven DIY laundry room ideas from budget-friendly storage hacks to smart utility upgrades with real examples, practical costs, and the kind of detail that actually helps you get started.
Whether you’re working with a dedicated laundry room, a closet conversion, or a shared multi-purpose space, these ideas are scalable and actionable. Let’s get into it.
What are the best DIY laundry room ideas?
The best DIY laundry room ideas include installing floating shelves for vertical storage, adding a folding station over the washer/dryer, using pegboards for tool and supply organization, building a simple pull-out ironing board cabinet, and repainting walls in a light, moisture-resistant finish. These upgrades are low-cost and high-impact.
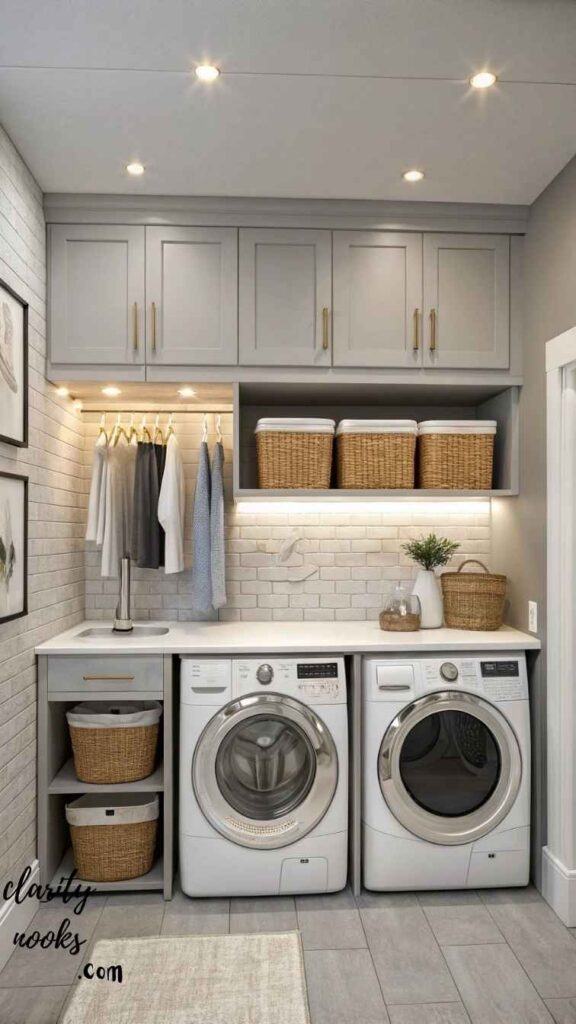
Build a Floating Shelf System Above the Machines
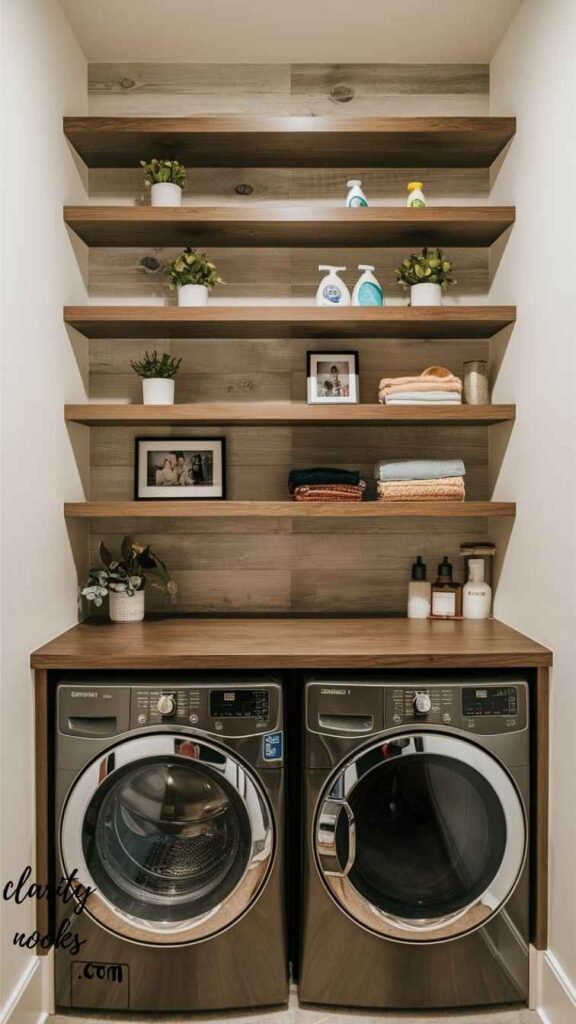
The vertical space above your washer and dryer is prime real estate that most homeowners completely ignore. Installing floating shelves using simple 2×10 pine boards, L-brackets, and wall anchors creates meaningful storage for detergents, fabric softeners, dryer sheets, and more. Total material cost typically runs $40–$80, depending on shelf length and finish.
The key is to mount shelves at least 18 inches above top-loading machines (12 inches for front-loaders) so lids and doors can open freely. Use closed-back baskets on upper shelves to keep the look clean and prevent items from falling. A finish of white or light wood immediately makes the area feel intentional rather than improvised.
Real-world scenario:
A homeowner in a 1,100 sq. ft. apartment installed a two-tier floating shelf system using IKEA Ekby brackets and pine boards in a single afternoon. The result added 14 linear feet of usable storage and eliminated the cluttered floor pile that had accumulated over two years. Total cost: $63.
Must Read: DIY Dressing Table Ideas for a Cozy and Functional Bedroom Makeover
Create a DIY Folding Station with a Countertop
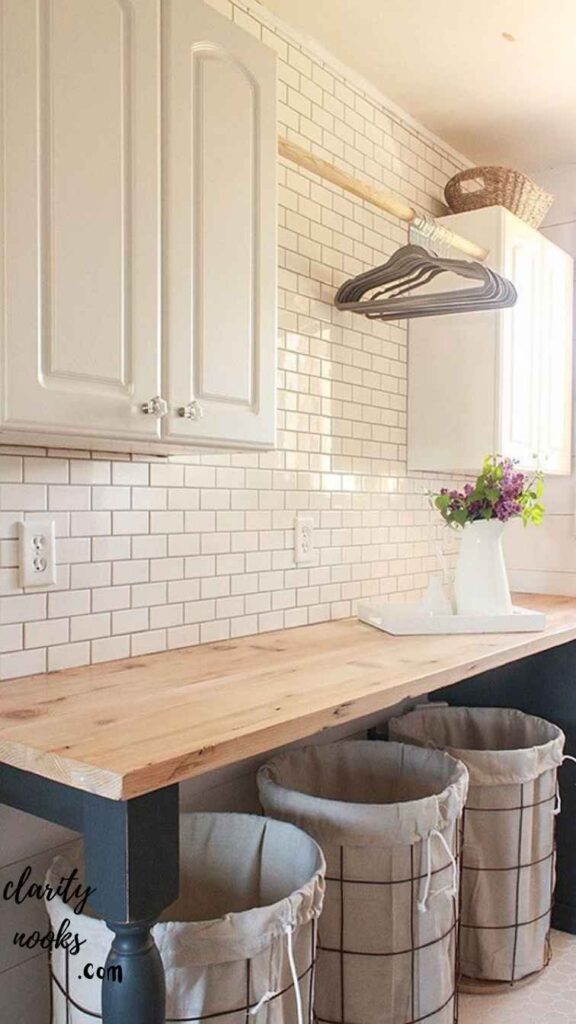
The absence of a flat folding surface is the number one frustration in small laundry rooms. A simple countertop cut to fit and mounted on the wall or directly over a front-load washer and dryer changes your entire workflow. Butcher block, laminate countertop offcuts, or even a solid-core interior door cut to size are all excellent, budget-friendly options.
For front-loaders, purchase or build a simple surround cabinet that holds both machines side by side, then lay your countertop across. For top-loaders, mount a fold-down countertop on the adjacent wall using heavy-duty piano hinges. When not in use, it folds flat. When you need it, it folds down. This single upgrade saves you from folding on your bed or kitchen table forever.
Don’t Skip: DIY Library Room Ideas: Modern, Aesthetic & Functional Home Library Designs
Install a Pegboard Wall for Supplies and Tools
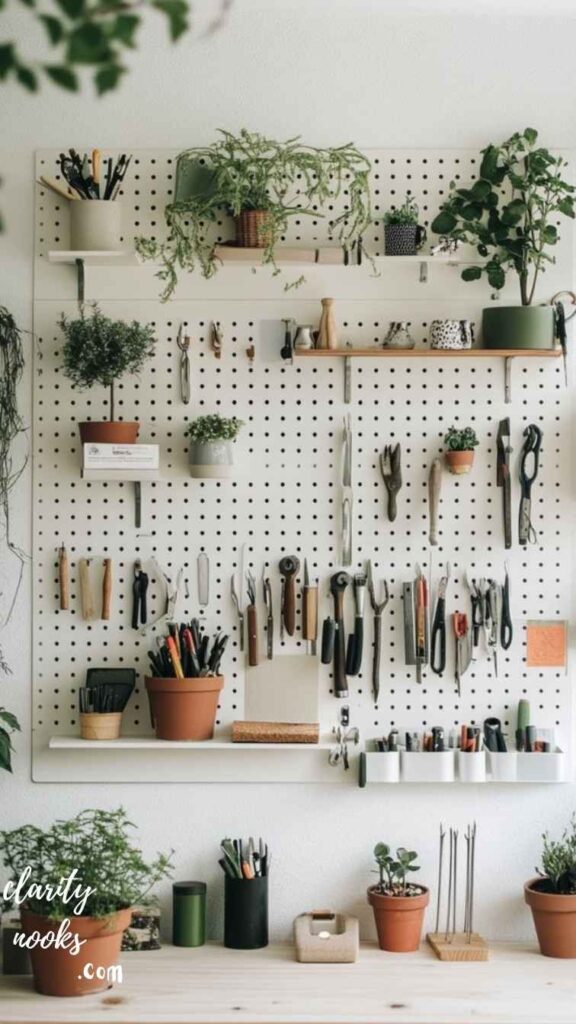
Pegboards aren’t just for garages. A painted pegboard panel installed on one laundry room wall gives you an infinitely reconfigurable storage system for cleaning brushes, spray bottles, small bins, lint rollers, and hanging items. A 4×4 foot panel costs about $25–$35 at any hardware store and installs in under an hour.
The smartest approach: paint the pegboard to match your wall before mounting, then use matching or contrasting hooks and bins for a cohesive look. Organize by category cleaning supplies on one section, laundry accessories on another. Unlike fixed shelving, you can reorganize a pegboard as your needs change, which makes it a long-term investment in flexibility.
Also Read: DIY Flower Garden Ideas That Bring Natural Beauty to Any Home
Add a Built-In Pull-Out Ironing Board Cabinet
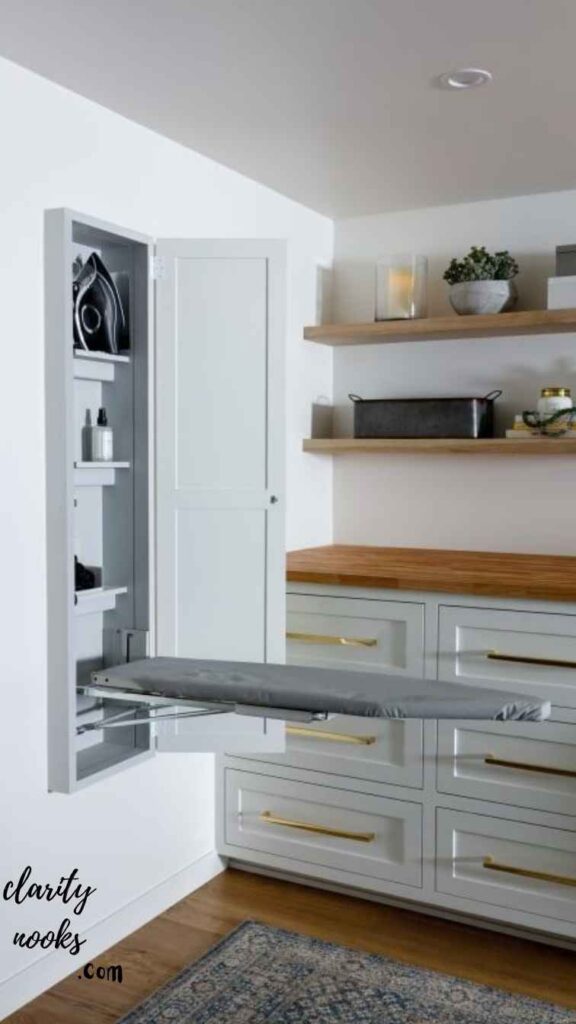
A freestanding ironing board takes up precious floor space and is awkward to store. A recessed or cabinet-mounted pull-out ironing board solves both problems permanently. You can purchase a prefab unit from companies like Hafele or Rev-A-Shelf for $120–$250, or build a simple cabinet version using plywood and a standard replacement ironing board pad.
Recessing one into the wall between studs is the most elegant solution it disappears completely when not in use. If wall modification isn’t feasible, a surface-mounted cabinet with a fold-out board works nearly as well. Either way, you reclaim floor space and eliminate the daily hassle of setup and breakdown.
How do I add a folding board in a small laundry room?
Install a wall-mounted pull-out ironing board cabinet. Surface-mount models require no wall modification and fold flat when not in use, saving significant floor space in closet-sized laundry rooms.
Use a Rolling Utility Cart for Portable Storage
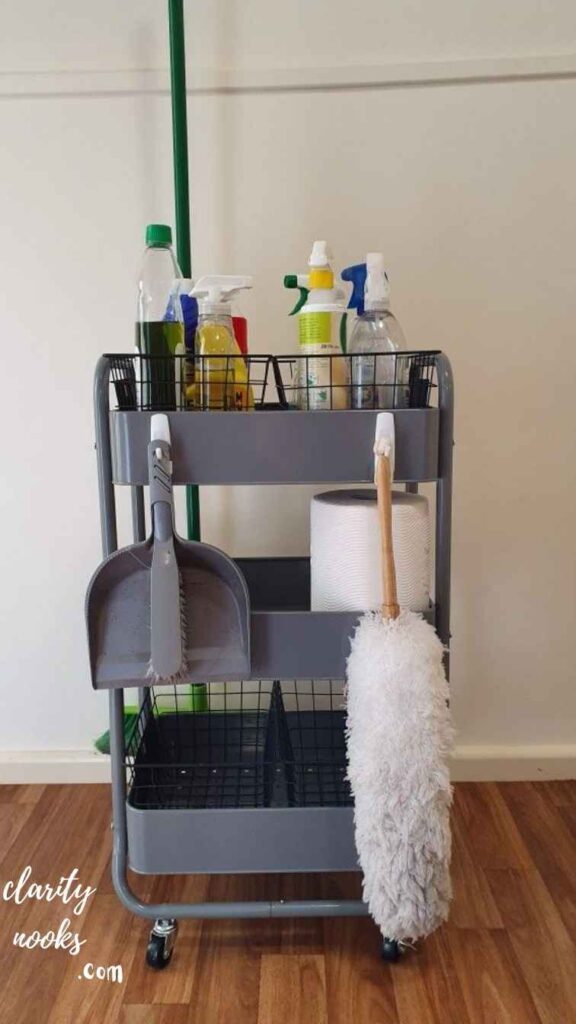
Not every laundry room has enough wall space or a favorable layout for fixed shelving. A rolling utility cart stainless steel or powder-coated metal fills gaps between machines and walls, slides out when needed, and tucks back when not in use. The slim models (typically 4–6 inches wide) are specifically designed for this exact gap.
Stock it with: detergent pods, dryer balls, stain remover sticks, spare hangers, and a lint roller. Because it rolls freely, it also doubles as a mobile helper when doing laundry throughout the house. Models run from $30 to $80 on Amazon or IKEA, and require zero installation.
Don’t Miss: Budget-Friendly DIY Media Wall Ideas to Upgrade Your Space
DIY a Laundry Sorting System with Multiple Hampers
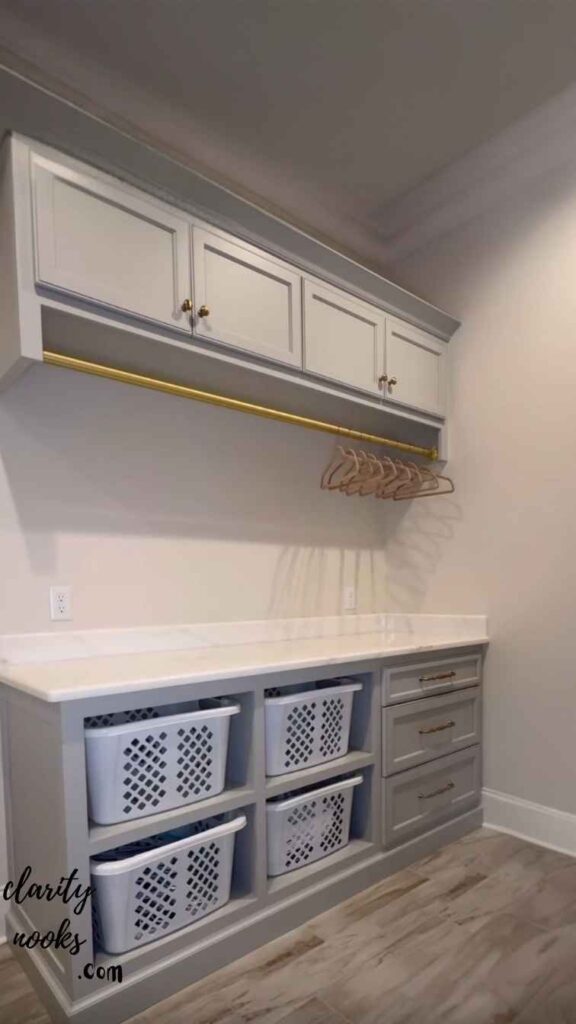
Pre-sorting laundry is the single biggest time-saving habit in laundry management but it requires a system. A simple DIY frame built from 2×4 lumber can hold three canvas hampers side by side (darks, lights, delicates) in a footprint of about 36 inches wide by 18 inches deep. Add a simple label above each bin, and sorting becomes automatic for every household member.
For wall-mounted versions, install three canvas tote bags on individual hooks at chest height. This keeps the floor clear entirely. For a more polished look, wooden crate dividers or a repurposed wine rack with large canvas liners creates a designer look at a fraction of the cost.
Mini case study:
A family of five built a three-bag laundry sorter from 1×6 pine boards, three canvas grocery bags, and dowel rods for $22. It reduced their average laundry day from 6 hours to under 4, simply by eliminating the sorting step at wash time. They’ve used it daily for over two years.
Paint the Walls a Moisture-Resistant, Uplifting Color
The fastest, lowest-cost transformation available to any laundry room is a fresh coat of paint. But not any paint you need a semi-gloss or satin finish with mold-resistant additives, specifically formulated for high-humidity environments. Brands like Zinsser Perma-White or Sherwin-Williams Emerald Interior are excellent choices.
Color matters more than most people realize. Bright whites and warm off-whites (like Benjamin Moore’s White Dove) make small spaces feel larger. Sage greens, soft blues, and warm taupes add personality without overwhelming. Avoid flat finishes and dark colors in small, windowless rooms they absorb light and make the space feel even smaller.
Read More: DIY BBQ Patio Ideas That Turn Your Backyard Into a Party Spot
Install Proper Task Lighting
(Not Just an Overhead Bulb)
Standard laundry rooms get a single overhead light which creates shadows, makes it hard to spot stains, and drains energy. Upgrading to LED recessed lighting combined with under-shelf puck lights costs $60–$120 and transforms your ability to see what you’re doing. This is especially important for pre-treating stains and matching socks.
For renters who can’t modify ceiling fixtures, plug-in under-cabinet LED bars (available for under $30) mount with adhesive strips and plug into any standard outlet. Natural daylight-spectrum bulbs (5000K–6500K) are ideal for color accuracy when sorting laundry by color or checking for stains that need pre-treatment.
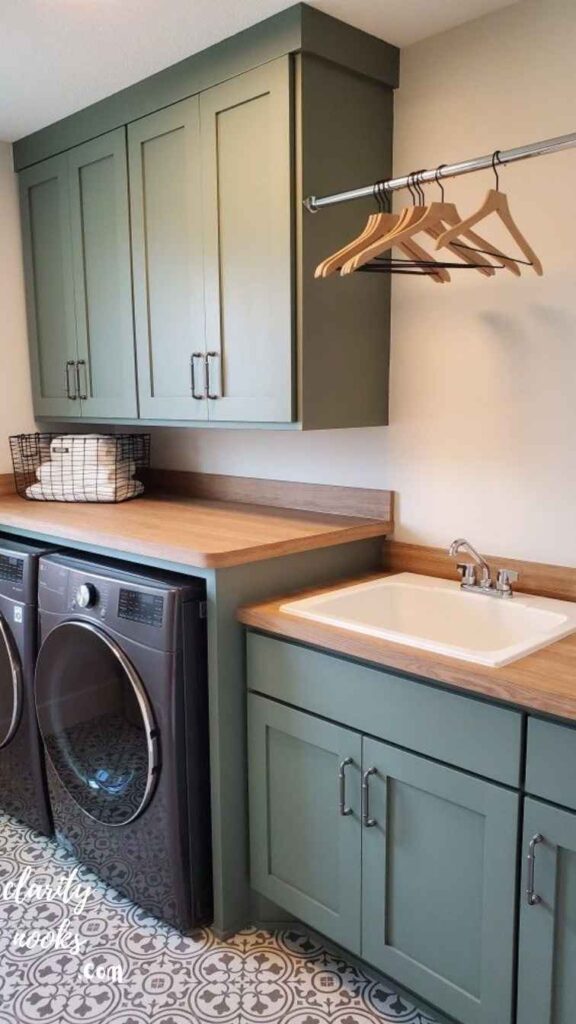
Build a DIY Drying Rack System
A wall-mounted retractable drying rack is one of the smartest investments for any laundry room. When extended, it gives you multiple bars to hang delicates, hand-washables, and items that can’t go in the dryer. When retracted against the wall, it’s virtually flush and takes up zero floor space. Pre-built units from IKEA or Amazon cost $30–$60.
For the DIY version, mount three 1-inch wooden dowels into a hinged wooden frame using ¼-inch drill holes. The frame swings away from the wall for use and folds back against it when done. Finish with white paint or clear varnish. This project takes about two hours and costs roughly $20–$30 in materials.
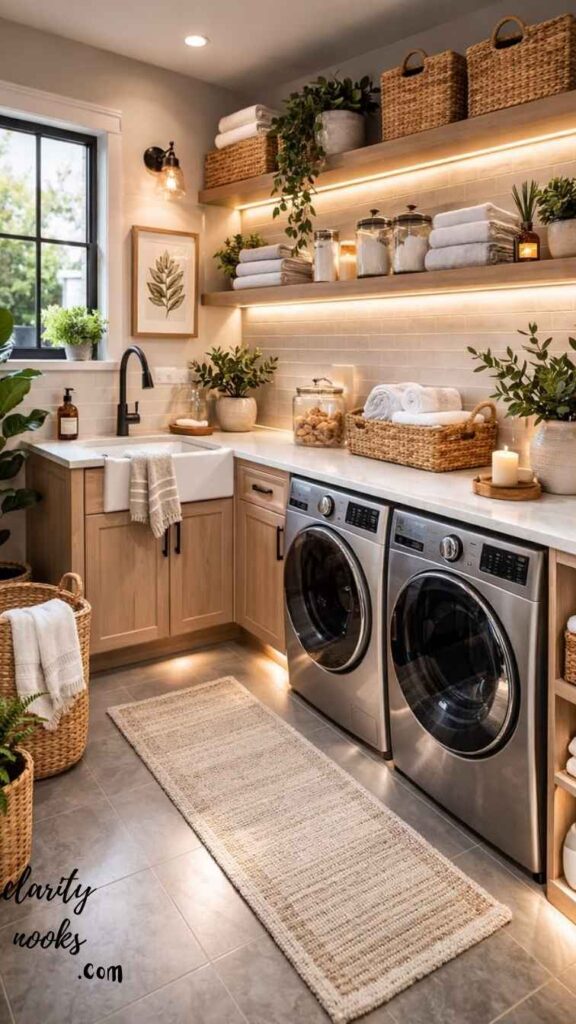
Add Open Shelving with Labeled Bins and Baskets
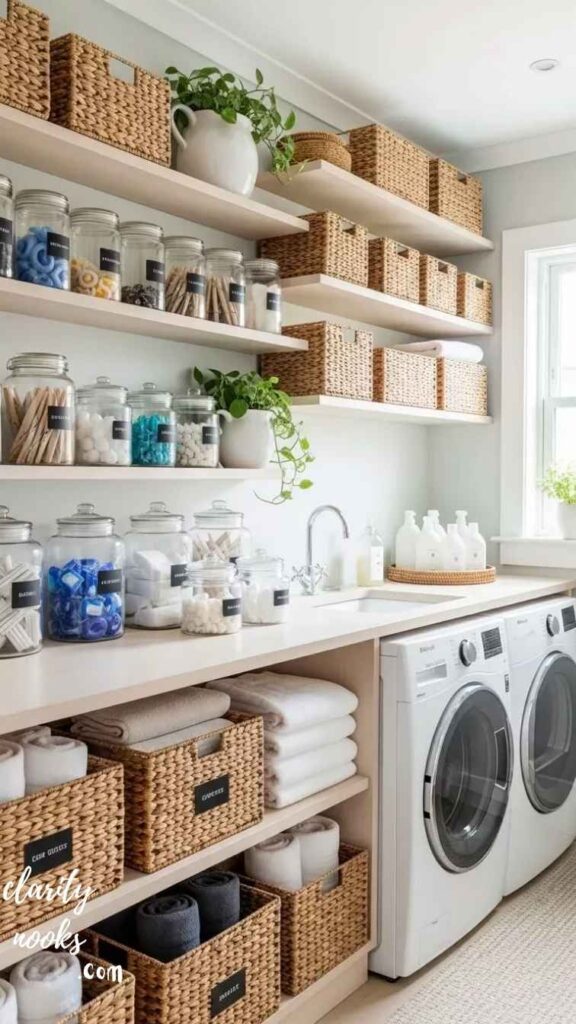
Open shelving with clearly labeled storage bins eliminates the guesswork from laundry tasks and creates a visually clean, organized environment. Wire shelving (ClosetMaid or Rubbermaid) is the most durable and affordable option it doesn’t trap lint, allows airflow, and is easy to install with basic tools. A 6-foot section with two shelves typically costs under $60.
Use white or natural rattan baskets to hold: dryer sheets, clothespins, spare hangers, cleaning cloths, and seasonal items. Print labels on a home printer, laminate them, and attach with a small clip or adhesive Velcro strip. The visual clarity this creates isn’t just aesthetic it genuinely saves time during a task most people already find tedious.
Add a Utility Sink
(Even as a Rental-Friendly DIY)
A utility sink is a game-changer for pre-treating stains, hand-washing delicates, and rinsing muddy items before they go in the machine. If your laundry room already has a water line nearby, adding a laundry sink is a straightforward plumbing project for a confident DIYer typical costs run $150–$400 including sink, faucet, and supply lines.
For renters or those without plumbing access, a portable wash basin on a rolling cart with a drain hose that extends to a floor drain or bathtub is a practical workaround. It’s not permanent, but it brings 90% of the utility sink benefit with zero modification required.
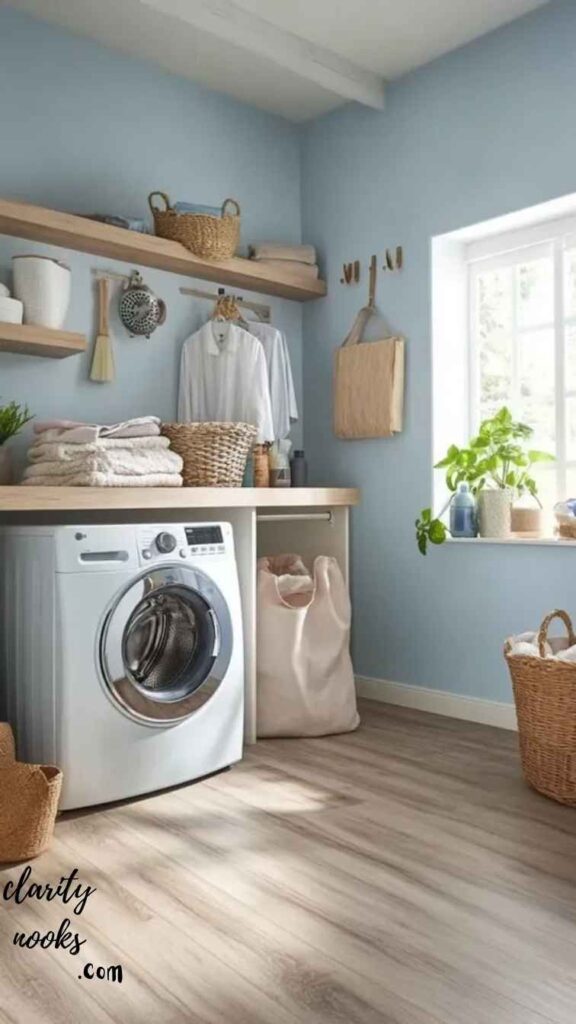
Style the Space with Plants, Art, and Textiles
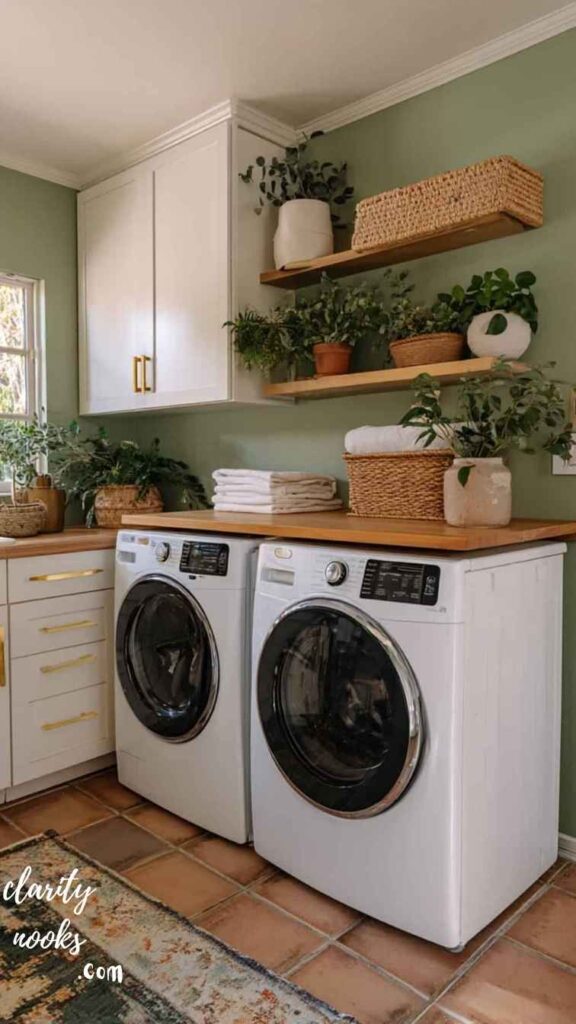
This idea gets almost no attention from competitors, but it’s one of the highest-impact changes you can make. Styling your laundry room as a real room not a utility closet changes how you feel about spending time there. A small potted plant (pothos and snake plants thrive in humid environments), a framed print on the wall, and a washable rug on the floor cost under $50 total.
A lidded laundry basket that looks like a woven bin, a small window treatment, and matching containers for supplies make the space feel curated. When a space feels pleasant, you’re more likely to maintain it. The psychology here is real people take better care of spaces they find appealing. That’s not fluff. That’s behavioral science applied to home design.
📦
Floating Shelves
Vertical storage above machines. ~$40–$80 DIY.
🗂️
Folding Station
Countertop over front-loaders or fold-down wall mount.
🔩
Pegboard Wall
Reconfigurable supply storage. ~$25–$35.
🧺
Sorter System
3-hamper frame cuts laundry day by 30%+.
💡
Task Lighting
LED under-shelf lights for stain detection.
🌿
Style the Space
Plants, art, textiles under $50 total.
Conclusion:
Your laundry room doesn’t have to be a space you dread. With the right DIY laundry room ideas from floating shelves and folding stations to smarter lighting and thoughtful styling you can build a room that’s efficient, organized, and genuinely pleasant to work in. The biggest wins are almost always the simplest: better storage, better lighting, and a surface to fold on.
You don’t need a renovation budget or a contractor. You need a Saturday afternoon, a hardware store run, and the right plan. These 12 ideas give you exactly that.
Trend Analysis
Trend Analysis: 2026 and Beyond
Laundry room design is undergoing a quiet revolution. Homeowners are no longer tolerating utility-grade spaces, and the data reflects it Pinterest searches for “laundry room makeover” have grown over 200% in the past three years, while searches for “laundry room aesthetic” have surpassed “kitchen organization” in several demographics. The room is finally getting the attention it deserves.
| Trend | Timeline | What It Means for DIYers |
| Laundry room as “wellness room” | 2026–27 | Adding aromatherapy diffusers, plants, ambient light, and calm color palettes to reduce task-associated stress |
| Smart appliance integration | 2027–28 | WiFi washers/dryers with app control are going mainstream; future rooms need outlet placement and ventilation planning |
| Multi-use laundry/mudroom hybrids | 2025–28 | Reclaimed wood shelves, recycled-content tiles, and low-VOC finishes are becoming default, not premium |
| Sustainable material choices | 2026+ | Reclaimed wood shelves, recycled-content tiles, and low-VOC finishes are becoming default, not premium |
| Concentrated/zero-waste detergents | 2026–28 | Smaller storage footprints needed for pods and strips vs. liquid jugs changes how shelving gets designed |
Looking ahead to 2027–2028, the integration of AI-powered appliances will start shaping physical room design. Machines that diagnose their own maintenance needs, communicate with your home network, and auto-order supplies will need dedicated device charging stations, improved ventilation, and potentially, wall-mounted displays. Designing your laundry room with a single available outlet in mind will look quaint within five years.
Practical Tips and Expert Insights
These aren’t generic suggestions they come from the kinds of problems that actually derail DIY laundry room projects.
📐
Measure twice, anchor into studs: Floating shelves loaded with laundry supplies can weigh 30–50 lbs. Never rely on drywall anchors alone for shelves above machines. Use a stud finder and hit at least two studs per bracket it’s the difference between safe and dangerous.
🌡️
Treat moisture before you decorate: Dryers expel warm, humid air. If your ventilation is inadequate, mold will undo every upgrade within a year. Before any cosmetic project, check that your dryer vent is clean, fully connected, and vents outdoors not into a crawlspace or wall cavity
📋
Start with a use-case audit: Before buying anything, spend one week writing down every task you perform in or near the laundry room. Then design storage around those tasks not around what looks good on Pinterest. Function should drive form, especially in small spaces.
🎨
Prime before you paint in high-humidity rooms Skip the primer and your fresh paint will peel within 18 months in a humid laundry environment. Use a dedicated moisture-blocking primer (Zinsser BIN or Bulls Eye 1-2-3) before applying your topcoat, regardless of what the paint label says.
💰
Batch your purchases at the end of each quarter: Home improvement retailers (Home Depot, Lowe’s, IKEA) run consistent 15–25% off sales on storage and organization products in January, June, and September. If your timeline is flexible, batching your purchases around these windows can save $80–$150 on a medium-sized project.
Long-Term Strategy and Sustainability
The smartest DIY laundry room projects are ones you don’t have to redo in three years. Choosing materials that last solid wood over MDF in humid environments, powder-coated metal over plastic, semi-gloss paint over flat costs 20–30% more upfront but outlasts cheaper alternatives by 5–10 years. That math is straightforward.
From a sustainability standpoint, every upgrade that improves energy efficiency pays for itself over time. Switching from a conventional overhead bulb to LED task lighting saves roughly $35–$50 per year in electricity. Adding proper ventilation reduces appliance wear and extends machine life. Even a well-organized space reduces water and detergent waste by making it easier to run full loads instead of half-loads.
Think modular. The best laundry room storage systems wire shelving, floating bracket shelves, pegboards are all reconfigurable. This means as your household composition changes (kids grow, habits shift, appliances are upgraded), your room’s organization adapts without requiring a full redo. Avoid permanent, fixed cabinetry unless you’re absolutely certain of your long-term layout needs.
Future Predictions and Innovations
The next three years will bring several changes that forward-thinking DIYers should anticipate now. Steam function washers and heat-pump dryers are becoming the standard and they require different clearances, drainage considerations, and ventilation specs than traditional models. If you’re designing a laundry room today, leave extra space and a floor drain option if at all possible.
AI-assisted laundry where machines identify fabric types via camera, suggest wash settings, and log usage patterns will become a mid-market feature by 2027–2028. This technology won’t require structural changes, but it will need reliable WiFi coverage in laundry areas, which are often dead zones. Running ethernet or installing a dedicated WiFi extender outlet is a future-proof move most people overlook entirely.
What will laundry rooms look like in the future?
Future laundry rooms will integrate smart appliances with app connectivity, require stronger WiFi infrastructure, and blend laundry functions with mudroom and pet-care utility zones. Sustainable materials and energy-efficient lighting will become standard, not premium.
Common Mistakes and Hidden Gaps
Most DIY laundry room guides skip the failure modes. Here’s what actually goes wrong and how to avoid it.
Beginner
Buying storage before measuring
Shelves, carts, and organizers that don’t account for machine dimensions, door clearances, or wall obstacles are the number-one return item in home organization. Always measure your specific space including vent hose clearances before purchasing anything.
Beginner
Ignoring airflow behind machines
Most DIYers push machines as far back as possible to save floor space. Washers and dryers need 4–6 inches of clearance behind them for hoses, vents, and heat dissipation. Blocking this shortens appliance life significantly.
Intermediate
Overloading a single wall with too many systems
Pegboard + floating shelves + hanging rack on the same wall looks chaotic and makes everything harder to reach. Choose one primary system per wall and use a secondary wall for supplementary storage. Clarity over quantity.
Intermediate
Skipping a designated “lost sock” zone
Sounds trivial, but having a small fabric bin or magnetic board for unmatched socks eliminates a genuinely frustrating recurring problem. This is the single most underrated laundry room feature, and nearly zero competitors mention it.
Both
Designing for aesthetics over ergonomics
A beautiful laundry room that puts detergent 18 inches above your head on a shelf, or requires bending to reach the hamper, is a room you’ll resent within a week. Design for the height and reach of every household member who uses the space, then make it look good.

Rameen Zara is the founder of Clarity Nooks, bringing over five years of experience in home décor and interior styling. She shares simple yet practical design ideas that suit real homes and everyday living. Her approach focuses on cozy aesthetics, soft color palettes, and natural textures that create warm, inviting spaces.


