

Budget-Friendly DIY Media Wall Ideas to Upgrade Your Space
“You’ve stared at the same blank wall long enough. A great DIY media wall doesn’t just hide cables it redefines how the entire room feels. Whether you’re working with a tight budget or a full weekend, the ideas below are designed to give you real results, not just inspiration.”
The term “media wall” covers a broad range of built-in or surface-mounted designs that frame a television and integrate storage, lighting, and architectural detail into one cohesive feature. Search intent here is clearly mixed: you want both inspiration and the practical how-to. This guide covers both. Each idea below is followed by material notes, a real-world scenario, and the common pitfall to avoid.
The Floating Shelf Surround
Clean, Modern, Budget-Friendly
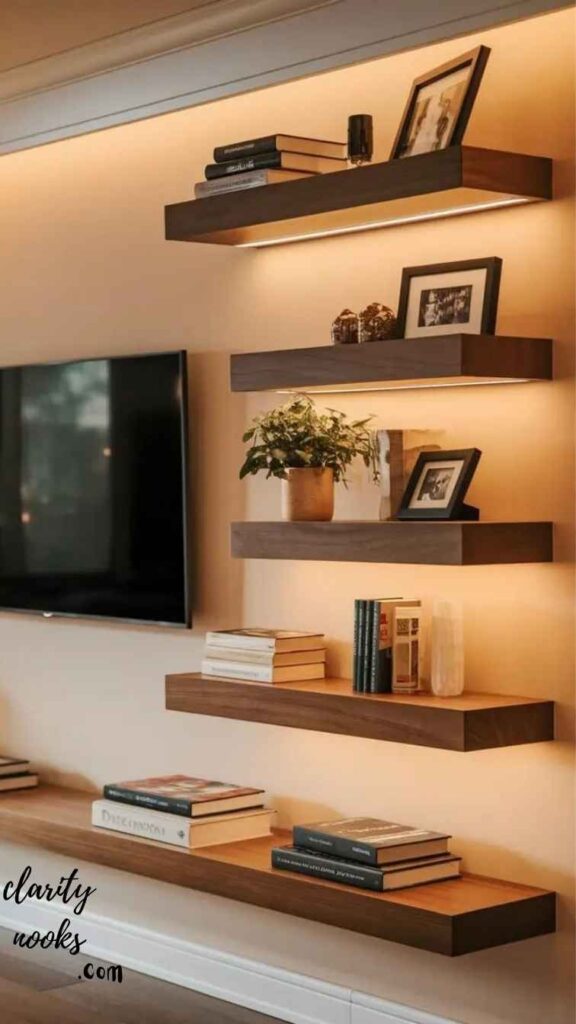
If you want the biggest visual impact for the least money, the floating shelf surround is your answer. You mount the TV directly to the wall and flank it or surround it with floating shelves at varying heights. The asymmetry is intentional: it makes the composition feel designed rather than assembled.
A common real-world version uses three horizontal shelves on one side and a taller vertical unit on the opposite side, creating visual balance without exact symmetry. IKEA LACK shelves, custom MDF cut-to-size from a hardware store, or reclaimed pine all work well. The key is anchoring everything into studs or using proper drywall anchors rated for the weight.
Style tip: leave the shelves intentionally sparse books stacked horizontally, a plant, a speaker, one decorative object. Over-styling kills the minimalist effect this design achieves so well.
Pro Tip: Use a laser level rather than a spirit level for this project. A single degree of slope is invisible until it’s permanent.
Featured Snippet Answer
A DIY floating shelf media wall costs between £80–£350 depending on materials, requires basic tools, and can be completed in a single weekend by one person.
Must Read: Simple DIY Bedroom Interior Ideas for a Stylish and Relaxing Bedroom Makeover
The Full-Panel Wood Slat Wall
Texture, Warmth, and Design Depth
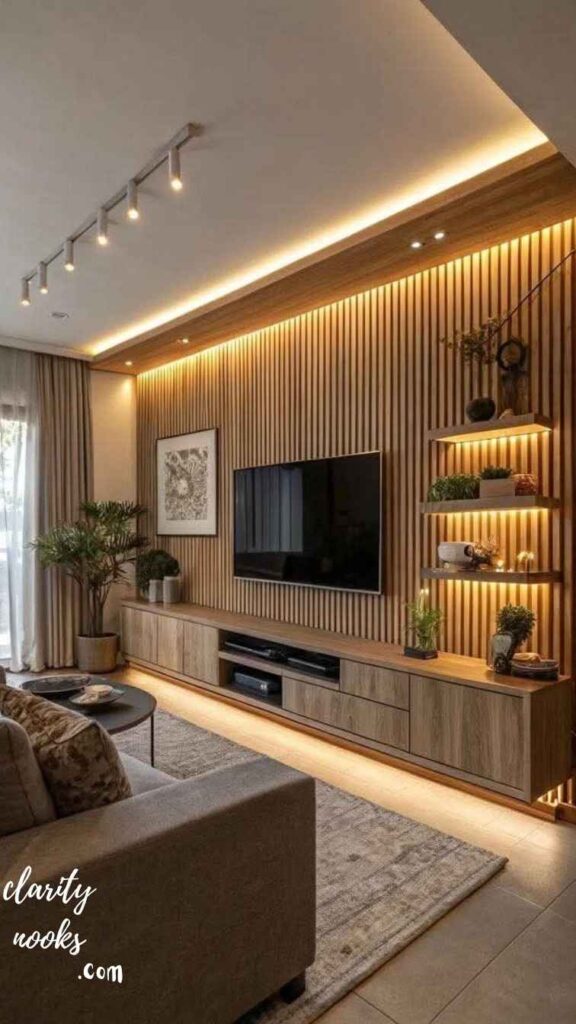
Wood slat panels have dominated interior design Instagram and Pinterest for three consecutive years and for good reason. Thin strips of timber (typically 20–40mm wide) are fixed vertically or horizontally to a backing board or directly onto the wall, creating a ribbed texture that catches light beautifully and adds acoustic dampening to any room.
DIY-wise, you can purchase pre-made slat panel kits (available at most large home improvement retailers) or cut your own from softwood battens. The TV either mounts on a metal bracket that passes between slats or sits on a recessed shelf integrated into the panel. Cable management is straightforward: a vertical channel cut into the backing board routes wires invisibly behind the slats.
A case study worth noting: one homeowner in a 1990s semi-detached house used American white oak veneer slats across the entire chimney breast wall, painted the surround walls in a deep charcoal, and the result read as a custom interior design feature rather than a weekend project.
Pro Tip:
If you’re painting slats rather than using natural wood, use MDF rather than softwood it takes paint with zero grain bleed-through.
Don’t Skip: DIY Home Office Ideas That Actually Work Smart Setups for Every Space and Budget
The Recessed Alcove Build
The Gold Standard of Media Walls
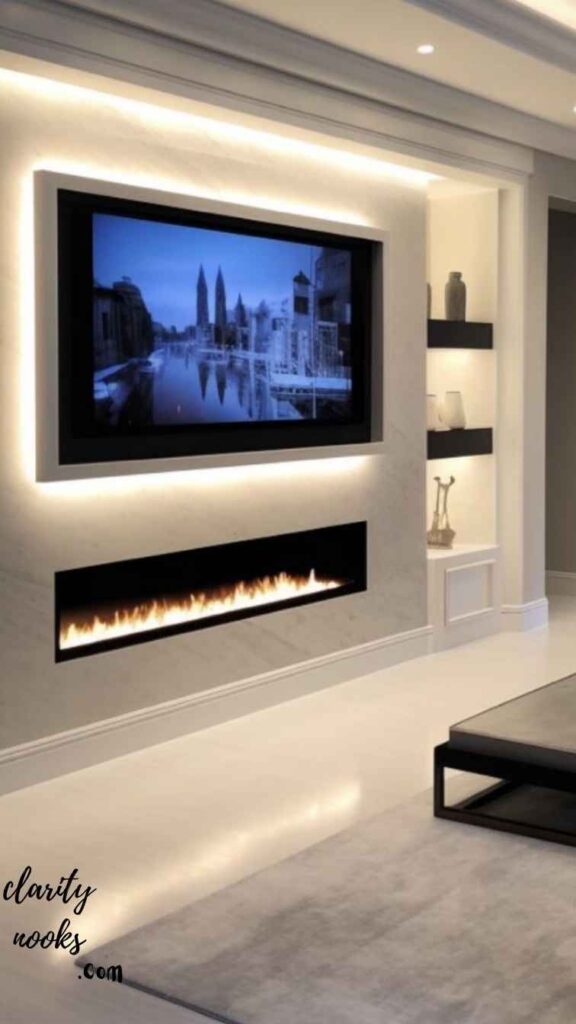
A recessed media wall where the television sits inside a built alcove rather than projecting forward is the most architecturally refined option on this list. It requires more skill and planning than the others, but the result looks like something drawn up by an architect, not sourced from a YouTube tutorial.
The basic construction uses a timber stud frame built out from the wall to a depth of around 100–150mm, clad in moisture-resistant MDF, then decorated to match your wall finish. The TV mounts inside the recess, eliminating the “TV bolted onto wall” look entirely. Below the TV, a lower run of joinery creates integrated storage drawers, doors, or open shelving that completes the built-in effect.
The hidden advantage of this approach is cable management: all wires, media players, and even your router can live inside the lower storage unit, completely invisible. Ventilation slots at the rear prevent heat build-up. This is the one idea on this list where spending an extra £150–£300 on materials is always justified by the result.
Pro Tip:
Line the interior of the recess in a contrasting matte paint colour navy, black, or forest green reads particularly well behind a dark-framed screen.
Don’t Miss: DIY Patio Decor Ideas to Transform Your Backyard on a Budget
The Shiplap & Paint Contrast Wall
Farmhouse Meets Contemporary
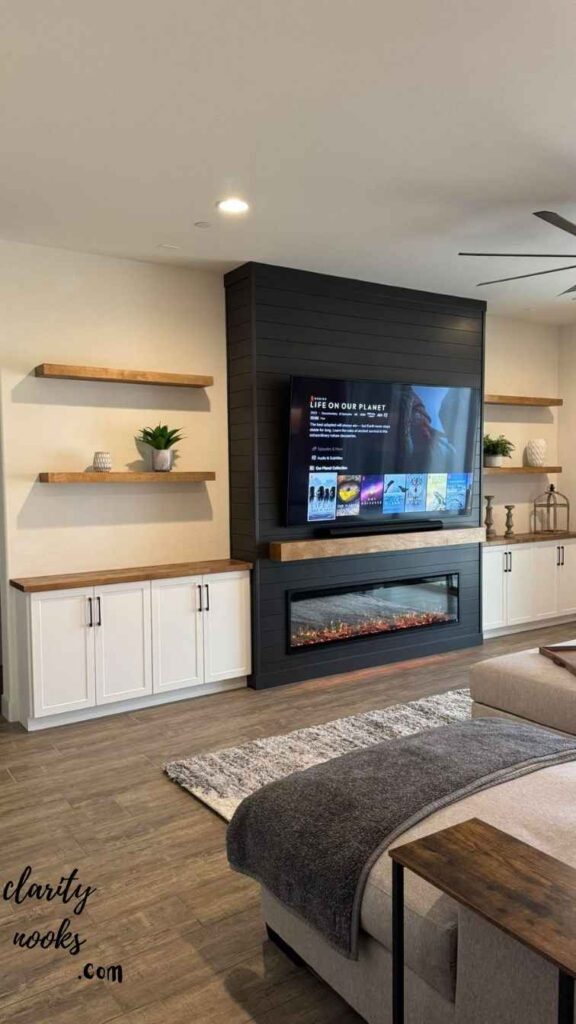
Shiplap horizontal planks with a slight reveal between each board remains one of the most popular DIY media wall techniques precisely because it works across multiple interior styles. Done in white, it reads as relaxed coastal. Done in charcoal or slate grey, it becomes bold and contemporary. Done in natural pine, it leans into a Scandinavian warmth.
The construction couldn’t be simpler: fix horizontal planks (real tongue-and-groove pine, MDF strips, or purpose-cut plywood) to the wall with adhesive and finishing nails, fill nail holes, prime, paint, and mount your TV. The contrast between the texture of the shiplap and the flat screen creates the focal point without any additional elements required.
Where this idea often gets elevated beyond the expected is in the paint choice. A full-wall shiplap in the same colour as the room’s trim, paired with a deeply contrasting accent on the adjacent walls, makes the media wall feel like a deliberate architectural gesture rather than a cladding choice.
Pro Tip:
Use Farrow & Ball, Little Greene, or Mylands for the feature wall paint the depth of pigment in premium paints visibly outperforms budget alternatives at exactly the point in the room where that matters most.
Read More: DIY Wall Painting Ideas for Stylish and Cozy Home Walls
Stone or Brick Veneer Feature Wall
Industrial and Rustic Character
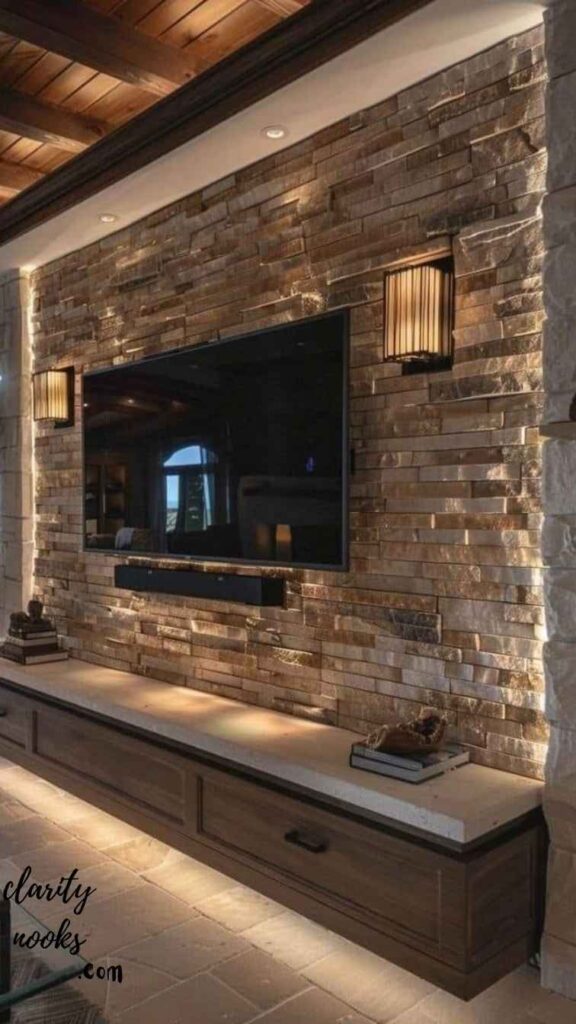
If you want a media wall that looks like it has existed for decades raw, textural, and entirely unlike anything else in the street stone or brick veneer is worth the extra effort. Modern veneer products (thin slices of real or reconstituted stone bonded to a mesh backing) are far lighter and simpler to install than they appear, requiring only tile adhesive and basic tiling tools.
The visual effect is dramatic. A split-face stone veneer in natural slate or sandstone behind a matte-black TV and simple floating oak shelf creates a composition that photographs beautifully and feels premium in person. Brick slips thin-cut real brick faces create a more urban, industrial atmosphere and pair well with exposed metal shelving brackets and Edison-style lighting.
Practical note: the wall behind needs to be flat and sound. Old plaster walls may need a ply backing board before veneer application. Also consider that stone veneer adds real weight check your wall’s substrate before committing to a large run of product.
Pro Tip:
Apply a clear penetrating sealer to stone veneer after installation. It deepens colour, makes cleaning easier, and prevents moisture ingress in rooms with variable temperature.
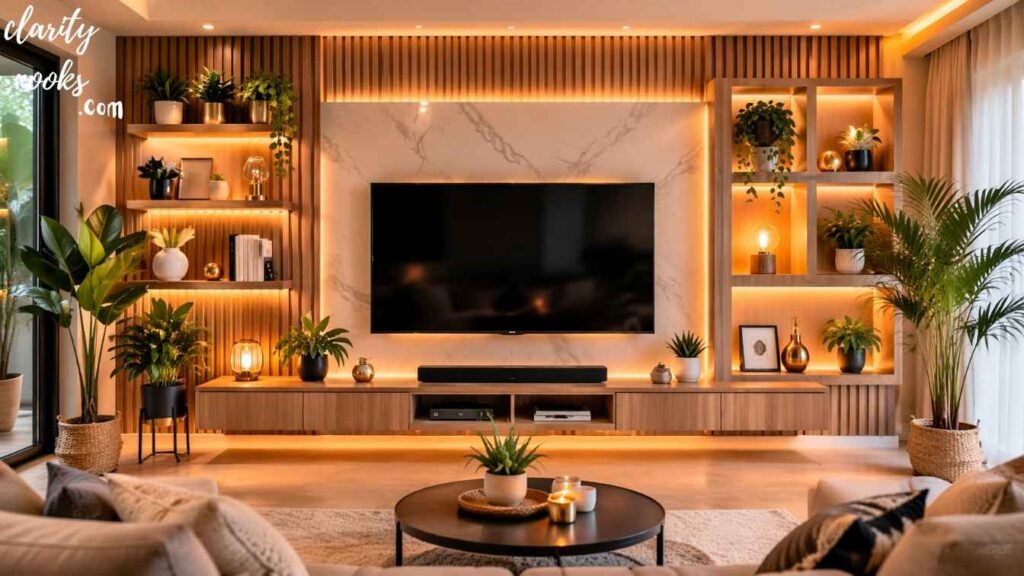
Modular Storage Media Wall
Maximum Function, Fully Customisable

Not every media wall needs to be built from scratch. A thoughtfully configured modular storage system using units from IKEA BILLY/KALLAX, String shelving, or custom-sized modular joinery can produce a media wall that rivals bespoke built-ins at a fraction of the cost. The secret is treating the individual units as raw material rather than finished furniture.
The process involves selecting units that suit your wall dimensions, screwing them together and to the wall, adding plinth boards along the bottom and cornice profiles along the top to integrate the units into a continuous run, and painting everything in a single colour. This “IKEA hacking” technique is well-documented in the design community and, done well, is genuinely indistinguishable from a joinery quote that would cost several thousand pounds.
For media wall use specifically, a central tall unit at TV height flanked by lower cupboard units creates a strong architectural hierarchy. Integrate LED strip lighting inside the tall unit’s upper section for a backlit TV effect that adds perceived depth to the room and reduces eye strain during evening viewing.
Pro Tip:
Always remove handles and replace with push-to-open mechanisms on lower cupboard doors. It makes the design look custom rather than modular, and costs very little.
Conclusion:
A well-executed DIY media wall is one of the highest return-on-investment projects you can undertake in a living room it transforms proportion, adds architectural identity, and solves the cable problem most rooms have lived with for years. Whether you choose the simplicity of a floating shelf surround or the ambition of a full recessed alcove build, the ideas in this guide are designed to produce genuinely professional results with accessible skills and realistic budgets.
Start with the idea that fits your current skill level and expand from there. Most homeowners who complete one media wall project go on to tackle a second, more ambitious one. Pick your idea, plan your materials list, and begin the wall you’re staring at today could look completely different by next weekend.
Trend Analysis
Trend Analysis: 2026 and the Next Two to Three Years
Current Trends
Media wall design is shifting in meaningful ways as homeowners spend more time at home and demand more from their interiors. The dominant trends of 2026 are not passing phases they represent a structural shift in how people think about living room design.
2026 Now
Integrated acoustic panels are replacing purely decorative slat walls NRC-rated felt backing behind timber slats addresses noise and aesthetics simultaneously.
2026–2027
Biophilic media walls featuring live moss panels, planting niches, and natural material combinations are gaining traction in high-specification residential projects.
2027–2028
Smart-integrated media walls with invisible speaker systems (in-wall and in-ceiling), hidden projector ports, and Dolby Atmos wiring built into the initial construction are becoming standard in new-build premium homes.
Emerging
Japandi-influenced media walls combining Japanese minimalism with Scandinavian functionality are emerging as the dominant aesthetic direction, displacing the farmhouse shiplap look that peaked around 2023–2024.
Expert Insights & Practical Tips
From the Field
These are the insights that separate media walls that look good in progress photos from ones that continue to look good five years later.
Always Start With the TV Mount, Not the Joinery
The most common structural mistake is building the joinery first and then trying to mount the TV. The mount location dictates the stud positions, the cable channel routing, and the height of every shelf above and below. Fix the mount bracket to the wall first, confirm the viewing angle from your seating position, then design around it.
LED Bias Lighting Is Not Optional
Bias lighting LED strips affixed to the rear of the TV, projecting onto the wall behind reduces the contrast between screen brightness and the surrounding dark room. This measurably reduces eye fatigue during extended viewing and, as a secondary benefit, makes any media wall look dramatically more polished in evening use. RGBIC LED strips (addressable, responsive to on-screen colour) are now available for under £40 and take 20 minutes to install.
Cable Management Is a First-Fix, Not an After thought
Run conduit behind the wall during construction even if you don’t have all your devices yet. A 50mm oval conduit run from the TV position down to the storage below allows any cable configuration, including future HDMI 2.1 runs for 8K content. Retrofitting cable management into a finished wall is always more expensive and more disruptive than doing it correctly at the start.
Proportion Matters More Than Style
A beautifully executed design in the wrong proportions will still feel wrong. The TV should occupy no more than 60% of the total media wall’s visual width. The height of shelving on either side should not exceed the top edge of the TV. These are not arbitrary aesthetic rules they are proportional relationships that the eye reads as harmonious or discordant before the brain registers why.
Long-Term Strategy & Sustainability
Think Ahead
The best media wall you can build in 2026 is one that doesn’t need to be demolished in 2029 when you upgrade your TV. Build with adaptability as a primary design requirement, not a secondary consideration.
Use full-motion TV brackets, not fixed mounts, even if you don’t currently intend to move the screen. TV sizes increase over time the 55-inch screen you have today will likely be replaced by a 65-inch or 75-inch set within a decade, and a full-motion bracket makes size upgrades possible without structural alterations. Similarly, design the central TV void to be 200–300mm wider than your current screen on each side.
On sustainability specifically: choose FSC-certified timber, low-VOC paints, and water-based finishes wherever possible. The media wall is a large surface in a room you spend significant time in the off-gassing of synthetic materials in a closed room has measurable air quality implications. Natural wood oils, chalk paint, and lime-wash finishes are both more sustainable and more durable than their synthetic equivalents.
Future Predictions & Innovations
What’s Coming
The media wall as a category is evolving faster than most areas of interior design, driven by rapid changes in display technology and home automation. Within three to five years, several shifts will become mainstream.
Transparent OLED panels already available at commercial scale will enter the residential market at near-accessible price points. These displays can show content or appear as near-transparent glass, opening entirely new design possibilities where the TV disappears when not in use rather than becoming a black rectangle on the wall. Media wall design will need to accommodate this by treating the TV space as a window rather than a screen frame.
AI-assisted design tools (already embedded in applications like Planner 5D and IKEA’s planning suite) will allow homeowners to photograph their living room and receive a dimensionally accurate media wall design in under 60 seconds, with a shopping list and step-by-step construction guide generated automatically. The skill in media wall design will shift from technical execution to creative direction.
Common Mistakes & Hidden Gaps
Avoid These
Not planning for the future: Building a media wall with a single fixed HDMI cable run limits future flexibility. Install three or four conduit runs at different heights they cost nothing extra during construction and are invaluable later.
Mounting the TV too high: The centre of the screen should be at seated eye level approximately 100–110cm from the floor for standard sofa height. The most common mistake is mounting at standing eye level, which causes neck strain after 20 minutes.
Forgetting heat management: Every AV component generates heat. Enclosing a receiver, streaming device, and games console in a sealed cabinet without ventilation will cause system failures. Design-in ventilation openings or active cooling from the beginning.
Using the wrong fixings: A 65-inch TV weighs 25–30kg. A plasterboard anchor that is not rated for that load is a safety risk, not just a DIY error. Always locate studs or use specialist toggle anchors rated to at least 3× the required load.
Neglecting the floor plane: A media wall that stops at the floor without a plinth, baseboard, or transition detail looks unfinished. The bottom edge of your joinery needs the same level of detail as the rest of the installation.
Choosing style over acoustic performance: A bare stone or tile media wall creates significant mid-frequency reflections in a room, making voices on TV sound harsh and reverberant. Adding fabric panels, a soft rug, or upholstered elements nearby is not optional in hard-surfaced rooms.
FAQ’s About DIY Media Wall Ideas
How much does a DIY media wall cost on average?
A basic floating shelf media wall runs £80–£200 in materials. A full wood slat panel wall with integrated shelving and cable management typically costs £300–£700. A recessed alcove build with painted joinery and integrated lighting ranges from £600–£1,500 depending on materials and wall size. Professional installation of equivalent designs costs two to four times more.
Can I build a media wall in a rented property?
Yes, with limitations. Floating shelves on proper anchors are typically acceptable. Full joinery and structural builds are not. The best approach for renters is a freestanding media wall unit floor-to-ceiling modular systems that use ceiling pressure mounts rather than wall fixings can produce a near-identical visual effect with no permanent fixings required.
What is the best wood for a DIY media wall?
MDF is the best choice for painted finishes it is stable, smooth, and takes paint without grain showing. For natural or stained finishes, American white oak, pine, and walnut all perform well. Avoid ramin and other tropical hardwoods without FSC certification. For slat panels, pre-finished panels in teak or ash veneer are widely available and significantly reduce finishing time.
Do I need a permit to build a media wall?
In most residential properties in the UK and US, internal media walls do not require planning permission or a building permit, as they are classified as internal decoration. However, if the build involves structural alterations removing part of a wall, altering load-bearing elements a structural engineer’s sign-off is required. Always check with your local authority if you are unsure.

Rameen Zara is the founder of Clarity Nooks, bringing over five years of experience in home décor and interior styling. She shares simple yet practical design ideas that suit real homes and everyday living. Her approach focuses on cozy aesthetics, soft color palettes, and natural textures that create warm, inviting spaces.


