

Creative DIY Bathroom Mirror Ideas Budget-Friendly to Match Your Interior Style
You open your bathroom door every single morning, and the first thing staring back at you is a plain, uninspiring mirror that does absolutely nothing for your space. Sound familiar? Your bathroom mirror is one of the most looked-at fixtures in your entire home yet most people never think to upgrade it. The good news is you do not have to spend thousands on a bathroom renovation to make a dramatic change.
With the right DIY bathroom mirror ideas, you can transform a boring wall into a focal point that feels custom, intentional, and designer-quality. Whether you are working with a tiny powder room or a spacious double-vanity setup, there is a creative mirror makeover that fits your skill level, your style, and most importantly your budget.
In this guide, you will discover practical, budget-friendly DIY mirror ideas for bathrooms complete with materials, step-by-step directions, estimated costs, and decorating tips. We have also included advanced insights on upcoming trends, expert advice, and the most common mistakes people make when tackling this project. Let’s get started.
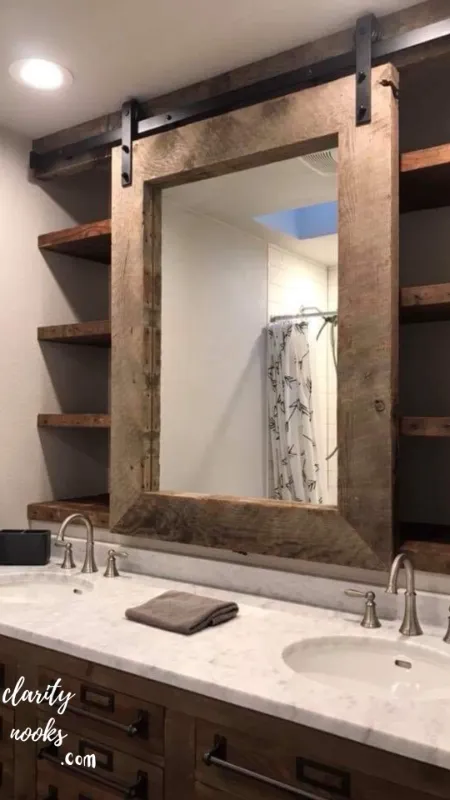
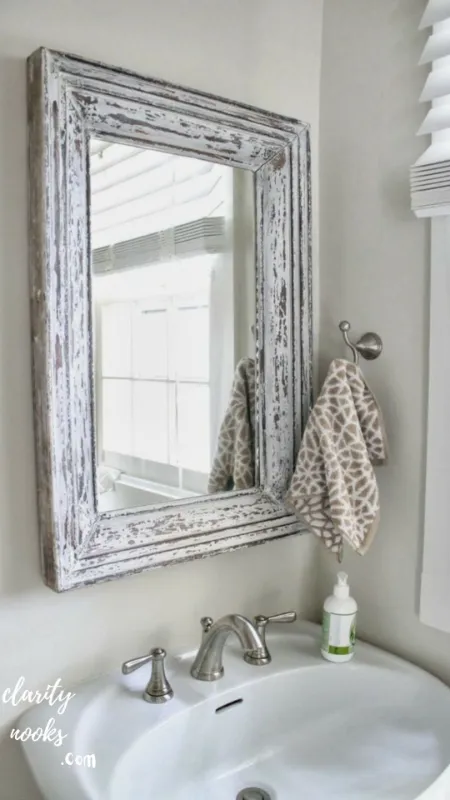
Rustic Wood Frame Bathroom Mirror
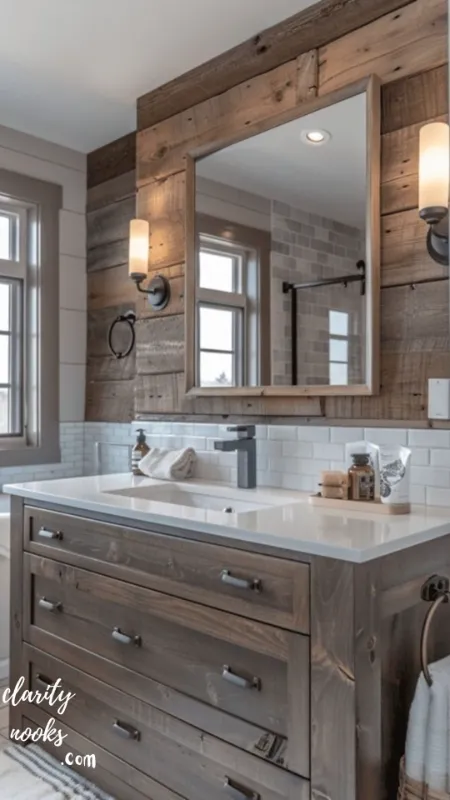
Rustic bathroom mirror ideas are consistently trending because they bring warmth and texture to a space that is otherwise dominated by cold tile and chrome hardware. A DIY wood-framed mirror is one of the easiest projects you can tackle, even if you have never picked up a miter saw. All you need are some reclaimed or craft-store wood pieces, basic tools, and a weekend afternoon.
To build this frame, measure your existing mirror and cut four pieces of wood to create a border, mitering the corners at 45 degrees for a clean finish. Sand each piece smooth, then stain or paint in a color that suits your bathroom think natural walnut, whitewash, or charcoal grey. Apply wood glue and small nails to assemble the frame, then secure it directly over the mirror using construction adhesive. The result looks like a high-end custom piece that can cost hundreds at a home goods store.
This is a particularly smart option for farmhouse, bohemian, and transitional bathroom styles. You can customize the width of the wood planks to go thick and dramatic or thin and minimal depending on your preference.
Materials Needed: Pine or cedar boards, miter saw, sandpaper, wood stain or paint, wood glue, finishing nails, construction adhesive
Estimated Cost: $20–$45
Benefits: Adds warmth and a custom look; hides unsightly mirror edges; works with nearly every décor style
Decorating Tip:
For extra character, use reclaimed pallet wood. The imperfections add an authentic rustic charm competitors cannot replicate with store-bought frames.
Must-Read Articles: Easy DIY Funky Bathroom Ideas to Refresh Your Bathroom on a Budget
Sunburst Mirror Using Wooden Dowels or Twigs
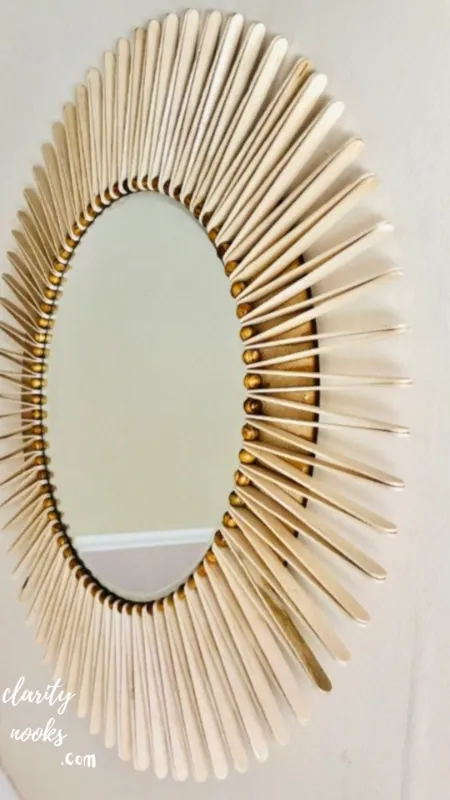
A sunburst bathroom mirror is one of those statement pieces that looks incredibly complex but is actually quite approachable as a DIY project. The radial design draws the eye outward, making your bathroom feel larger and more open. It is also one of the most photographed interior design trends, meaning your bathroom will look absolutely stunning in photos.
Start with a round mirror any size works, though 12 to 18 inches in diameter hits the sweet spot for most bathrooms. Gather wooden dowels, bamboo skewers, or actual gathered twigs from your yard, and cut them to varying lengths. Hot glue them in a starburst pattern around the back edge of the mirror, alternating long and short pieces. Finish with a coat of gold, bronze, or natural spray paint for a polished, cohesive look.
Real-life scenario: A homeowner in a rented apartment replaced her plain medicine cabinet with a DIY sunburst mirror and the entire bathroom felt transformed. The best part it cost her only $18 in materials and used twigs gathered from her backyard.
Materials Needed: Round mirror, wooden dowels or natural twigs, hot glue gun, spray paint (gold or bronze), scissors
Estimated Cost: $15–$35
Benefits: Dramatic visual impact; highly customizable size and finish; works well above a pedestal sink
Decorating Tip:
Group odd numbers of dowels together at different lengths. Asymmetry looks more natural and organic than perfectly even spacing.
Recommended for You: Smart DIY Bathroom Tile Ideas to Make Any Bathroom Look Bigger
Mosaic Tile Mirror Frame
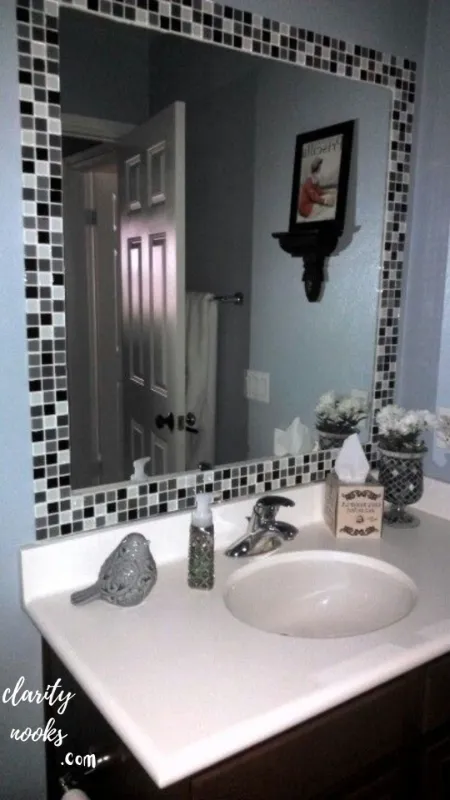
If you love color and pattern, a mosaic tile mirror is the ultimate way to bring artistic energy into your bathroom. This project lets you use leftover tiles, broken ceramic plates, colored glass pieces, or even sea glass to create a one-of-a-kind decorative border that no store will ever stock.
Apply tile adhesive around the mirror’s existing frame or directly onto a wooden backing board. Press your tile or glass pieces into the adhesive in your desired pattern you can go geometric, random, gradient-colored, or even map out a specific design. Once dry, apply tile grout over the surface, wipe clean, and seal. The result is a handcrafted mosaic bathroom mirror with genuine artisan character.
Mini case study: A couple renovating an older home used broken blue and white ceramic dishes from a thrift store to create mosaic frames around two matching bathroom mirrors. The total cost was under $30, and the mirrors became the room’s standout design feature guests constantly ask whether they are antique imports.
Materials Needed: Broken tiles, glass, or ceramic pieces; tile adhesive; unsanded grout; grout sealer; palette knife
Estimated Cost: $25–$55
Benefits: Truly unique and artistic; excellent use of leftover or thrifted materials; bohemian and Mediterranean-style appeal
Decorating Tip:
Use safety glasses when breaking tiles with a hammer. Vary the size of your pieces mixing large chunks with small shards creates visual depth.
You May Also Like: DIY Small Bathroom Ideas to Make Your Bathroom Feel Spacious
Rope-Framed Nautical Mirror
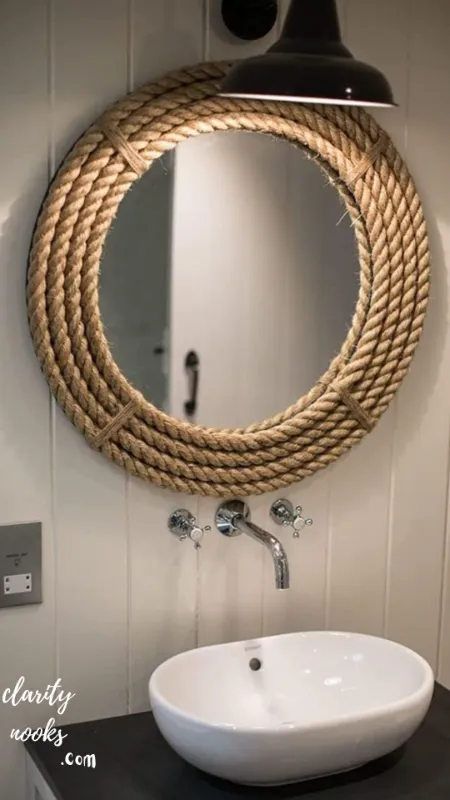
Coastal and nautical bathroom styles have exploded in popularity, and a rope-framed bathroom mirror is the perfect low-cost accent piece to pull the theme together. This project requires almost no tools and can be completed in about an hour. It works beautifully with white shiplap walls, weathered wood accents, and aqua-toned accessories.
Take a simple round mirror and apply a thick bead of hot glue around its outer edge, then immediately press the rope in place, winding it inward or outward depending on your preference. Use manila rope for a natural look, or white or navy cotton rope for a more polished coastal feel. Some designers add a knotted detail at the top or bottom for extra nautical character.
This idea works especially well in small powder rooms where a single mirror is the room’s main decorative statement. It is also renter-friendly since it requires no permanent changes to walls or fixtures.
Materials Needed: Round mirror, manila or cotton rope, hot glue gun and glue sticks, scissors
Estimated Cost: $12–$28
Benefits: Renter-friendly; quick to make; perfect for coastal, beach, and nautical themes
Decorating Tip:
Seal the finished rope with a light mist of hairspray or a clear craft sealant to prevent fraying over time.
Trending Post: DIY Bathroom Decor Ideas That Actually Elevate Your Space
Leaner Mirror With a DIY Painted Frame

A leaner mirror for the bathroom adds instant height, drama, and the illusion of a larger space especially in narrow bathrooms where floor-to-ceiling visual lines are important. Rather than buying an expensive pre-framed leaner, you can purchase a plain large mirror and build a custom frame around it using simple trim boards from the hardware store.
Cut four pieces of MDF trim or flat wood molding to size, attach them in a rectangle directly to the mirror using construction adhesive, and fill any gaps with paintable caulk. Once dry, paint the frame in any color that complements your bathroom palette matte black, sage green, dusty rose, and crisp white are all popular choices in 2025. You can lean it against the wall as-is or mount it vertically for a fixed installation.
This project is particularly popular for primary bathrooms where space allows a large-scale piece. It also photographs exceptionally well for listing a home, which makes it a smart investment for those planning to sell.
Materials Needed: Large frameless mirror, MDF trim boards, construction adhesive, paintable caulk, latex paint
Estimated Cost: $35–$75
Benefits: Makes rooms look taller and larger; high visual impact; extremely customizable in color and trim style
Decorating Tip:
Use picture hanging wire and D-rings on the back of the frame if you want to mount it securely rather than lean it.
Keep Exploring: Inspiring DIY Staircase Decor Ideas for Every Style & Budget (2026)
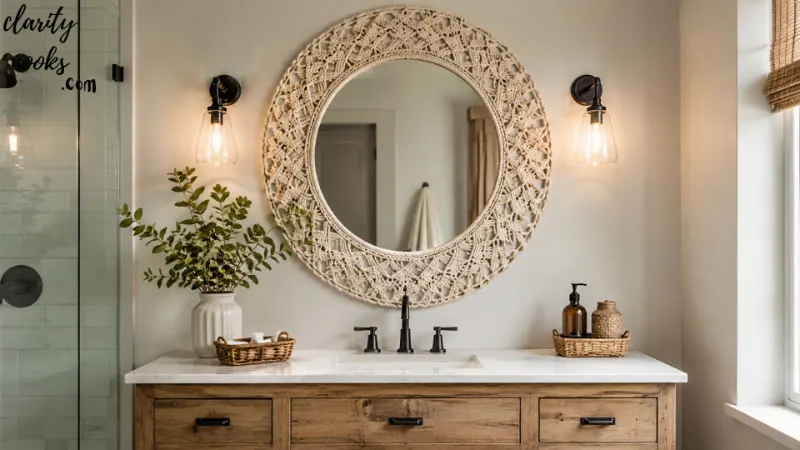
Boho Macramé Mirror Frame
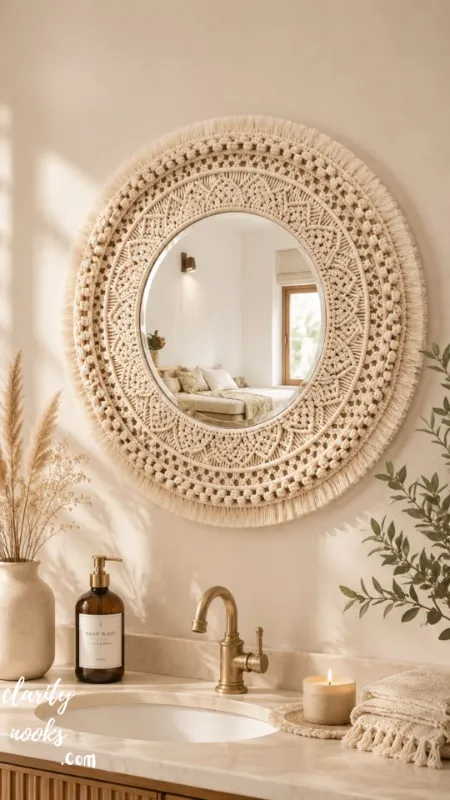
Macramé mirror ideas have taken over interior design boards in recent years, and for good reason they bring texture, softness, and a handcrafted warmth that is nearly impossible to replicate with mass-produced décor. A macramé-framed bathroom mirror is especially striking in a bohemian, earthy, or Japandi-inspired space.
You do not need to be a skilled fiber artist to pull this off. Basic macramé knots the square knot and the half-hitch are easy to learn within an hour. Work with natural cotton macramé cord in 3mm or 5mm thickness, and attach your knotted sections around a metal hoop or directly onto a circular mirror backing. The fringe details can extend outward as much or as little as you prefer.
This also makes a wonderful handmade gift for a housewarming, as each piece is entirely unique. Pair the finished mirror with terracotta planters, woven baskets, and warm Edison bulb lighting for a fully realized boho bathroom look.
Materials Needed: Cotton macramé cord (3mm or 5mm), metal hoop or round mirror, scissors, a comb (for fringing)
Estimated Cost: $18–$40
Benefits: Highly artisanal look; great texture contrast; very popular on social media and home décor platforms
Decorating Tip:
Pre-cut all your cord lengths before starting. A good rule of thumb is to cut each strand four times the length of the desired finished section.
Discover More: DIY Basement Family Room Ideas: 9 Budget-Friendly Transformations Home Improvement (Guide 2026)
Industrial Pipe Frame Mirror
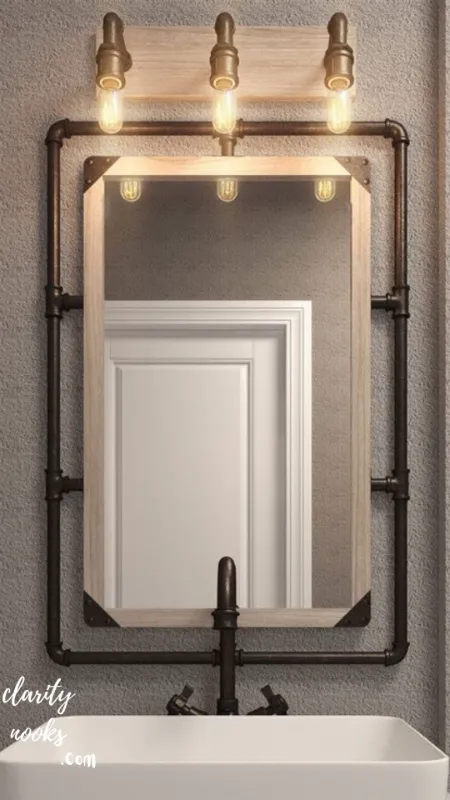
Industrial-style bathrooms have become a design staple, and a black iron pipe mirror frame is the defining accessory for this look. Raw metal, exposed hardware, and dark finishes create a bathroom that feels bold, confident, and urban. The contrast between cold steel framing and a reflective mirror surface is visually striking.
Visit your local hardware store and purchase black iron pipe fittings flanges, nipples, elbows in the size you need to border your mirror. Arrange them into a rectangular or square frame shape, connect them using pipe thread, and mount the assembly to your wall with the mirror sitting inside the pipe border. Use rubber bumpers between the pipe and mirror surface to prevent scratches.
This works well in loft apartments, industrial-themed primary bathrooms, or any space with concrete, brick, or dark tile finishes. It also pairs beautifully with Edison bulb vanity lighting.
Materials Needed: Black iron pipe and fittings, pipe wrench, mirror cut to size, rubber bumpers, wall anchors
Estimated Cost: $40–$80
Benefits: Extremely durable; unique and bold visual; pairs well with modern and industrial interiors
Decorating Tip:
Measure your pipe frame very precisely before purchasing. Even a quarter-inch of error can cause alignment issues with the surrounding wall tile.
Reader Favorites: DIY Family Room Ideas: 10 Budget-Friendly Transformations That Actually Work
Ornate Thrift-Store Mirror Makeover

One of the most overlooked DIY bathroom mirror makeover ideas is the thrift-store flip. Secondhand shops and garage sales are filled with ornate, heavy mirrors in dark or outdated finishes frames with beautiful sculptural detail buried under layers of brown paint or gilded finishes that feel decidedly dated.
Sand down the existing frame lightly to create adhesion, then apply spray paint in a modern color. Chalk paint finishes, metallic silver, antique white, and flat matte black all transform these ornate pieces from dated to elegant. A single can of spray paint costing $8 can completely resurrect a $5 thrift-store mirror into a piece that looks like it belongs in a luxury hotel bathroom.
Real-life scenario: A designer shared on her blog how she flipped a $7 garage sale mirror with $9 worth of antique gold spray paint and a $4 can of clear sealant. The transformed mirror became the centrepiece of her powder room and was repeatedly mistaken for a $300 antique.
Materials Needed: Thrift-store mirror, sandpaper, spray paint, clear sealant coat, painter’s tape
Estimated Cost: $15–$30 total
Benefits: Extremely budget-friendly; sustainable and eco-conscious; results often look high-end
Decorating Tip:
Always apply two to three thin coats of spray paint rather than one thick coat. Thin coats dry faster and result in a smoother, drip-free finish.
Barn Door Style Sliding Mirror
A barn door bathroom mirror adds incredible functionality alongside major style points. In small bathrooms where storage is precious, mounting a large mirror on a sliding barn door track allows it to conceal shelving, toilet paper storage, or even a medicine cabinet behind it. When you need the storage, slide the mirror aside. When you need the reflection, slide it back into place.
You will need a pre-cut mirror (or a frameless mirror from a home improvement store), a barn door sliding track kit, and a wooden backing panel to mount the mirror to. Attach the track to the wall above your vanity, hang the mirror-backed panel, and adjust until level. Sand and stain the wood panel edges for a finished look.
This is an especially smart solution for bathrooms with awkward layouts, extremely limited medicine cabinet space, or in older homes where recessing a traditional medicine cabinet is not feasible.
Materials Needed: Frameless mirror, plywood backing, barn door track hardware kit, wood stain, drill, level
Estimated Cost: $60–$110
Benefits: Dual function (storage + mirror); unique and impressive design statement; great for small or awkward bathrooms
Decorating Tip:
Make sure your wall can support the hardware anchors at the weight needed. If there are no studs in the right spot, use heavy-duty toggle bolts rated for the combined weight.
LED Backlit Glow Mirror
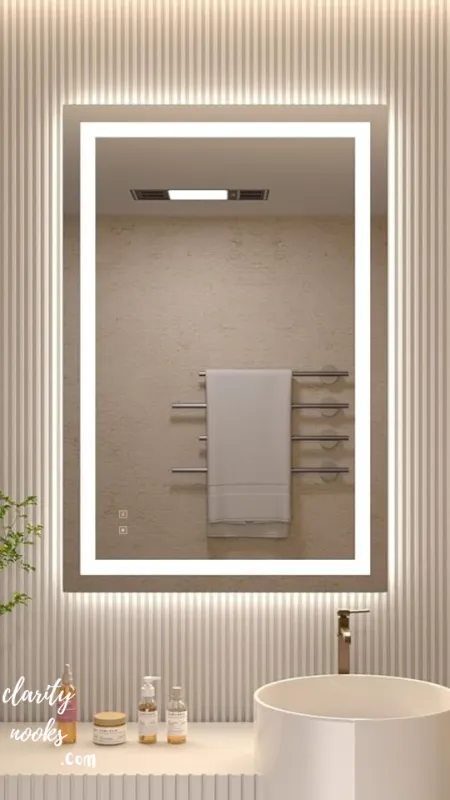
A DIY LED backlit bathroom mirror is one of the most dramatic and functional upgrades you can make, and it no longer requires electrician-level skills. With the rise of adhesive LED strip lighting, adding a soft ambient glow behind your mirror is a Saturday afternoon project. The result looks like a high-end spa bathroom feature.
Purchase an LED strip light kit with a warm white or cool white color temperature depending on your preference warm white creates a cozy, flattering glow while cool white replicates daylight for accurate makeup application. Attach the LED strips around the perimeter of the mirror’s back edge, ensuring the light faces the wall rather than directly outward. Mount the mirror with at least 1.5 inches of space between it and the wall so the light has room to diffuse.
Smart LED mirror ideas are evolving rapidly. New versions include dimmable strips controllable via smartphone app, color-changing capability, and motion-activated on/off functions. This makes the feature both practical and technologically current.
Materials Needed: Flat frameless mirror, adhesive LED strip lights, USB adapter or hardwired connection, wall spacer mounts
Estimated Cost: $30–$65
Benefits: High-end spa look; improved vanity lighting; energy-efficient; adds real estate value perception
Decorating Tip:
Use 2700K–3000K warm white LEDs for the most flattering, skin-tone-friendly bathroom lighting. Avoid cool blue tones for vanity mirrors.
Mirror Gallery Wall
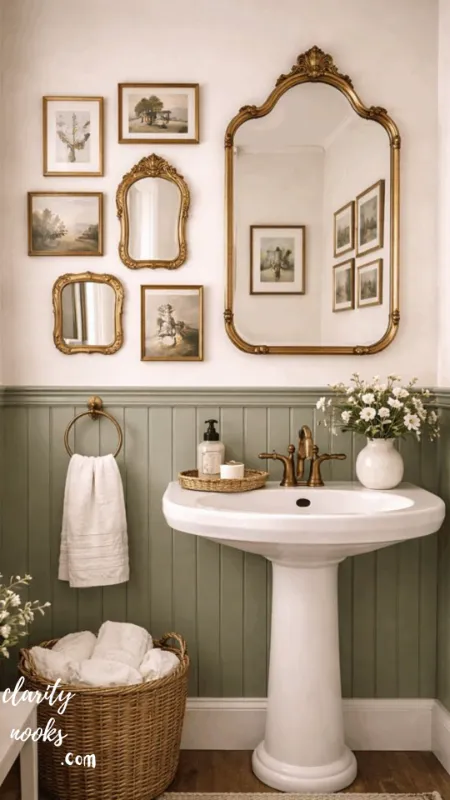
Instead of a single large mirror, a bathroom mirror gallery wall uses multiple smaller mirrors in a curated arrangement to create something far more interesting than any single piece could achieve. This approach works beautifully in larger bathrooms, or in any space where you want to add artistic energy above a floating vanity or freestanding sink.
Collect mirrors of varying shapes round, oval, arched, rectangular in a consistent color palette or finish. Brass-framed mirrors create a warm, eclectic look. Black-framed mirrors give a more editorial, modern feel. Arrange your grouping on the floor first, photographing the layout, before committing to wall holes. Maintain consistent spacing 2 to 3 inches between pieces for a cohesive look.
This is one of the best small bathroom mirror ideas for renters or those who prefer to change décor frequently, as the individual mirrors are lightweight, affordable, and easy to rehang.
Materials Needed: Multiple small mirrors (various shapes), picture hooks, measuring tape, painter’s tape (for planning layout), level
Estimated Cost: $40–$90
Benefits: Gallery-art aesthetic; highly flexible and rearrangeable; great use of thrift-store or discount mirrors
Decorating Tip:
Use painter’s tape on the wall to map out each mirror’s exact position before drilling. This saves enormous time and prevents unnecessary holes.
Arched Mirror With DIY Plaster or Limewash Frame
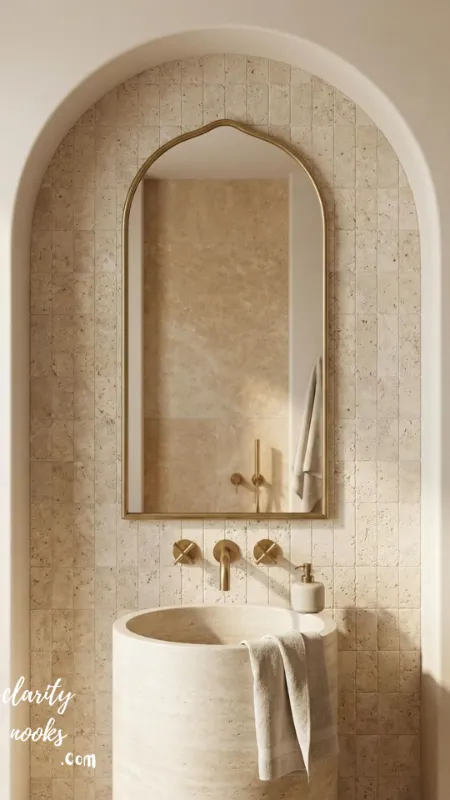
The arched mirror is arguably the most searched bathroom mirror style in 2025, and pairing one with a DIY limewash or venetian plaster-style frame pushes it firmly into luxury territory. The organic, softly textured finish has a timeless Mediterranean quality that elevates the entire space.
Purchase an arch-shaped mirror from a discount home goods store, then apply joint compound or plaster over a foam or cardboard border you have built around the mirror edge. Work in thin layers and deliberately vary your trowel strokes for texture. Once cured, apply a lime wash paint available at most home improvement stores with a dry brush technique for a soft, chalky, lived-in look.
This finish pairs exceptionally well with warm-toned walls, natural stone tile, and warm brass or unlacquered brass fixtures. It feels expensive and handcrafted because it genuinely is.
Materials Needed: Arch mirror, joint compound or plaster, limewash paint, trowel, foam or cardboard backing for frame construction
Estimated Cost: $35–$70
Benefits: Luxurious, artisanal look; highly sought-after arched silhouette; pairs with Mediterranean and organic modern styles
Decorating Tip:
Apply the lime wash in circular motions with a barely-loaded brush for the most authentic, aged plaster effect.
Chalkboard or Marker Board Mirror
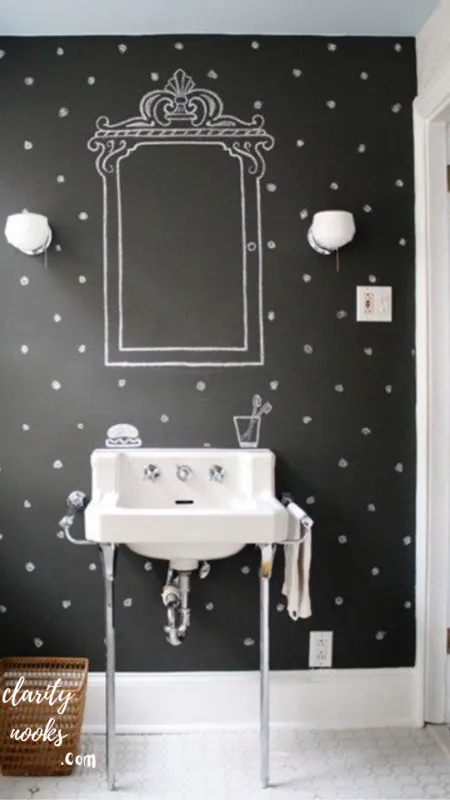
A chalkboard bathroom mirror is a creative and highly practical option for family bathrooms, children’s bathrooms, or any space where you want to add a fun, interactive element. It turns your mirror into a communication board for daily notes, reminders, and doodles and kids absolutely love it.
The easiest way to achieve this is to purchase chalkboard spray paint and apply it to a section of a plain mirror. Some people paint the outer border of the mirror, leaving the central reflective area intact. Others use a large mirror as the base and apply chalkboard paint to just the bottom third, creating a combined reflection and writing surface. Let each coat cure fully before writing.
Liquid chalk markers work even better than traditional chalk on glass surfaces and wipe off cleanly with a damp cloth. This is a wonderful option for busy families who use the bathroom as a quick communication hub in the morning.
Materials Needed: Plain mirror, chalkboard spray paint, painter’s tape, liquid chalk markers
Estimated Cost: $10–$25
Benefits: Functional and fun; great for families; easy to update seasonally or daily
Decorating Tip:
Season new chalkboard surfaces by rubbing the side of a piece of chalk across the entire area, then erasing before your first use. This prevents ghost images.
Vintage Window Frame Mirror
A vintage window frame mirror repurposes old architectural salvage into a bathroom statement piece with built-in character and history. Old multi-pane wooden windows the kind with six or eight separate glass sections can be converted into stunning decorative mirrors by replacing the glass panes with cut mirror inserts.
Source a vintage window from an architectural salvage yard, antique market, or online marketplace. Remove any remaining glass carefully, then have a glass shop cut mirror pieces to fit each pane. Secure the mirror pieces in place with glazing points and mirror adhesive. Sand and repaint the window frame in whatever color fits your bathroom aged white, deep navy, or distressed black are all standout choices.
This is among the most visually impactful and conversation-starting creative bathroom mirror ideas on this list. Each piece is fundamentally one-of-a-kind since no two vintage windows are identical.
Materials Needed: Vintage window frame, custom-cut mirror pieces, glazing points, mirror adhesive, sandpaper, paint
Estimated Cost: $30–$65 (window from salvage yard)
Benefits: Completely unique; rich in character; excellent sustainability angle; striking visual impact
Decorating Tip:
Clean all old paint and debris from the window frame thoroughly before painting. Old paint may contain lead wear gloves and a dust mask when sanding pieces older than 1978.
Conclusion
Your bathroom deserves better than a plain, bare mirror that blends into the background. With these 14 DIY bathroom mirror ideas, you have every tool, tip, and technique needed to create a space that feels elevated, personalized, and genuinely impressive. From budget-friendly thrift-store flips to architectural vintage frames, each idea proves that a meaningful bathroom mirror upgrade does not require a professional contractor or an expensive renovation budget.
Pick the idea that speaks to your style, gather your materials, and set aside a weekend to bring it to life. Even one well-executed DIY mirror project can shift the entire energy of your bathroom. So go ahead transform that wall, and let your creativity do the reflecting.
Trend Analysis:
DIY Bathroom Mirror Ideas in 2026–2027
The bathroom mirror market is evolving faster than most homeowners realize. In 2026, three dominant macro-trends are reshaping how people approach bathroom mirror design: the shift toward organic and natural materials, the growing demand for smart and functional mirrors, and the rising influence of social platforms like Pinterest and TikTok on DIY project selection.
On the material side, natural wood, rattan, wicker, and plaster-finished frames are decisively replacing the chrome and polished nickel finishes that dominated bathrooms through the 2010s. Consumers are actively seeking imperfection and texture finishes that look handmade rather than factory-produced. This directly supports the relevance of several ideas in this guide, including the rustic wood frame, macramé, and limewash arch mirror projects.
Looking ahead to 2026–2027, the smart mirror segment is projected to grow significantly. Mirrors with integrated LED lighting, anti-fog functionality, embedded Bluetooth speakers, and even touchscreen displays are moving from luxury hotels into mainstream residential bathrooms.
DIY versions are already emerging, with makers combining affordable LED strip kits with frameless mirrors to approximate the look at a fraction of the cost. Expect AI-powered mirror assistants capable of analyzing skin health, tracking lighting conditions, and syncing with smart home ecosystems to become commercially accessible within this timeframe.
Expert Insights & Practical Tips for DIY Bathroom Mirrors
Interior design professionals consistently point to the bathroom mirror as one of the highest-leverage investment points in a bathroom refresh. The logic is simple: a mirror is always visible, always functional, and occupies the most prominent wall in the room. Upgrading it delivers visible impact per dollar spent that very few other projects can match.
Top Expert Recommendations
- Size up, always. Most homeowners install mirrors that are too small for their vanity. A general rule: the mirror should be at most 2 inches narrower on each side than the vanity below it.
- Lighting is inseparable from mirror placement. A beautifully framed mirror flanked by poor lighting still produces a frustrating reflection. Always consider your vanity lighting simultaneously with your mirror upgrade.
- Protect mirror edges. Exposed mirror edges in humid environments are prone to desilvering the black spots that appear along mirror edges over time. Sealing all exposed edges with clear silicone caulk extends mirror life significantly.
- Frame depth affects the feel. Thicker frames (2+ inches) make a bolder statement and work better in larger bathrooms. Thin frames (under 1 inch) are more subtle and suit small powder rooms.
- Mounting height matters. The center of your bathroom mirror should sit at approximately eye level for the primary user typically 57 to 65 inches from the floor.
For those using the LED backlit mirror approach, lighting professionals recommend choosing a bulb color temperature between 2700K and 3000K for the most natural, flattering result. This range closely mimics warm incandescent light and renders skin tones accurately critical for daily grooming tasks.
Long-Term Strategy: Getting the Most From Your DIY Bathroom Mirror
A DIY bathroom mirror project is not just a weekend activity it is a strategic home improvement decision that can deliver returns for years. To maximize the long-term value of your project, think beyond the immediate aesthetic result and consider durability, adaptability, and resale impact.
First, material longevity matters. Projects using moisture-resistant materials sealed wood, metal frames, or sealed grout on mosaic pieces will outlast those made with uncured MDF or unprotected natural fibers. A small investment in a high-quality sealant or clear topcoat at the finishing stage can double the lifespan of your project in a humid bathroom environment.
Second, consider resale value consciousness. If you are planning to sell your home within five years, prioritize mirror upgrades that appeal broadly: clean lines, neutral colors, and timeless styles. The leaner mirror, the LED backlit mirror, and the thrift-store makeover in a classic finish all have wide appeal. Highly personal choices like the chalkboard mirror or maximalist macramé piece may need to be swapped out before listing.
Third, plan for scalable upgrades. A simple wood-framed mirror today can be evolved repainted, restained, or decorated with additional trim as your taste evolves. Designing your initial project with future adaptability in mind means you may never need to fully replace the piece, just refresh it.
Future Predictions & Innovations in Bathroom Mirror Design
The next several years will bring meaningful changes to how bathroom mirrors are designed, manufactured, and experienced. Several trends are already visible at the leading edge of the design industry and will become mainstream within the near future.
Predictions for 2026–2028
- AI-integrated smart mirrors will analyze your skin in real time, track changes over weeks and months, and recommend product adjustments. Early commercial versions already exist at premium price points, and DIY-accessible versions using a tablet mounted behind a two-way mirror are already circulating in maker communities.
- Sustainability-driven design will push reclaimed and upcycled mirrors further into mainstream home décor. Expect salvaged window frames, vintage mirror flips, and sustainably sourced wood frames to dominate Pinterest and design editorial content.
- Biophilic bathroom design incorporating natural materials like live edge wood, stone, and plant growth — will increasingly extend to mirror framing. Living moss frames and integrated planter-mirror combinations are early indicators of this direction.
- Maximalist mirror walls featuring floor-to-ceiling mirrored panels will continue gaining popularity in primary bathrooms as homeowners seek to create spa-like environments at home.
- Voice and gesture-controlled mirrors integrated with systems like Amazon Alexa, Google Home, and Apple HomeKit will become attainable for typical homeowners within the next product cycle.
For DIY enthusiasts, the most exciting frontier is the accessible smart mirror build: an old monitor, a Raspberry Pi, a two-way mirror, and a simple weather/calendar interface that can be assembled for under $150. Detailed tutorials for this project are already widely available and growing in sophistication.
Common Mistakes & Hidden Gaps in DIY Bathroom Mirror Projects
Even experienced DIYers make predictable errors with bathroom mirror projects. Understanding these pitfalls in advance will save you time, money, and frustration.
Mistakes Beginners Make
- Choosing the wrong adhesive. Standard craft glue or wood glue is not suitable for mounting mirrors. Always use mirror-specific adhesive or construction adhesive rated for glass. Using the wrong product can cause the mirror to fall or the frame to detach.
- Ignoring moisture considerations. Untreated wood, unsealed grout, and natural fibers will deteriorate quickly in a humid bathroom environment. Always seal, stain, or weatherproof natural materials before installation.
- Getting the size wrong. Ordering or cutting a mirror before confirming final frame dimensions leads to costly remakes. Measure twice, cut once and account for the kerf (the material removed by the saw blade) in your calculations.
- Poor wall preparation. Mounting a heavy mirror on drywall anchors alone is risky. Always attempt to locate wall studs for heavier pieces, and use the appropriate toggle bolts for lighter-weight drywall mounting.
Mistakes Intermediate DIYers Make
- Rushing paint and finish curing time. Applying a second coat before the first is fully cured creates bubbling, peeling, and an uneven surface. Follow manufacturer drying time instructions even when they feel unnecessarily conservative.
- Ignoring the hardware scale. A delicate thin-framed mirror with heavy industrial hooks or chunky hardware creates a visual mismatch. Always align the scale and finish of your hanging hardware with the weight and style of the mirror.
- Overlooking lighting interaction. A mirror may look perfect in natural light during installation but reveal shadows, discoloration, or visual warping under your actual bathroom lighting. Test how your mirror looks in both daylight and artificial light conditions before finalizing.
- Neglecting edge finishing. The back edge of a frame where it meets the wall is often neglected. A thin bead of color-matched caulk along this edge creates a professional, finished look and also prevents moisture intrusion.
Hidden Gaps Competitors Miss
- Accessibility considerations. Few guides address mirror placement for users of varying heights or those using mobility aids. If your bathroom serves multiple generations, consider a slightly lower placement or a vertically elongated mirror that spans a wide height range comfortably.
- Anti-fog options for DIY mirrors. Demister pads thin heating elements that can be applied to the back of a mirror are widely available and can be added to any DIY mirror project. They are particularly valuable in bathrooms without strong ventilation.
Weight distribution for floating mirrors. Large frameless mirrors with added frames can become significantly heavier than expected. Many DIYers underestimate the final weight and purchase insufficient wall anchors, creating a safety hazard.
Frequently Asked Questions
What is the easiest DIY bathroom mirror idea for beginners?
The easiest option is the rope-framed mirror or the thrift-store spray paint flip. Both require minimal tools, cost under $30, and can be completed in under two hours with no advanced skills required.
How do I frame a bathroom mirror without removing it from the wall?
Apply a wood frame, trim pieces, or rope directly over the existing mounted mirror using construction adhesive rated for glass. No removal necessary. Measure the mirror precisely and build or cut your frame to match.
What kind of mirror is best for a small bathroom?
For small bathrooms, a large single mirror or leaner creates the strongest illusion of space. Arched and rounded shapes are particularly effective at softening the feel of a tight room. A gallery wall of smaller mirrors also works well if a single large piece is impractical.
How can I add lighting to a DIY bathroom mirror?
Use adhesive LED strip lights applied to the back perimeter of any flat mirror, ensuring at least 1.5 inches of wall clearance for the glow to diffuse. Choose 2700K–3000K warm white strips for the most flattering result.
Can I make a bathroom mirror waterproof?
You cannot make a standard mirror fully waterproof, but you can dramatically extend its life in humid conditions by sealing all frame edges with clear silicone caulk, sealing any natural wood with polyurethane or lacquer, and ensuring adequate bathroom ventilation to reduce humidity buildup.

Rameen Zara is the founder of Clarity Nooks, bringing over five years of experience in home décor and interior styling. She shares simple yet practical design ideas that suit real homes and everyday living. Her approach focuses on cozy aesthetics, soft color palettes, and natural textures that create warm, inviting spaces.


