

DIY Gaming Chair Ideas for a Cool and Comfortable Setup at Home
Here’s the good news: you don’t need to drain your budget to sit comfortably and game like a pro. DIY gaming chairs are having a serious moment in 2026 not because people are broke, but because builders and gamers are realizing they can create something more personalized, more ergonomic, and far more satisfying than anything off a shelf.
This guide covers five powerful DIY gaming chair ideas that go beyond the basics. You’ll find real build strategies, material recommendations, ergonomic principles, and the kind of practical knowledge that actually helps whether you’re a woodworker, a budget builder, or a first-timer with basic tools.
What Is a DIY Gaming Chair?
A DIY gaming chair is any custom-built or heavily modified seating solution designed specifically for gaming use. It prioritizes ergonomics, comfort during long sessions, and personal customization without the brand markup of commercial gaming chairs.
DIY options range from upcycled office chairs to full wooden throne builds, and they can cost anywhere from $30 to $300 depending on materials and ambition.
Upcycled Office Chair Upgrade
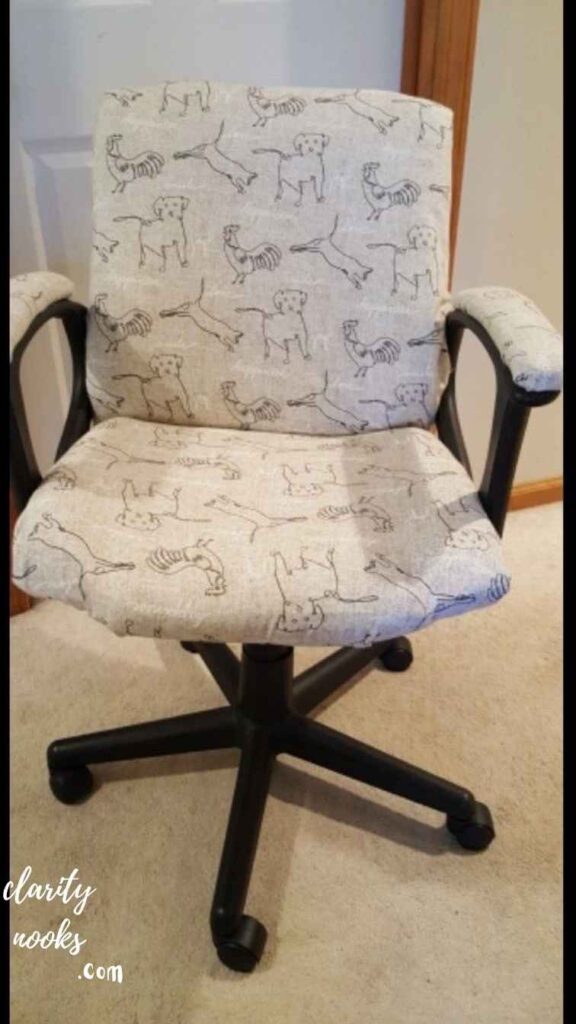
Commercial gaming chairs are largely marketing. Many ergonomics experts including those at Cornell University’s Human Factors and Ergonomics Research Group argue that a well-adjusted mid-range office chair outperforms most gaming chairs for long-term posture support. So instead of building from scratch, start smarter: grab a used Herman Miller, Steelcase, or even a decent Staples brand chair from Facebook Marketplace for $30–$80.
The real DIY magic happens in the upgrades. Strip the fabric, re-foam the seat pan with high-density memory foam (2–3 inch layer works best), and reupholster with faux leather or breathable mesh. Add an aftermarket lumbar support cushion, and you’ve created a chair that rivals $600 setups for a fraction of the cost.
Real-life scenario: Reddit user u/Gaming Builds_Karl shared his build in late 2026 a $45 Staples chair from Goodwill, $22 in foam, and $18 in leatherette fabric. Total: under $90. His post got 14,000 upvotes because the finished product looked store-bought and felt better.
Key Upgrades to Prioritize
Focus on three zones: seat pan (foam density), lumbar region (shaped support, not just a pillow), and armrests (add gel pads or replace entirely with aftermarket 4D armrests). These three areas account for 80% of long-session discomfort.
Must Read: DIY Gaming Desk Ideas: Creative Designs for a Powerful Gaming Station
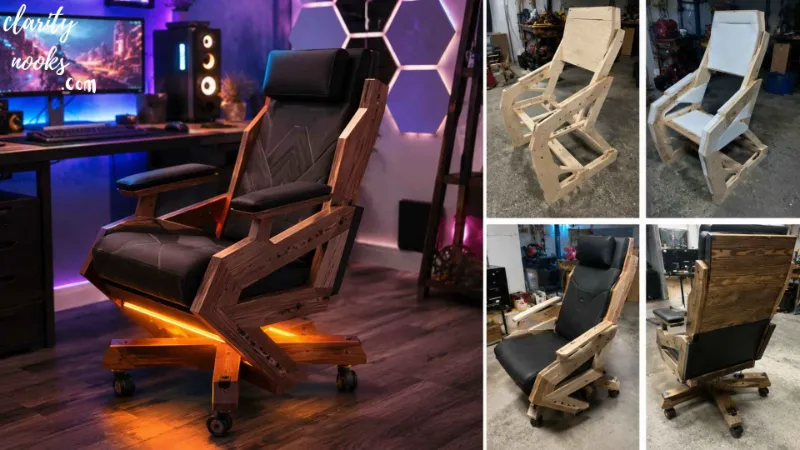
Wooden Gaming Throne

If you have basic woodworking skills and a Saturday afternoon free, a wooden gaming throne is one of the most visually dramatic DIY builds you can attempt. Think carved armrests, angled backrests, and even built-in cable channels. This isn’t just aesthetic wood allows you to control the exact angle and height of every surface.
The key structural principle: your seat should angle slightly backward (5–8 degrees), your backrest should recline between 100–110 degrees from seat level, and your armrests should sit at elbow height when your shoulders are relaxed. These numbers come from published ergonomic guidelines and are easy to build in from the start when you’re designing your own frame.
Mini case study: A Twitch streamer called “BuiltNotBought” documented his full plywood throne build on YouTube in 2024. He used 18mm birch plywood, $15 in wood screws, and upholstered it with automotive vinyl. The chair became a centerpiece of his stream background and cost $110 total. His channel grew 40% in three months partly because of the distinctive setup.
Materials and Tools You’ll Need
Pine or birch plywood works best affordable, strong, and easy to cut. You’ll need a jigsaw, drill, sandpaper, wood glue, and foam + fabric for upholstery. Avoid MDF for load-bearing parts; it doesn’t handle weight stress over time.
Read More: DIY Living Room Carpet Ideas: Transform Your Space Without Breaking the Bank
Racing Seat Cockpit Chair
If you play racing simulators, first-person shooters with high immersion, or flight simulators, a repurposed automotive racing seat might be the most authentic DIY gaming chair build possible. Real car bucket seats especially from older sports cars are contoured for exactly the kind of lateral support gamers need during intense sessions.
You can find used racing seats at auto salvage yards for $20–$80. The challenge is mounting them. A simple steel pipe frame welded or bolted together works well. If you’re not comfortable with metalwork, prefab seat risers made for sim rigs are available on Amazon for around $40–$60 and accept most universal seat bolt patterns.
Example: The sim racing community on r/simracing has documented dozens of these builds. One popular build uses a Bride-replica seat from a Japanese import car, mounted to a $50 steel frame with angle brackets. The total build cost was $130 comparable ergonomic performance to $700 commercial sim rigs.
Ergonomic Considerations for Racing Seats
Racing seats sit very low, which can strain the neck if your monitor isn’t positioned correctly. When using this style, raise your monitor setup accordingly, or add a monitor arm. Eye level should align with the top third of your screen.
Read Also: Simple DIY Boys Bedroom Ideas with Easy Decor and Storage Hacks
Modular PVC Pipe Gaming Chair
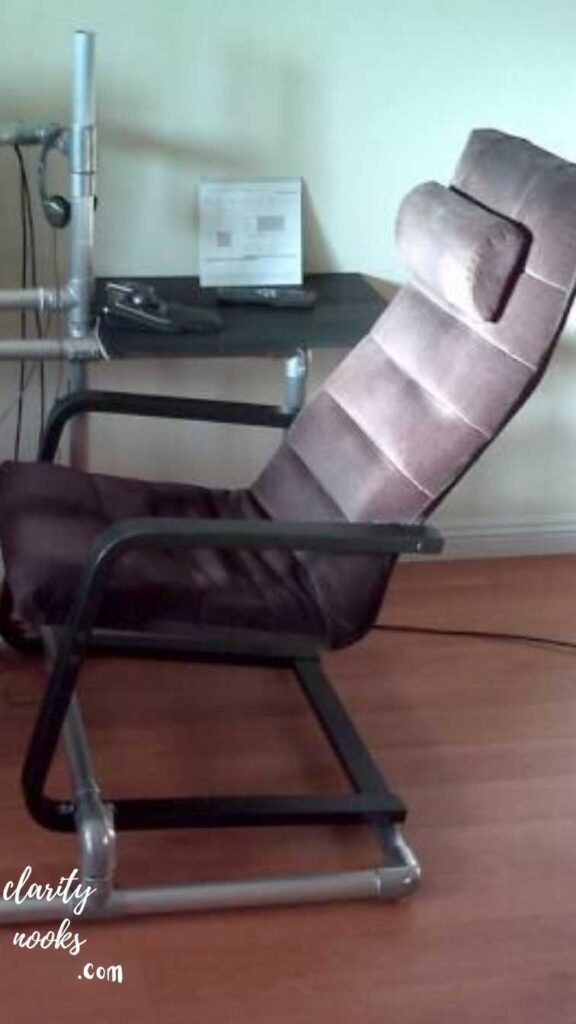
PVC pipe furniture has been a DIY staple for decades, but it’s underused in gaming setups. A 1.5-inch schedule 40 PVC frame costs about $25 in pipe and fittings, weighs almost nothing, and can be disassembled and reassembled without tools. For renters or dorm-room gamers, this flexibility is a major advantage.
The key to making PVC feel premium is the upholstery. Use a hammock-style canvas seat or stretch a piece of dense fabric over a foam-padded frame insert. The structural design should include angled back legs for stability a straight-leg PVC chair will rock. A 15-degree backward lean on the rear legs eliminates this completely.
Practical tip: Use PVC cement on joints that should stay permanent (frame corners), but keep the seat and back attachment points friction-fit so you can adjust or replace them without starting over. This makes the chair modular over time.
Customization Options
PVC accepts spray paint well (use plastic-bond primer first). You can match your room’s color scheme exactly. Swap out the seat fabric seasonally a cooler mesh in summer, padded fabric in winter
Don’t Miss: Creative DIY Beach Bedroom Ideas for a Cozy Nautical Style Bedroom
Hybrid Bean Bag Gaming Chair
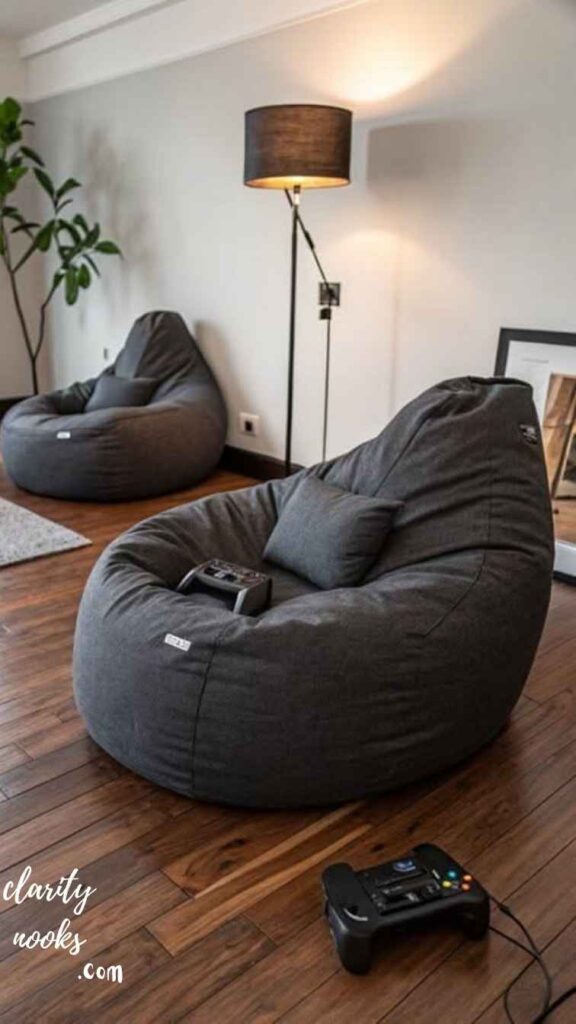
Bean bags have a reputation problem. People assume they’re posture killers. However, modern ergonomic bean bag designs filled with shredded memory foam instead of polystyrene beads are genuinely supportive when sized correctly. A DIY version can outperform both because you control the fill density.
Build the cover from heavy canvas or faux suede (patterns are free online). Use shredded memory foam as your fill you can buy it in bulk for $30–$50 per bag. The secret is overfilling slightly, then compressing the cover to create a firm, body-conforming seat. Add a built-in lumbar ridge by sewing a foam bolster into the back seam.
Real-life scenario: A game developer in Austin, Texas documented her build on her personal blog after dealing with chronic lower back pain. She built a custom memory foam bean bag chair for $68, added a side pocket for her controller, and reported a 70% reduction in end-of-day back stiffness over four weeks of use.
Why This Works for Long Sessions
The body-conforming nature of shredded foam distributes pressure across more surface area than any rigid chair. It’s particularly effective for people who shift positions frequently during gaming a behavior that rigid chairs discourage but that’s actually healthy for your spine.
Conclusion
DIY Gaming Chair Ideas can help you create a comfortable and stylish gaming space without spending too much money. Simple changes like soft cushions, LED lights, and custom colors can make your chair look modern and feel better for long gaming hours. These ideas are easy to try and work well for small or large gaming rooms.
With the right DIY Gaming Chair Ideas, you can match your chair with your gaming setup and personal style. You do not need expensive tools or professional skills to make great upgrades. A creative gaming chair setup can improve comfort, add personality, and make your gaming room more fun and relaxing every day.
Trend Analysis
2026 and the Next 2–3 Years
Ergonomics Is Replacing Aesthetics as the Primary Driver
In 2026–2027, gaming chairs were sold almost entirely on aesthetics the racing stripes, the RGB, the “gamer look.” That trend is reversing fast. Younger gamers in 2026 are citing back pain, posture issues, and hours-long session fatigue as their primary seat-shopping concerns. DIY builds benefit directly from this shift because builders can prioritize function over form from day one.
The wellness gaming movement which intersects gaming with physical health awareness is growing steadily. Content creators who document ergonomic builds are outperforming aesthetic-only gaming setup channels in engagement metrics. This signals a durable shift, not a fad.
Sustainability Is Becoming a Purchase Motivator
Gen Z and Millennial gamers are increasingly uncomfortable with fast furniture cheap chairs that break in 18 months and end up in landfills. DIY builds, especially those using reclaimed materials or repurposed car seats, align perfectly with this value shift. Expect upcycled and modular DIY gaming furniture to grow as a content niche and a practical choice over the next three years.
Practical Tips and Expert Insights
Tip 1 — Measure before you build. Your ideal seat height is determined by your leg length, not a standard measurement. Sit on a flat surface and measure from the floor to the crease behind your knee. That’s your target seat height.
Tip 2 — Foam density matters more than thickness. A 1.5-inch layer of 3 lb/ft³ high-density foam outperforms a 4-inch layer of 1.2 lb/ft³ low-density foam for long-session comfort. Check density specs before buying.
Tip 3 — Test your lumbar position before finalizing. Roll up a small towel, place it at different heights on your backrest, and sit in your normal gaming position. Where it feels best is where your lumbar support should live for most people, that’s 2–4 inches above seat level.
Tip 4 — Armrests are not optional. Floating your arms without support adds 15–20 lbs of load to your neck and shoulders per session, per ergonomic research. Even a basic padded armrest reduces fatigue significantly
Long-Term Strategy and Sustainability
Build for Repairability, Not Just Cost
The smartest DIY gaming chair builders design for component replacement from the start. If your foam wears out in two years, you want to be able to replace just the foam not rebuild the whole chair. Use removable covers, bolt-on components, and modular sections wherever possible.
This approach also lets you upgrade over time. Start with basic foam, swap to memory foam later. Start with a simple fabric cover, reupholster with premium vinyl when your budget allows. A well-designed DIY chair improves with you instead of degrading beside you.
The Economic Case for DIY Long-Term
A commercial gaming chair at $200–$400 typically needs replacement every 2–4 years. A DIY build with quality materials and modular design can last 8–12 years with basic maintenance. Over a decade, the cost difference often exceeds $600–$1,000 enough to fund an entire PC upgrade.
Future Predictions and Innovations
Embedded Technology in DIY Builds
The next frontier for serious DIY builders is integration. Haptic feedback modules (originally designed for sim racing rigs) are dropping in price and can now be bought for under $80. These allow your chair to vibrate in sync with game events. DIY builders are already experimenting with embedding these in wooden throne builds.
Heating and cooling elements thin flexible pads originally designed for car seats are another emerging addition. A heated seat element costs $15–$25 and runs off USB power. Expect this to become a standard DIY upgrade recommendation within two years.
AI-Assisted Design Tools for Custom Builds
Several woodworking and furniture design apps are now incorporating AI layout tools that generate cut plans from your body measurements. By 2027, it’s likely that DIY gaming chair builders will be able to input their height, weight, and sitting preferences and receive a full cut list, materials list, and assembly diagram tailored specifically to their body. This will dramatically lower the barrier for beginners
Common Mistakes and Hidden Gaps
Mistakes Beginners Make
Choosing the wrong foam. Craft store foam is not furniture foam. It compresses permanently within weeks under body weight. Always buy upholstery-grade foam with a minimum density of 2.0 lb/ft³ for seats.
Ignoring seat depth. A seat that’s too deep forces you to slouch to reach the backrest, or sit without lumbar support to keep your feet flat. Ideal seat depth for most adults is 16–18 inches from front edge to backrest.
Skipping the armrests entirely to save money. This is a false economy. Budget $15–$25 for basic padded armrests your shoulders will thank you within the first week.
Mistakes Intermediate Builders Make
Over-engineering the aesthetics at the expense of ergonomics. It’s easy to get caught up in how your chair looks and lose sight of how it functions. Build ergonomics in first, then apply cosmetic upgrades.
Using the wrong mounting hardware for heavy builds. Wooden thrones and racing seat cockpits can weigh 40–70 lbs. Use structural screws (not drywall screws), and pre-drill to avoid splitting joints under load.

Rameen Zara is the founder of Clarity Nooks, bringing over five years of experience in home décor and interior styling. She shares simple yet practical design ideas that suit real homes and everyday living. Her approach focuses on cozy aesthetics, soft color palettes, and natural textures that create warm, inviting spaces.


