

DIY Kitchen Lighting Ideas to Make Your Kitchen Look Modern and Warm
Your kitchen works hard. Its lighting shouldn’t be an afterthought. These DIY kitchen lighting ideas will help you upgrade the most-used room in your home without hiring an electrician or blowing your budget.
You’re chopping vegetables at 7 p.m., a single overhead fixture casting flat, shadowless light across your countertop. You can see, technically but you’re squinting slightly, and the space feels more like a hospital hallway than the heart of your home. This is how millions of kitchens operate, and it doesn’t have to be yours.
Bad kitchen lighting isn’t just an aesthetic problem. It’s a safety hazard, a mood killer, and a daily frustration disguised as “just how kitchens are.” The good news? You don’t need a full renovation to fix it. Strategic, well-executed DIY kitchen lighting upgrades can completely change how your kitchen looks, feels, and functions often for under $150.
This guide goes beyond the basics. You’ll find lighting ideas your competitors gloss over, real-life scenarios, mini case studies, and expert-level thinking about layering light the way professional kitchen designers do.
72%
of homeowners say kitchen lighting affects cooking enjoyment
$80
average cost of a DIY under-cabinet LED upgrade
3×
more energy-efficient: LEDs vs. incandescent bulbs
Featured Snippet Answer
The best DIY kitchen lighting ideas include: under-cabinet LED strip lights, pendant lights over islands, plug-in sconces, smart bulb upgrades, and toe-kick floor lighting. These ideas work together to create layered light the same principle professional designers use.
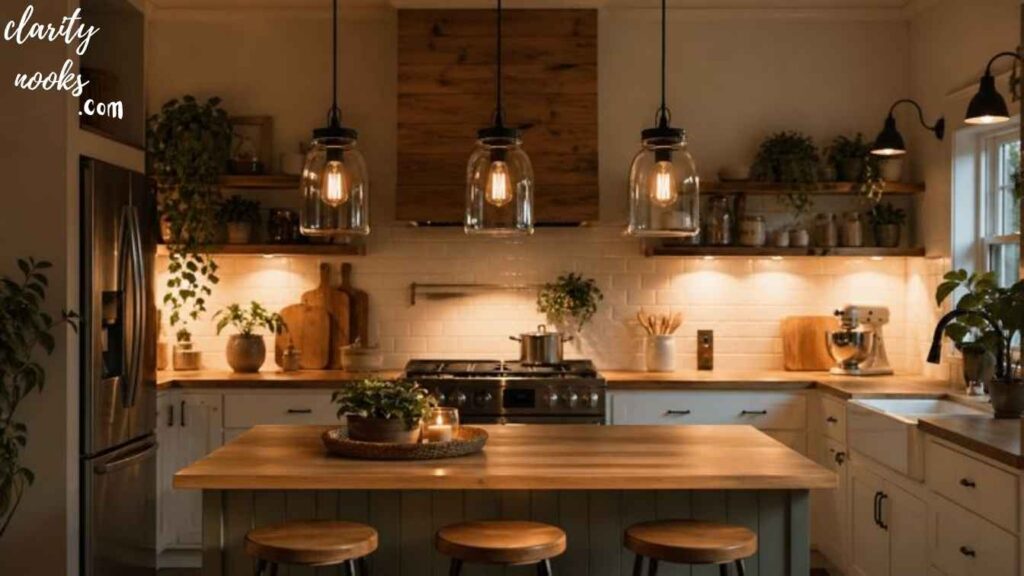
Under-Cabinet LED Strip Lighting
“The single upgrade that changes everything“
If you could only do one thing to improve your kitchen lighting, this would be it. Under-cabinet LED strips illuminate your countertop directly the surface where you actually prep food. Unlike overhead fixtures, they eliminate the shadow your own body casts when you’re standing at the counter. That alone is a revelation most people don’t realize they needed.
The best part? Installing them requires zero electrical work. Most modern LED strip kits are plug-in, cutting to length, with adhesive backs that stick directly to the underside of upper cabinets. A quality warm-white or tunable-white strip (look for CRI 90+ for the most natural food colors) will run about $25–$50 for a standard kitchen. Brands like Govee, Kasa, and Sylvania all make solid options available at hardware stores.
Real-life scenario
Sarah, a home cook in a rented apartment in Leeds, couldn’t install hardwired fixtures. She used plug-in LED strips with a cord channel cover to hide the wire along the cabinet bottom edge. Total cost: £42. Her words after: “I can finally see what I’m doing. I didn’t realise how dark it was until it wasn’t.”
Pro tip:
Choose strips with a color temperature of 2700K–3000K for a warm, inviting glow, or 4000K if you want crisper task lighting. Avoid anything above 5000K in kitchens it feels clinical and unflattering.
Must Read: Creative DIY Kitchen Nook Ideas That Make Your Kitchen Feel Warm and Inviting
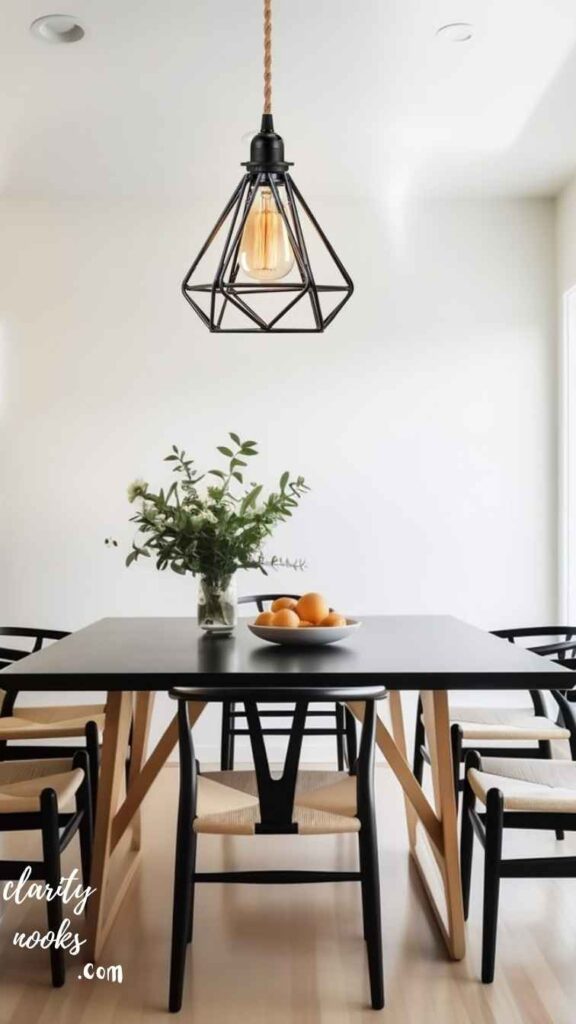
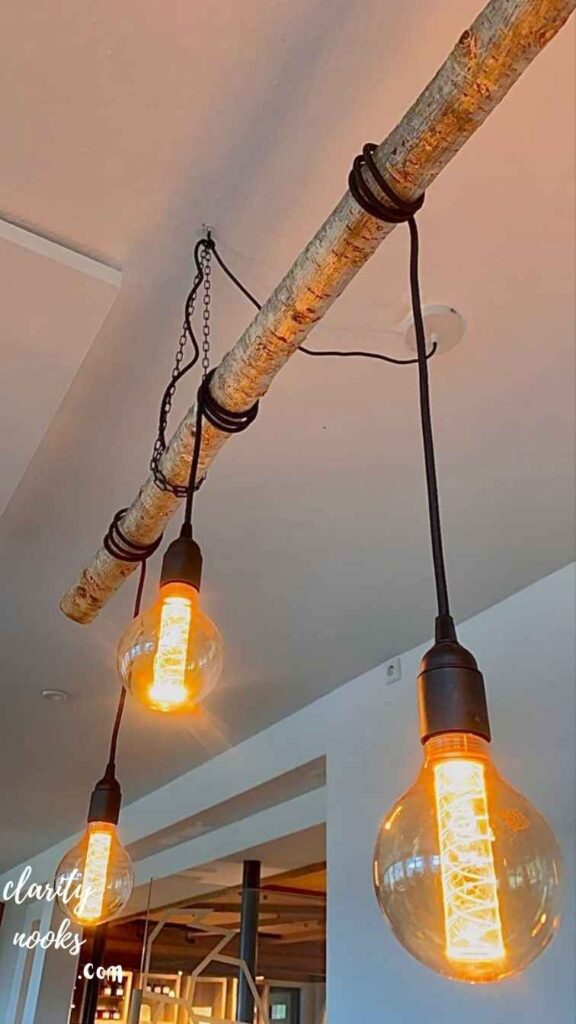
Plug-In Pendant Lights Over an Island or Dining Area
“Hardwired look without touching a single wire”
Pendant lights are one of the most powerful visual tools in kitchen design they define zones, add character, and draw the eye upward. The problem most people assume is that adding pendants requires a licensed electrician and ceiling work. In many cases, that’s simply not true. Plug-in pendant lights, which use a standard outlet and a cord that runs along the ceiling or wall, have become widely available and genuinely stylish.
Look for pendant kits that include a ceiling canopy and cord management hardware. You install a ceiling hook (which fits into a joist or a toggle anchor for drywall), route the cord in a matching cover channel, and plug it into an outlet ideally above your cabinets if accessible. A pair of rattan, ceramic, or glass pendants positioned 70–80cm above an island surface creates a magazine-worthy focal point for under $100 total.
Expert Insight
Interior designer Mark Fenwick recommends hanging pendants so the bottom sits between 70–90cm above counter height for islands. Too high and they lose presence; too low and they become obstacles.
However, if your layout doesn’t allow for easy cord routing, consider a corded swag pendant instead these drape in a soft arc from a ceiling hook to a wall outlet, and when done intentionally, the cord becomes part of the aesthetic rather than something to hide.
Don’t Skip: DIY Small Kitchen Ideas to Make Cooking Spaces More Functional
Smart Bulb Retrofit for Existing Fixtures
“Instant intelligence for the lights already on your ceiling“
You don’t need new fixtures to get dramatically better lighting. Swapping your existing bulbs for tunable smart bulbs the kind that shift from warm amber in the evening to cooler daylight in the morning is one of the highest-leverage, lowest-effort DIY kitchen lighting upgrades available. It takes about four minutes and requires no tools beyond a step stool.
Smart bulbs from Philips Hue, LIFX, or the more budget-friendly Tapo range let you control color temperature, brightness, and schedules via an app or voice assistant. This matters in a kitchen because your lighting needs shift throughout the day. You want bright, neutral light when meal-prepping at noon, warm, dimmed light during dinner, and something in between for morning coffee. A smart bulb lets you program all three as scenes.
Mini case study
James and Priya renovated their kitchen on a £3,000 budget. Instead of spending £400 on new recessed downlights, they spent £90 on four Tapo smart bulbs for their existing pendants and added a £35 LED strip beneath the cabinets. The result, photographed for their renovation blog, was indistinguishable from a professionally lit kitchen and the smart scheduling meant the kitchen always felt welcoming when they arrived home.
Read More: DIY Small Bathroom Ideas to Make Your Bathroom Feel Spacious
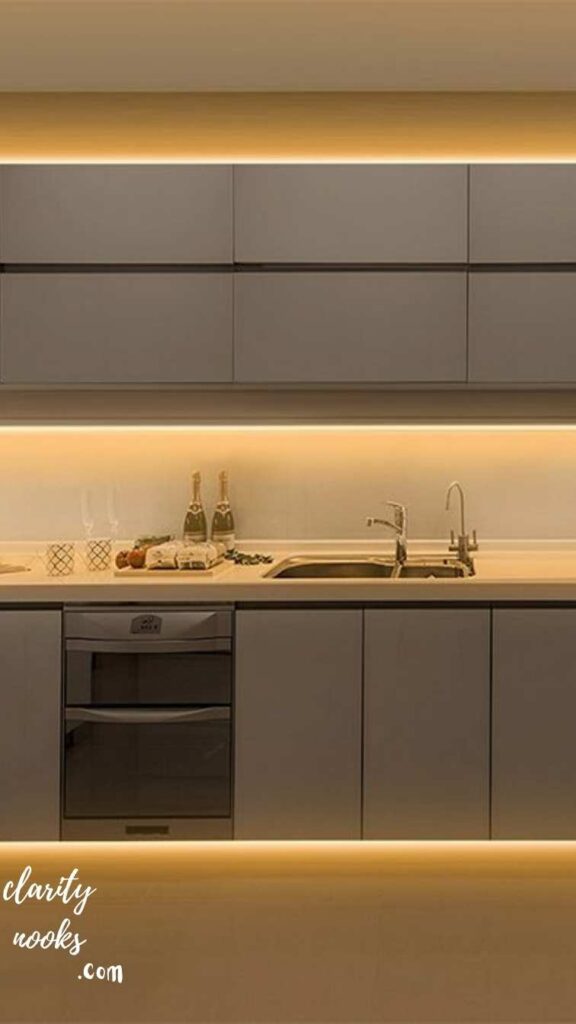
Toe-Kick Lighting (Floor-Level LED Strips)
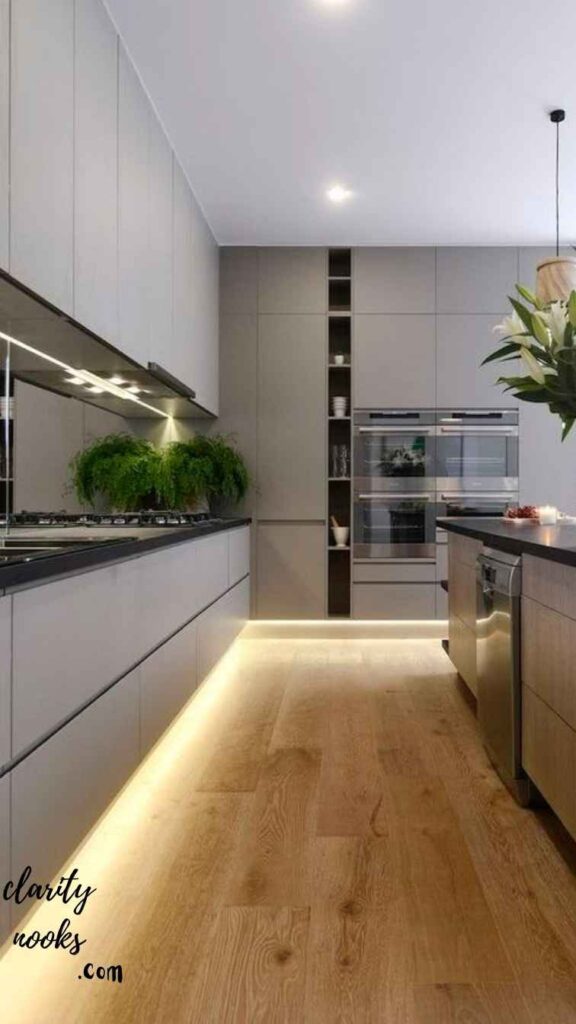
“The upgrade designers use that homeowners rarely discover:”
Toe-kick lighting is the gap at the base of your lower cabinets typically a recessed strip about 10cm tall running along the floor line. Installing LED strips here creates an extraordinary floating-cabinet effect that makes even a budget kitchen look considered and high-end. It’s also practical: these strips provide gentle ambient light for nighttime navigation, letting you grab a glass of water at 2 a.m. without blinding yourself with the overhead lights.
The installation is straightforward: clean the toe-kick surface, apply waterproof LED strips (important, since floors can be damp), and route the power cord through a channel up to a nearby outlet inside a cabinet. A warm amber or gold tone works best here this isn’t task lighting, it’s atmosphere. You’re creating depth and drama, not illuminating a prep surface.
This is one of the most competitor-missed tips in kitchen lighting content. Most blogs never mention it, yet interior designers include it in nearly every high-end kitchen project. The transformation it creates is disproportionate to its cost (around $30–$50 in materials).
Also Read: Trendy DIY Living Room Curtain Ideas for a Fresh and Elegant Look
In-Cabinet and Glass-Door Lighting
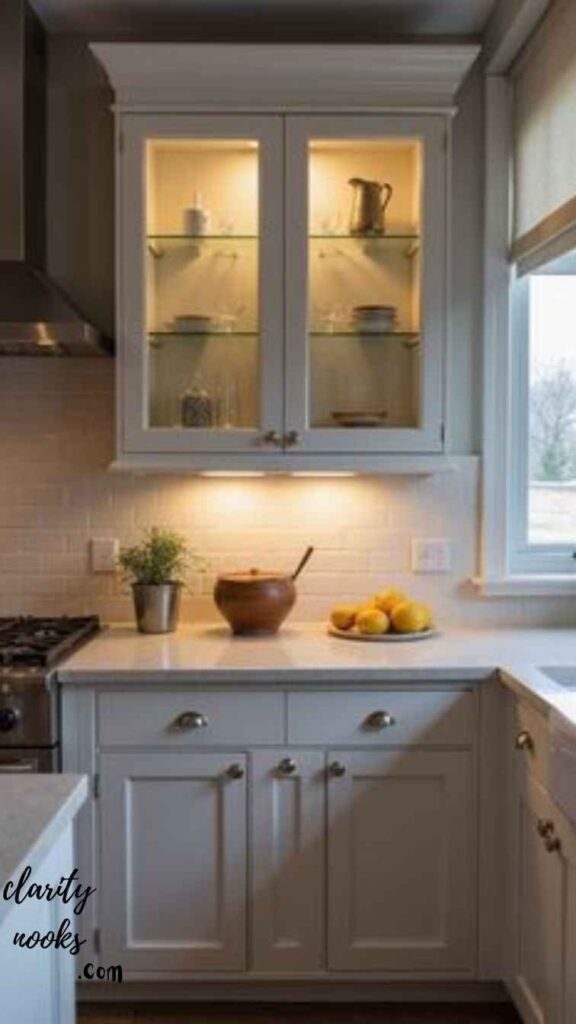
“Lighting your storage like a boutique restaurant“
If you have glass-fronted upper cabinets or you’re considering replacing solid doors with glass-fronted ones adding interior cabinet lighting is a transformative DIY project. Small LED puck lights or thin flex strips mounted inside the cabinet illuminate your dishware, glassware, or decorative items from within, turning storage into a display that glows beautifully in the evening,
The simplest approach uses battery-powered LED puck lights with adhesive mounts no wiring needed, and they last 6–12 months per set of batteries depending on usage. For a more permanent solution, thin LED strips with an in-cabinet power supply are worth the slightly more complex installation. Position lights at the top of the cabinet interior, facing downward, to avoid visible hotspots on the glass doors.
Design Note
This technique works best with curated, uncluttered cabinet contents. If your cabinets are packed, the lighting reveals the clutter. Consider using just one or two glass-fronted cabinets for display pieces, keeping others solid-door for utilitarian storage.
Conclusion
Great DIY kitchen lighting doesn’t require a contractor, a permit, or a massive budget. It requires understanding three principles: layer your light sources, match color temperature to function, and plan for both task and atmosphere. The five ideas in this guide from under-cabinet LED strips to toe-kick lighting are your practical toolkit for turning a poorly lit kitchen into one that genuinely works for you.
Start with one upgrade this weekend. Even a single LED strip beneath your upper cabinets will show you, immediately, what your kitchen has been missing. Once you see the difference, you’ll understand why professional kitchen designers treat lighting as the most important finish in the room and you’ll be ready for the next layer.
Trend Analysis
Trend Analysis: Kitchen Lighting in 2026 and Beyond
Now · 2026
Tunable white as standard
Homeowners are moving away from fixed color temperature. Adjustable 2700K–5000K fixtures are becoming the default, not the upgrade.
2026–2027
Circadian rhythm lighting
Lighting that automatically shifts temperature throughout the day synced to sunrise and sunset is moving from luxury spec to mainstream DIY.
2027–2028
AI-scheduled scenes
Smart home AI will auto-generate lighting scenes based on calendar events, weather data, and occupancy without manual programming.
Ongoing
Warm-toned resurgence
Post-pandemic, data from interior platforms shows a clear shift toward warmer, more amber tones in kitchens reacting against sterile, cold-white interiors.
Perhaps the most significant behavioral shift: homeowners are treating kitchens as social spaces, not just functional ones. Lighting is following suit. The “always-on bright overhead” model is giving way to layered systems that can shift from a bright workspace at noon to a warm, dimmed dining atmosphere by evening all within the same room.
Practical Expert Insights
The three-layer principle every professional uses
Professional kitchen designers never rely on a single light source. They build lighting in three layers: ambient (general illumination), task (targeted working light), and accent (decorative or atmospheric). Your overhead fixture handles ambient. Under-cabinet strips handle task. Toe-kick lights, cabinet lighting, and pendants handle accent. When all three layers are present, a kitchen feels both functional and welcoming.
Dimmer switches: the most underrated upgrade
If you’re changing a bulb and not adding a dimmer, you’re leaving the most important variable on the table. A $15 dimmer switch (or a smart plug with dimming capability for renters) transforms a fixed-brightness room into one you can tune to the moment. Make sure your chosen bulbs are rated as “dimmable” not all LEDs are, and non-dimmable bulbs on dimmer circuits will flicker or fail prematurely.
CRI: the number most buyers ignore
Color Rendering Index (CRI) measures how accurately a light source renders colors compared to natural daylight. A CRI of 80 is acceptable; 90+ is excellent. In a kitchen, this matters because food appearance directly affects perceived freshness and appetite. Low-CRI bulbs can make fresh vegetables look dull and meat look unappetizing. Always check the CRI rating on packaging before buying kitchen bulbs.
Long-Term Strategy & Sustainability
The smartest DIY kitchen lighting choices are modular and upgradeable. Rather than committing to a single-brand smart ecosystem (which may become obsolete or discontinued), opt for Matter-protocol-compatible devices Matter is the cross-platform smart home standard now supported by Apple, Google, Amazon, and Samsung. A Matter-compatible bulb or strip works with any ecosystem and future-proofs your investment.
On sustainability: LED technology has reached a point where a quality bulb should last 15,000–25,000 hours roughly 15 years of typical kitchen use. However, cheap LEDs often fail far earlier and contain lower-quality drivers that flicker in ways invisible to the naked eye but measurable in headache frequency. Spend slightly more on LEDs with a five-year warranty and a known brand. The total cost of ownership, including replacements, almost always favors the higher-quality option.
For those building toward a full kitchen renovation, document your DIY lighting placements carefully. When the time comes for a rewire, an electrician can hardwire your plug-in strips into permanent installations using the positions you’ve already proven work for your space. Your DIY phase becomes free planning and testing for your eventual renovation.
Future Predictions & Innovations
Within the next two to three years, expect AI-driven lighting automation to move from premium smart home setups into standard DIY territory. Systems will learn your household’s rhythms recognizing when you typically cook, when family gathers, when the kitchen empties and automate lighting scenes without requiring app programming. This is already possible with high-end Lutron systems; it will be achievable with $50 smart strips by 2028.
Human-centric lighting (HCL) long the preserve of commercial spaces and hospital design is entering residential kitchens. This approach uses biologically-aware light schedules to support sleep, focus, and energy based on the time of day. Early consumer products have arrived; mainstream adoption in kitchens will follow. The DIY opportunity here is significant: tunable LED strips installed today will be compatible with HCL schedules simply through a firmware or app update.
Wireless power delivery for lighting (used commercially since 2023) is unlikely to reach kitchen DIY before 2028–2030, but when it does, it will eliminate the last obstacle for renters: the visible cord. Watch this space if you’re making long-term plans.
Common Mistakes & Hidden Gaps
- Using a single overhead fixture as the only light source. This is the most universal kitchen lighting mistake. A single ceiling fixture creates flat, shadow-heavy illumination that’s inadequate for task work and uninviting as ambient light.
- Choosing the wrong color temperature. A kitchen lit with 6500K “daylight” bulbs feels like a supermarket, not a home. Most kitchens benefit from 2700K–3000K for warmth, or 4000K where clinical accuracy matters (for pro cooks).
- Installing LED strips without checking the IP rating. Near sinks and dishwashers, moisture resistance matters. Look for IP65 or higher on any strip within 60cm of a water source. Standard indoor strips will fail and potentially create a safety hazard.
- Forgetting about the switch location. Installing beautiful pendant lights or smart strips and then realizing you need to reach around a corner or into a cabinet to turn them on defeats the purpose. Plan your control points outlets, smart plugs, switches before you install.
- Intermediate mistake: over-dimming task areas. Dimmers are wonderful but not on your under-cabinet strips during prep. A surprising number of people add dimmers to every circuit and then struggle to see what they’re cutting. Keep task lighting at or near full brightness; use dimmers on ambient and accent circuits.
- Hidden gap: ignoring the range hood area. Many range hoods include a built-in light, but it’s often a single incandescent bulb that casts yellow light directly over your cooking zone. Replacing this with an LED equivalent of the same base fitting a simple bulb swap dramatically improves the most important task area in the kitchen.
FAQ’S About DIY Kitchen Lighting Ideas
Can I add kitchen lighting without an electrician?
Yes plug-in pendant lights, LED strip kits, battery-powered puck lights, and smart bulb retrofits all require zero electrical work and are fully reversible, making them ideal for renters and DIY beginners.
What color temperature is best for kitchen lighting?
For most kitchens: 2700K–3000K for warm, welcoming ambient light, and 3500K–4000K for task areas like countertops and the range. Avoid going above 5000K unless you have a specific clinical or professional-cooking need.
How do I hide LED strip light wires?
Use cord channels (also called cable raceways) in matching cabinet or wall colors. For under-cabinet strips, run the cord along the cabinet interior and exit through a small drilled hole or around the back of the cabinet to a nearby outlet.
What is layered kitchen lighting?
Layered lighting combines three types: ambient (general overhead), task (direct working light over prep surfaces), and accent (decorative/atmospheric, like toe-kick strips or cabinet lighting). Using all three makes a kitchen feel both functional and beautifully designed.
How much does DIY kitchen lighting cost?
Entry-level upgrades (LED strip kit + smart bulbs) can cost $50–$120. A more complete layered lighting setup including pendants, strips, and toe-kick lighting typically runs $150–$300, depending on fixture quality and kitchen size.

Rameen Zara is the founder of Clarity Nooks, bringing over five years of experience in home décor and interior styling. She shares simple yet practical design ideas that suit real homes and everyday living. Her approach focuses on cozy aesthetics, soft color palettes, and natural textures that create warm, inviting spaces.


