

DIY Kitchen Rugs Ideas Budget-Friendly, Creative & Stylish Handmade Rug Projects for Every Kitchen
Your kitchen floor takes more abuse than any other surface in your home constant foot traffic, spills, splashes, and dropped utensils. Yet, this hardworking space is often the most neglected when it comes to decor. A DIY kitchen rug changes that instantly. It adds warmth, cushion underfoot, a pop of color, and your own personal style all without a contractor or a big budget.
The challenge most homeowners face is finding a kitchen rug that’s both stylish and practical. Store-bought options often come in generic patterns, wear out quickly, or simply cost too much. That’s exactly where DIY kitchen rug ideas shine. When you make it yourself, you control the size, color, material, and durability. You get something that fits your kitchen perfectly and costs a fraction of retail price.
In this guide, you’ll discover 8 practical and creative homemade kitchen rug ideas complete with step-by-step instructions, materials lists, honest cost estimates, and real decorating tips. Whether your kitchen is farmhouse-style, modern minimalist, or colorfully eclectic, there’s a DIY rug project here that will transform your space in a single weekend.
⭐ Featured Snippet:
What is a DIY Kitchen Rug? A DIY kitchen rug is a handmade floor covering created using materials like cotton rope, fabric strips, jute twine, or upcycled T-shirts. It provides cushioning, adds style, and protects flooring all at a fraction of the cost of store-bought rugs.
Braided Fabric Rug From Old T-Shirts
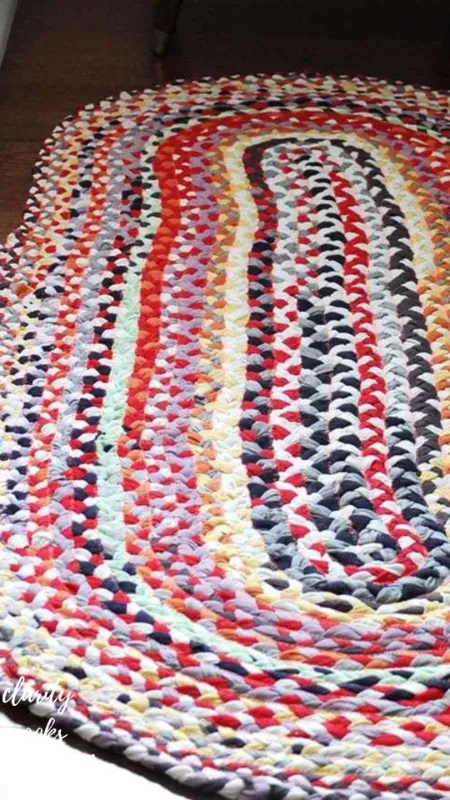
The Budget Champion of DIY Kitchen Rugs
If you have a pile of old T-shirts sitting in your closet, you already have everything you need for one of the most popular upcycled kitchen rug ideas out there. The braided T-shirt rug is durable, machine-washable, and surprisingly plush underfoot. It’s also one of the easiest projects on this list no sewing machine required for the basic version.
The beauty of this project is its zero-waste approach. You’re repurposing textile waste into a functional, beautiful handmade kitchen floor mat. Real-life scenario: Sarah, a mom of three in Ohio, made a 2×3 foot braided rug using 12 old T-shirts from her kids. It cost her nothing and now anchors her kitchen sink area perfectly. She’s been using it for two years with zero signs of wear.
Materials Needed
- 10–15 old cotton T-shirts (various colors for a rainbow effect)
- Sharp fabric scissors
- Safety pins or binder clips
- Optional: tapestry needle + thread for securing the coil
Step-by-Step Instructions
- Cut T-shirts into 1.5-inch wide strips. Cut off hems first.
- Stretch each strip it will curl into a tube-like rope naturally.
- Tie three strips together at one end and secure to a fixed point.
- Braid tightly and continuously, adding new strips by knotting them in.
- Coil the braid flat into an oval or round shape.
- Sew or use fabric glue to hold coils together as you go.
- Tuck and secure the final end. Let dry if using glue.
| Detail | Info |
| Estimated Cost | $0–$8 (if you have old T-shirts) |
| Time Required | 3–5 hours |
| Skill Level | Beginner |
| Best For | Sink area, stove front, entryway transition |
| Durability | High machine washable on gentle cycle |
Decorating Tips:
Use a gradient color scheme light to dark shades of the same hue for a modern farmhouse kitchen rug look. Alternatively, alternate two bold contrasting colors for a playful, retro vibe. This rug pairs beautifully with white shaker cabinets and butcher block countertops.
Find out more: DIY Pantry Organization Ideas to Create More Space and Keep Your Kitchen Clutter-Free
Woven Cotton Rope Rug
The Coastal Farmhouse Favorite
Cotton rope rugs have dominated kitchen decor trends for years, and for good reason. They’re naturally absorbent, slip-resistant when paired with a rug pad, and incredibly easy to clean. A DIY cotton rope rug gives you the look of an expensive artisan piece at about 15–20% of the retail cost.
This project is a weekend favorite among crafters because it requires no special loom. You simply coil thick cotton rope and stitch or hot-glue it into shape. Mini case study: A couple in Portland created a custom 3×5 foot rope rug for their farmhouse kitchen. Their total cost? $22 in cotton rope from the hardware store. The same size rug in a boutique store ran $140.
Materials Needed
- 50–80 feet of 3/8-inch natural cotton rope
- Hot glue gun + glue sticks (or heavy-duty thread + curved needle)
- Non-slip rug pad (optional but recommended)
- Scissors
Step-by-Step Instructions
- Start by coiling rope tightly in a flat spiral begin with a tight circle.
- Apply hot glue between each coil to bond layers together as you spiral outward.
- Work slowly, pressing firmly for 30 seconds at each glue point.
- Continue until you reach your desired size.
- Trim the rope end at an angle and glue flat to the underside.
- Let cure for 2 hours before placing on floor.
| Detail | Info |
| Estimated Cost | $18–$35 |
| Time Required | 2–4 hours |
| Skill Level | Beginner–Intermediate |
| Best For | Under island, dining area, open kitchen floor |
| Durability | Medium–High (spot clean, air dry) |
Decorating Tips:
Natural cotton rope pairs perfectly with neutral tones. For a coastal kitchen, leave it natural. For a modern kitchen, paint the top surface with a diluted chalk paint wash for a subtle pop of color. A jute or sisal rug alternative using the same method works great for a more rustic, textured look.
See the full breakdown: DIY Kitchen Backsplash Ideas 2026 to Refresh Your Kitchen in a Weekend
Painted Canvas Drop Cloth Rug
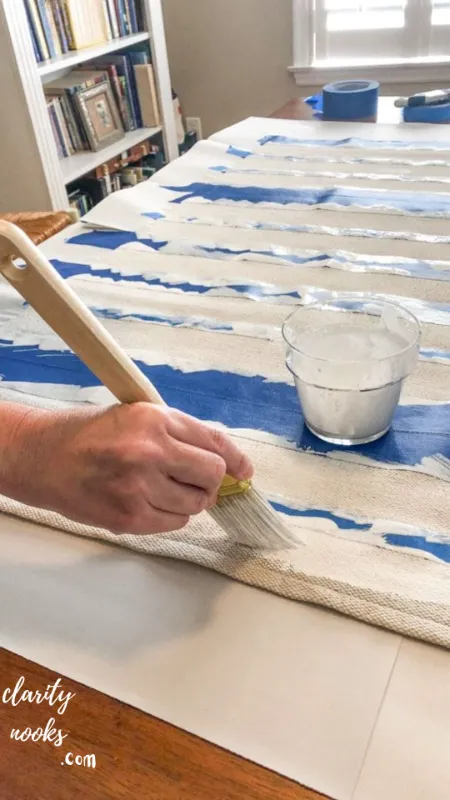
The Designer-Look on a Painter’s Budget
If you want something that looks like it came straight from an interior design studio, a painted canvas drop cloth rug is your answer. Drop cloths are incredibly cheap, already hemmed, and take paint beautifully. This is one of the most customizable DIY kitchen floor rug ideas because you can recreate any pattern stripes, geometric shapes, Moroccan tiles, or freehand florals.
The key secret most tutorials skip: priming the canvas first makes all the difference. A coat of diluted white acrylic creates a smooth base that prevents paint from soaking through unevenly. Real-life example: A blogger in Nashville painted a $12 drop cloth with a black and white geometric pattern for her rental kitchen. Result: a rug that looks like a $200 hand-painted piece.
Materials Needed
- 9×12 canvas drop cloth (hardware or paint store)
- White and accent color acrylic or floor paint
- Painter’s tape for clean lines
- Foam rollers and brushes
- Polyurethane sealer (matte finish)
- Non-slip rug pad
Step-by-Step Instructions
- Prewash and dry the drop cloth to remove sizing.
- Cut to desired rug size, fold edges under 1 inch, and iron flat.
- Apply a thin base coat of diluted white acrylic and let dry.
- Apply painter’s tape in your chosen pattern.
- Roll on your accent color. Apply 2–3 coats for solid coverage.
- Remove tape carefully while paint is still slightly wet.
- Seal with 2 coats of matte polyurethane for durability.
- Place non-slip pad underneath before using.
| Detail | Info |
| Estimated Cost | $12–$28 |
| Time Required | 4–6 hours (including drying time) |
| Skill Level | Beginner |
| Best For | Open kitchen floors, under kitchen table |
| Durability | High sealed surface resists spills |
Decorating Tips:
For a Mediterranean kitchen, use terracotta and white in a tile-like grid pattern. For a Scandi kitchen, try navy blue and white stripes. This DIY painted kitchen rug also works as a temporary fix for renters who can’t change flooring it completely transforms the look of vinyl or linoleum floors.
Check out our detailed article: DIY Kitchen Lighting Ideas to Make Your Kitchen Look Modern and Warm
Pom-Pom or Yarn Tufted Rug
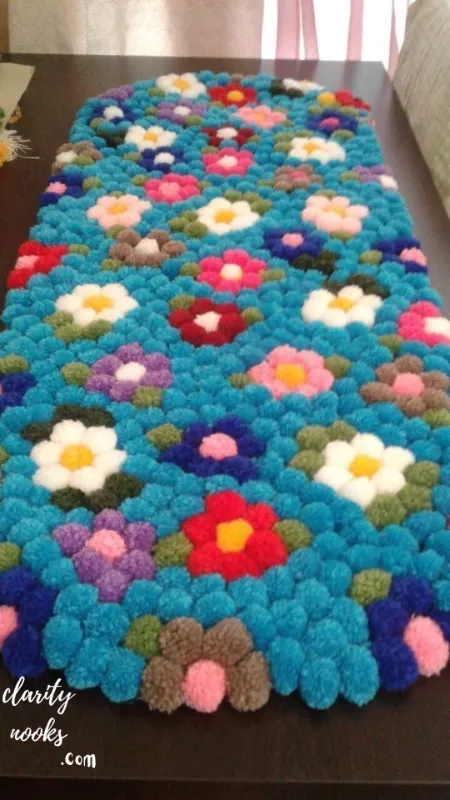
The Cozy, Textured Statement Piece
Yarn tufted rugs have exploded on social media for good reason they look luxuriously thick and tactile, yet they’re made with tools you can find at any craft store. A basic DIY tufted kitchen rug uses a tufting punch or even a simple rug canvas and a yarn needle. The result is a plush, custom rug that feels incredible underfoot.
However, for the kitchen specifically, the material choice matters. Use wool or acrylic yarns, which resist moisture better than cotton yarns alone. Add a rug backing after tufting for stability. Mini case study: A fiber artist in Brooklyn created a 2×3 tufted rug with chunky cream wool yarn. She listed a similar piece on Etsy for $180 hers cost $28 in materials.
Materials Needed
- Monk’s cloth or rug canvas (primary tufting fabric)
- Bulky or chunky yarn in your chosen colors
- Rug tufting punch needle tool
- Rug frame or embroidery hoop (for tension)
- Rug backing fabric + latex adhesive
Step-by-Step Instructions
- Stretch monk’s cloth tightly over a rug frame and secure.
- Draw or trace your design with a permanent marker.
- Thread punch needle with yarn and tuft along design lines.
- Work in rows, filling in all areas completely.
- Apply latex adhesive to the back and press backing fabric onto it.
- Let dry for 24 hours. Trim loops to even length if desired.
| Detail | Info |
| Estimated Cost | $25–$55 |
| Time Required | 6–10 hours |
| Skill Level | Intermediate |
| Best For | Sink area, coffee corner, kitchen reading nook |
| Durability | Medium (spot clean only) |
Decorating Tips:
Keep yarn rugs in lower-traffic kitchen zones since they require more maintenance. A simple abstract blob shape in sage green or terracotta adds a trendy, artisan kitchen decor touch without overwhelming the space. Pair it with natural wood elements and matte black hardware for maximum style impact.
Read our expert tips: Creative DIY Kitchen Nook Ideas That Make Your Kitchen Feel Warm and Inviting
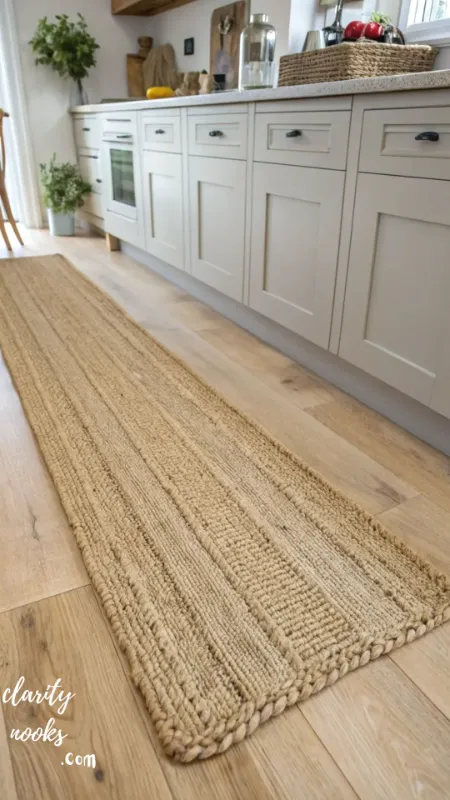
Jute Burlap Woven Rug
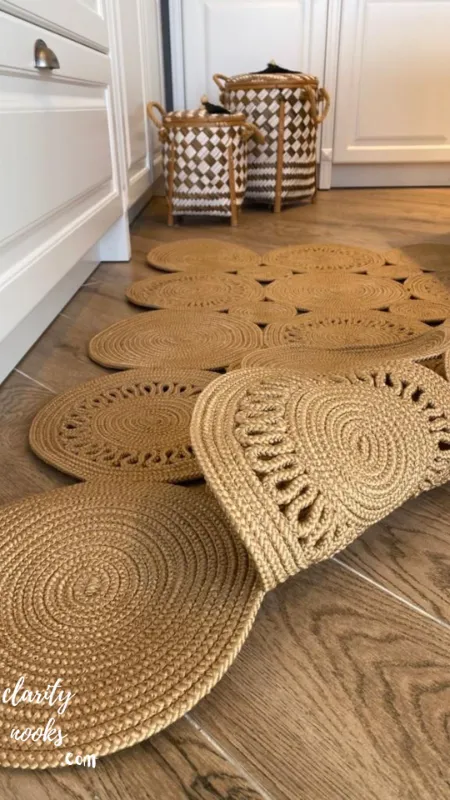
The Natural Texture Classic
Jute and burlap rugs have a timeless appeal that suits almost every kitchen style from boho to traditional to Scandinavian. The best part is that raw jute twine is one of the cheapest natural materials available. A roll of jute twine from the dollar store can become a beautiful farmhouse-style kitchen rug with just an afternoon of work.
There are two popular approaches: coiling (similar to the rope rug method) or flat weaving on a simple DIY cardboard loom. The coiling method is faster; the woven method produces a flatter, more refined look. For a beginner-friendly woven kitchen rug, the coiling approach wins every time.
Materials Needed
- 2–4 rolls of natural jute twine
- Hot glue gun or heavy-duty thread
- Scissors
- Fabric backing (optional but adds durability)
Step-by-Step Instructions
- Cut jute into manageable lengths (4–5 feet each).
- Twist three strands together tightly to create a thicker cord.
- Begin coiling flat, hot-gluing every 2–3 inches.
- Work outward to oval or rectangular shape as desired.
- Press each new coil firmly against the previous one.
- Seal the final end underneath and let cure fully.
| Detail | Info |
| Estimated Cost | $5–$15 |
| Time Required | 3–5 hours |
| Skill Level | Beginner |
| Best For | Under kitchen table, entryway to kitchen |
| Durability | Medium (shake out regularly, avoid soaking) |
Decorating Tips:
Natural jute complements warm-toned kitchens with honey wood floors, terracotta tiles, or cream-colored cabinets beautifully. For extra personality, dye sections of the jute with diluted leather dye before coiling. This creates a two-tone natural rug look that’s completely unique to your space.
Don’t miss this guide: DIY Small Kitchen Ideas to Make Cooking Spaces More Functional
No-Sew Fringed Fabric Rug
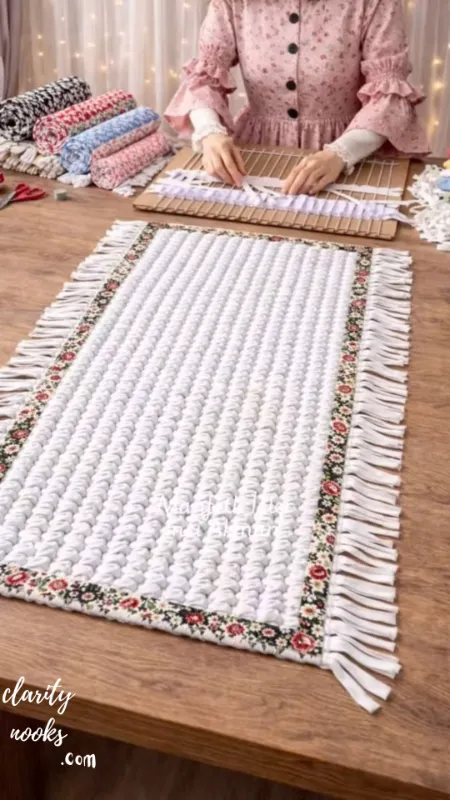
The Fast, Fuss-Free Weekend Project
Not everyone has a sewing machine, and that’s perfectly fine. The no-sew fringed fabric rug is proof that you can create a beautiful, professional-looking kitchen rug with nothing more than scissors, fabric, and fabric glue. This is one of the fastest easy DIY kitchen rug ideas on this list you can finish it in under two hours.
The technique works by layering two pieces of fabric, cutting fringe around the edges, and tying the layers together. It creates a reversible, double-sided rug with a boho-chic fringe detail. Use outdoor fabric or canvas duck cloth for the best results in the kitchen these materials clean up easily and hold their shape.
Materials Needed
- 1–2 yards of canvas duck cloth, outdoor fabric, or drop cloth
- Sharp rotary cutter or fabric scissors
- Cutting mat and ruler
- Fabric glue or iron-on hem tape
- Chalk or fabric marker
Step-by-Step Instructions
- Cut two identical rectangles of fabric to your desired rug size plus 4 inches on each side.
- Mark a 3-inch border around the edge with chalk.
- Cut 1-inch wide fringe strips up to the chalk line all around.
- Layer both pieces back to back, aligning fringe.
- Tie corresponding fringe pairs together in a double knot.
- Apply fabric glue along the center seam for added stability.
- Let dry flat. Flip and fluff fringe edges.
| Detail | Info |
| Estimated Cost | $10–$20 |
| Time Required | 1.5–2.5 hours |
| Skill Level | Beginner |
| Best For | Stove area, sink front, coffee station mat |
| Durability | Medium-High spot clean or gentle wash |
Decorating Tips:
Choose two complementary fabric colors to make the double-sided design pop. A mustard yellow paired with cream fringe creates a warm boho kitchen rug style. For a modern kitchen, try charcoal gray with white fringe it reads as clean, graphic, and intentional.
See our latest insights: DIY Kitchen Decor Ideas That Actually Transform Your Space
Stenciled Outdoor Rug Refreshed as Kitchen Mat
The Upcycle You Haven’t Tried Yet
Got an old outdoor rug sitting in the garage? Before you toss it, consider transforming it with stencils and exterior-grade paint into a brand-new custom kitchen mat. Outdoor rugs are perfectly suited to kitchen use they’re designed to resist moisture, fade, and foot traffic. This rug upcycling idea is one of the most sustainable options on this list.
The key is choosing the right stencil and paint. Metallic or chalk-finish paint adheres best to polypropylene outdoor rug fibers. You can find affordable stencil packs online or at craft stores. This project is also a smart solution for renters or anyone who moves frequently it’s lightweight, easy to roll up, and makes any kitchen feel instantly decorated.
Materials Needed
- Old flat-weave outdoor rug (any size)
- Craft stencil of your choice
- Foam roller + paint tray
- Exterior acrylic or chalk-based paint
- Painter’s tape
Step-by-Step Instructions
- Clean rug thoroughly and let dry completely.
- Position stencil in center or repeat pattern across surface.
- Secure stencil with tape to prevent slipping.
- Apply paint with foam roller use minimal paint to avoid bleeding.
- Lift stencil carefully, let dry, then reposition for repeat.
- Apply 2 coats for rich coverage. Let cure 24–48 hours before use.
| Detail | Info |
| Estimated Cost | $5–$15 (using existing rug) |
| Time Required | 2–3 hours + curing time |
| Skill Level | Beginner |
| Best For | Large kitchen floors, under kitchen table |
| Durability | Very High — outdoor rug base is extremely durable |
Decorating Tips:
A Moroccan tile stencil in white paint on a black outdoor rug creates a show stopping kitchen floor moment that costs under $15 total. Alternatively, a simple repeating diamond pattern in terracotta on a natural jute-colored rug reads as effortlessly sophisticated.
Must-Read Articles: DIY Front Door Entryway Ideas That Instantly Boost Curb Appeal and Welcome Guests
Crochet or Knit Chunky Rug
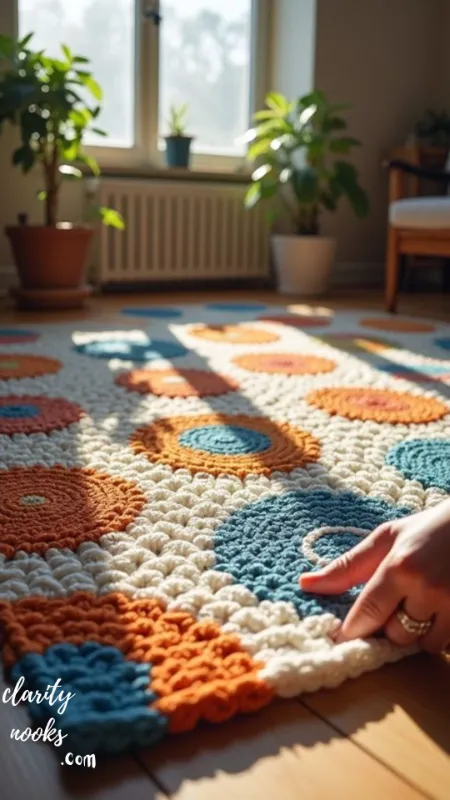
The Craft-Lover’s Kitchen Project
For those who love fiber arts, a chunky crochet kitchen rug is the perfect intersection of hobby and home decor. Using bulky cotton or recycled yarn, you can crochet a flat, dense rug in just a few evenings. Cotton is especially practical for the kitchen it’s absorbent, machine-washable, and naturally hypoallergenic.
You don’t need to be an expert crocheter. The simplest crochet kitchen rug pattern uses only single crochet stitches in continuous rounds a perfect beginner project. Even knitters can adapt this using very large needles (US size 13 or 15) and the garter stitch for a quick flat rectangle. Mini case study: A teacher in Vermont crocheted six matching kitchen rugs as Christmas gifts using one $10 skein of cotton rope yarn per rug.
Materials Needed
- Super bulky (size 6) cotton or recycled yarn
- Large crochet hook (size N/P or 10mm+)
- Scissors + yarn needle
- Non-slip rug pad
Step-by-Step Instructions
- Make a slip knot and chain 6. Join into a ring with slip stitch.
- Round 1: Work 12 single crochets into ring. Join.
- Round 2+: Increase every other stitch to maintain flat shape.
- Continue until rug is desired diameter (or work in rows for rectangle).
- Fasten off, weave in ends securely.
- Block flat and let dry before placing on floor.
| Detail | Info |
| Estimated Cost | $8–$25 |
| Time Required | 3–8 hours |
| Skill Level | Beginner–Intermediate |
| Best For | Sink area, coffee corner, pet feeding station |
| Durability | High machine washable in cold, air dry |
Decorating Tips:
A cream or off-white crochet rug on dark kitchen floors creates beautiful contrast. For a playful kitchen, alternate two colors every two rounds for a striped effect. The natural texture of chunky cotton crochet pairs well with farmhouse decor, wooden shelving, and ceramic accessories.
Recommended for You: DIY Backyard Design Ideas: Budget-Friendly Upgrades That Look Professionally Designed
DIY Kitchen Rugs: Cost & Difficulty Comparison
| DIY Rug Idea | Est. Cost | Time | Skill Level | Washable? |
| Braided T-Shirt Rug | $0–$8 | 3–5 hrs | Beginner | Yes |
| Cotton Rope Rug | $18–$35 | 2–4 hrs | Beginner | Spot clean |
| Painted Canvas Rug | $12–$28 | 4–6 hrs | Beginner | Wipe clean |
| Tufted Yarn Rug | $25–$55 | 6–10 hrs | Intermediate | Spot clean |
| Jute Burlap Rug | $5–$15 | 3–5 hrs | Beginner | Shake/spot |
| No-Sew Fringed Rug | $10–$20 | 1.5–2.5 hrs | Beginner | Gentle wash |
| Stenciled Outdoor Rug | $5–$15 | 2–3 hrs | Beginner | Hose/wipe |
| Crochet Chunky Rug | $8–$25 | 3–8 hrs | Beginner+ | Machine wash |
Conclusion
A DIY kitchen rug is one of the smartest, most satisfying home projects you can tackle it costs little, takes minimal time, and makes a huge visual impact. From braided T-shirt rugs to stenciled outdoor mats, every idea in this guide offers a practical, budget-friendly way to upgrade your kitchen floor with your own hands.
The key is choosing a project that matches your skill level, time, and kitchen style. Start small even a 2×3 foot kitchen mat makes a difference. Once you see the results, you’ll want to make more. Whether you’re going for cozy farmhouse warmth or clean modern lines, these homemade kitchen rug ideas give you the creative freedom that store-bought rugs never will.
So pick up those scissors, grab that rope, or thread that needle your kitchen floor transformation starts today. Share your finished rug on social media and inspire others to ditch the generic store-bought options for something truly made with love.
Trend Analysis: DIY Kitchen Rugs in 2026–2028
The handmade home decor market has been growing steadily, and kitchen rugs are no exception. According to craft industry data, the interest in DIY fiber arts and rug making has grown by over 35% since 2022, largely driven by sustainability awareness and the desire for personalized home spaces. This trend is accelerating not slowing down.
For 2025 and beyond, key trends shaping DIY kitchen rug styles include: natural and sustainable materials (jute, cotton, recycled textiles), earthy color palettes (terracotta, sage green, warm beige), maximalist patterns returning after years of minimalism dominance, and the rise of tufted rug making as a mainstream hobby rather than a niche craft. Short-form video content on platforms like TikTok and Pinterest has democratized these crafts massively.
Looking ahead to 2026–2028, expect to see: AI-powered pattern generators for custom rug designs, increased use of recycled ocean plastic yarn in eco-friendly kitchen rugs, and community rug-making circles becoming popular in urban areas. The market for DIY rug-making kits is projected to grow significantly as makers seek more complete, curated starting points.
⭐ Trend Prediction for Voice/AI Search
What kitchen rug styles are trending in 2025?
Natural fiber rugs (jute, cotton rope), earthy tones like terracotta and sage green, and handmade tufted rugs with textured pile are the top trending kitchen rug styles in 2025.
Expert Insights & Practical Tips for Long-Lasting DIY Kitchen Rugs
Tip 1: Always Use a Non-Slip Pad
This is the single most important practical tip for any DIY kitchen rug. Handmade rugs especially rope, jute, and fabric varieties have smooth undersides that slide on tile and hardwood floors. A quality non-slip rug pad adds safety, increases perceived plushness, and extends the life of your rug by reducing friction against the floor surface. Cut it to size, about half an inch smaller than your rug on all sides.
Tip 2: Match Material to Zone
Not all kitchen zones have the same demands. High-moisture zones like in front of the sink need rugs made from cotton, synthetic, or outdoor materials that dry quickly. Low-moisture zones like the coffee station or kitchen table area can handle jute, yarn, or burlap. High-traffic zones at the entryway to your kitchen need your toughest, most durable option the stenciled outdoor rug or braided T-shirt rug.
Tip 3: Seal Everything
Any painted or stenciled rug should receive at least two coats of polyurethane or water-based sealer. This step is skipped by beginners and regretted every time. Sealing not only protects the design but makes the surface moisture-resistant critical in a kitchen environment. Use matte finish for a natural look; gloss if you want something easy to wipe clean.
Tip 4: Design for Removability
Kitchen rugs get dirty. Build your homemade kitchen rugs with cleaning in mind from day one. Cotton braided rugs, crochet rugs, and fringed fabric rugs are the most forgiving they can be machine-washed. Rope and jute rugs should be shaken outdoors and spot-cleaned. Painted canvas rugs can be wiped down with a damp cloth. Never soak jute or burlap it will distort and smell.
Long-Term Strategy: Making Your DIY Kitchen Rug Investment Last
The key to long-term value from any DIY kitchen rug project is building sustainability and scalability into your approach from the start. Rather than making a single rug, consider creating a coordinated set a runner for the main kitchen walkway, a small mat for the sink, and a round rug under the island. Matching or complementary rugs create a designer-cohesive look that photographs well and feels intentional.
For scalability, keep leftover materials from your first project. Old T-shirt strips, yarn ends, and rope scraps are perfect for making smaller kitchen mat ideas like trivets, mug pads, or pet feeding mats. This zero-waste approach stretches your initial investment significantly. Crafters who adopt this mindset often find that their entire kitchen rug collection has cost less than a single retail purchase.
Invest in quality tools once a good hot glue gun, a sharp rotary cutter, and a non-slip rug pad and you’ll reuse them across dozens of future projects. The sustainable approach to DIY home decor isn’t just better for the environment; it’s significantly better for your wallet over a three to five year horizon.
Future Predictions & Innovations in DIY Kitchen Rugs
The intersection of technology and handmade crafts is closer than most makers realize. In the next 2–3 years, expect AI-powered design tools that generate custom rug patterns based on your kitchen’s color palette you upload a photo of your kitchen, and the AI outputs a pattern optimized for your space. Platforms like Canva and Adobe are already moving in this direction for surface pattern design.
Material innovation is another exciting frontier. Recycled ocean plastic fiber yarn is becoming commercially available at craft stores, making it possible to create fully eco-conscious kitchen rugs. Antibacterial cotton yarn treated with natural silver nanoparticles is also emerging particularly useful for kitchen environments where hygiene is a priority.
The DIY rug tufting kit market is projected to grow substantially as more crafters discover tufting guns as accessible tools (prices have dropped from $200+ to under $50 for entry-level models). This democratization of tufting means the quality of homemade kitchen rugs will increasingly rival professional-grade products. Makers who develop this skill now are building a genuinely valuable and marketable craft.
Common Mistakes & Hidden Gaps in DIY Kitchen Rug Projects
Beginner Mistakes
- Skipping the non-slip pad: This is the most common and most dangerous mistake. Never use a handmade rug in the kitchen without a non-slip backing or pad underneath.
- Using the wrong fabric: Delicate fabrics like chiffon or silk will not survive kitchen use. Always opt for cotton, canvas, outdoor fabric, or natural fiber ropes.
- Not sealing painted rugs: Paint on an unsealed canvas rug will crack and flake within weeks. Always seal with at least two coats of polyurethane.
- Making rugs too small: A rug that’s too small for its zone looks awkward. Measure your kitchen zones first and plan your rug size accordingly.
Intermediate Mistakes
- Inconsistent tension in braided/crochet rugs: Uneven tension causes rugs to curl at the edges. Practice consistent tension from the beginning and block your finished rug flat while wet.
- Using cheap glue: Dollar store hot glue doesn’t hold well under kitchen conditions. Use a high-temp hot glue gun with quality glue sticks, or stitch coils together for rope rugs that need to last.
- Ignoring color fastness: Cheap yarn or fabric dye bleeds when wet. Always wash fabrics before use and test yarns for colorfastness. This matters especially for light-colored kitchen floors.
- Not planning for care: Many makers create beautiful rugs with no clear cleaning plan. Before you finish your rug, know exactly how you’ll clean it and test your cleaning method on a small patch first.
Hidden Gap: Most Tutorials Miss This
The biggest content gap competitors overlook is the underlayer strategy. Most DIY rug tutorials tell you what to make but not what to put underneath. The combination of your rug material + the right non-slip pad + your specific floor type is what determines real-world performance. For example: a rope rug on tile needs a different pad than a canvas rug on hardwood. Taking five minutes to match your underlayer to your floor type will add years to your rug’s useful life.
Frequently Asked Questions (FAQ)
What is the best material for a DIY kitchen rug?
Cotton is generally the best material for a DIY kitchen rug because it’s absorbent, washable, and durable. Cotton rope, T-shirt yarn, and woven cotton all perform well in kitchen environments. For higher-moisture areas like in front of the sink, choose cotton or synthetic blends that dry quickly. Avoid wool in high-moisture zones as it takes longer to dry and can develop mildew.
How do I keep my handmade kitchen rug from sliding?
Always use a non-slip rug pad cut slightly smaller than your rug. Alternatively, apply a thin layer of puff paint or silicone caulk in a grid pattern to the underside of your rug and let it cure completely. This DIY non-slip rug backing is as effective as commercial pads at a fraction of the cost.
Can DIY kitchen rugs be machine washed?
It depends on the material. Cotton braided rugs, crochet rugs, and fringed fabric rugs can generally be machine washed on a gentle cycle in cold water. Rope rugs, jute rugs, and painted canvas rugs should be spot-cleaned or wiped down rather than machine washed. Always air dry handmade rugs dryer heat can distort shapes and loosen bonds.
How long does it take to make a DIY kitchen rug?
Most beginner DIY kitchen rug projects take between 2 and 6 hours. A braided T-shirt rug or no-sew fringed rug can be completed in 2–3 hours. More complex projects like tufted yarn rugs or large crochet rugs may take 6–10 hours spread across multiple sessions. The painted canvas rug technically takes 4–6 hours but requires additional cure time before use.
How much does a DIY kitchen rug cost to make?
A homemade kitchen rug typically costs between $5 and $55, depending on the type and size. The braided T-shirt rug can cost virtually nothing if you use old clothes. Cotton rope rugs cost $18–$35. Tufted yarn rugs are the priciest at $25–$55 but still cost significantly less than comparable retail options, which often start at $80–$150 for the same size.
What size should a kitchen rug be?
For a kitchen sink rug, aim for 18×24 inches to 20×30 inches. For a kitchen runner, 24×72 inches is standard. Under a kitchen island, measure the island length and go 12 inches wider on each side. The general rule: your rug should visually anchor the zone without blocking cabinet doors or creating a tripping hazard at the edges.

Rameen Zara is the founder of Clarity Nooks, bringing over five years of experience in home décor and interior styling. She shares simple yet practical design ideas that suit real homes and everyday living. Her approach focuses on cozy aesthetics, soft color palettes, and natural textures that create warm, inviting spaces.


