

Creative DIY Kitchen Nook Ideas That Make Your Kitchen Feel Warm and Inviting
Your kitchen deserves more than a cold island and bar stools. Here’s how to carve out a warm, functional nook even in the smallest spaces without hiring a contractor.
You’ve scrolled past dozens of beautiful breakfast nook photos on Pinterest. You love the idea a tucked-away corner with built-in benches, a round table, morning light, and space for your family to actually sit together. But then reality hits: your kitchen is small, your budget is tight, and you’re not sure where to start.
This guide breaks down exactly how to build or style a DIY kitchen nook that fits your space, serves your lifestyle, and looks like it cost three times what you spent. Whether you have a sprawling open-plan kitchen or a narrow galley, there’s a nook idea here for you.
Featured Snippet Answer
A DIY kitchen nook is a built-in or semi-permanent seating area typically corner benches, a table, and storage installed in an underused kitchen corner or alcove. It maximizes space, adds storage, and creates a cozy dining zone without a full renovation. Average DIY cost ranges from $200 to $1,500 depending on materials and complexity.
Why a Kitchen Nook Outperforms a Regular Dining Set
Most homes have at least one dead corner an awkward space next to a window, between cabinetry, or under a stairwell. A kitchen nook transforms that underperforming square footage into the most-used spot in your home. Studies from the National Kitchen and Bath Association consistently show that homeowners use breakfast nooks daily, while formal dining rooms sit empty most of the week.
Beyond daily use, a well-designed nook adds measurable resale value. According to real estate data, homes with built-in kitchen nooks sell faster in the $300K–$600K price range because buyers see them as premium features. The average DIY project costs $400–$800, yet can contribute perceived value of $2,000–$5,000 at resale. That’s a return most home improvement projects can’t match.
The functional upside is equally compelling. A corner bench with storage beneath it something a standard dining chair simply cannot offer gives you a home for linens, board games, or seasonal items. You’re not just adding seating. You’re solving a storage problem at the same time.
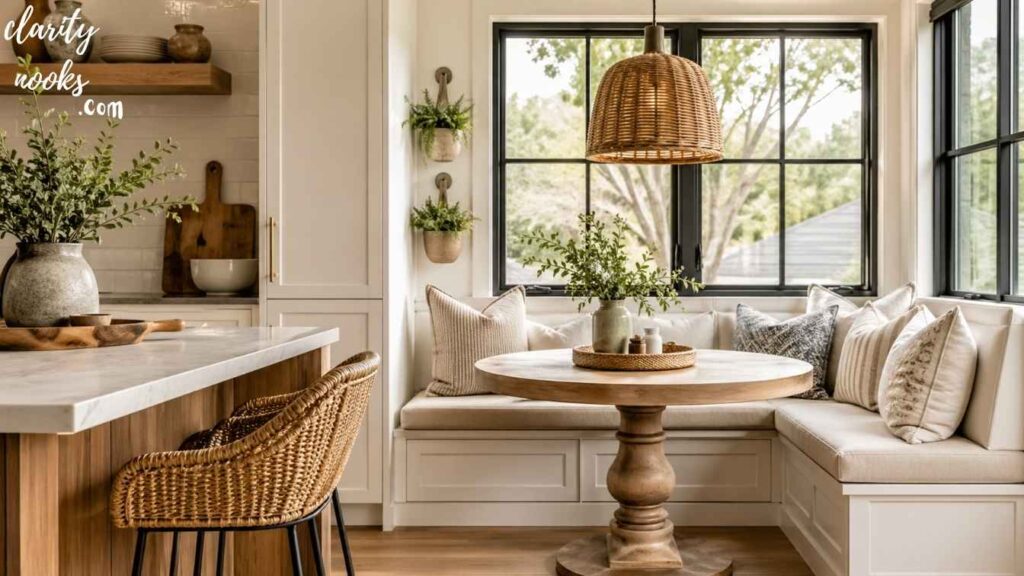
The Classic L-Shaped Corner Bench with Storage
The L-shaped corner bench is the gold standard of kitchen nook design and for good reason. It uses geometry to your advantage. Two bench segments meet in the corner, wrapping around a table to seat four to six people in a footprint that a round table and four chairs simply couldn’t occupy. The magic is in the corner: it becomes a structural support that eliminates the need for expensive custom cabinetry.
For a true DIY build, you’ll frame each bench section using 2×4 lumber, sheath the exterior in plywood or MDF, and add hinged seat lids for storage access underneath. Standard bench height is 18 inches; seat depth should be 18–20 inches for comfortable seating. Add 3–4 inches of seat cushion on top for a finished height that pairs well with a 30-inch dining table.
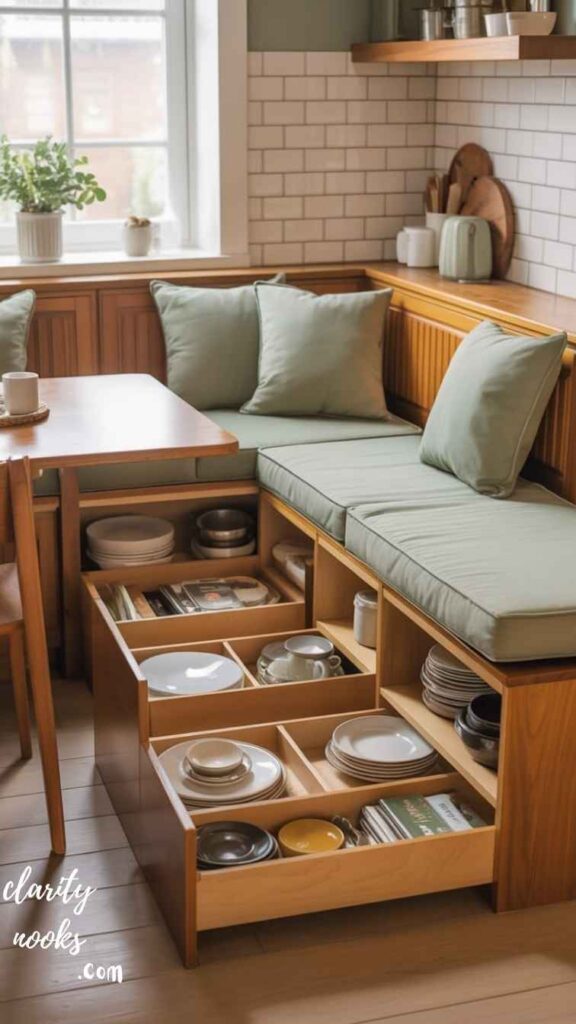
The real differentiator is the storage system inside. Instead of one hollow cavity, divide the interior into three sections: one hinged lid for bulky items, one sliding drawer at the front for frequently needed items like napkins and placemats, and one fixed shelf accessible from the side. This prevents the frustrating “rummaging through everything” problem that most bench builds create.
Real-Life Scenario
Jamie in Portland built an L-bench in a 9×9 ft kitchen corner using $280 in lumber and hardware. She used reclaimed wood paneling on the bench exterior for $0, and reupholstered old dining chair foam for the cushions. Total spend: $340. The nook seats her family of four every morning and stores over 60 liters of board games and seasonal linens.
click here👈
Best for: square or L-shaped kitchen corners · Budget: $300–$700
Must Read: DIY Small Kitchen Ideas to Make Cooking Spaces More Functional
Window Seat Nook with a Floating Table

If you’re lucky enough to have a window in or near your kitchen, you’re sitting on a nook goldmine. A built-in window seat even a simple one anchors the space visually and turns ambient light into an atmospheric feature. This design leans on the architectural detail already present rather than adding structure from scratch, which keeps costs low and complexity manageable for intermediate DIYers.
The build process starts by measuring the window sill width. Build a box-frame bench to span the full width, sitting roughly 6–8 inches below the sill. Mount a wall-hung drop-leaf or floating table on the adjacent wall rather than buying a freestanding table this frees floor space when the nook is not in use. Floating tables from IKEA (the NORBERG model, for example) support up to 100 lbs and fold flat in seconds.
For maximum visual impact, add open shelving on the walls flanking the window. Paint the shelves the same color as the bench to create a unified built-in look. Install shiplap or board-and-batten on the surrounding wall section to define the nook as a distinct zone within a larger kitchen. The result reads as a custom built-in at a fraction of the cost.
Mini Case Study
A designer in Austin transformed a south-facing kitchen window into a working nook for $220. She used a $40 floating shelf bracket system, a custom-cut butcher block top ($90 from a lumber yard), and painted the bench box to match existing trim. She reports using the nook for meals, laptop work, and her morning coffee all three use cases she hadn’t anticipated at the start.
Click Here👈
Best for: kitchens with bay windows or garden-facing walls · Budget: $150–$500
Also Read: DIY Small Bathroom Ideas to Make Your Bathroom Feel Spacious
The Banquette Using Repurposed Kitchen Cabinets
This idea is a content gap competitors consistently miss: you can build a professional-looking banquette using base kitchen cabinets as the structural foundation. Standard 24-inch-deep base cabinets, laid on their backs with the door face pointing outward, become the bench box. They’re already built for weight-bearing, finished on the exterior, and often come with built-in shelving and doors which become the bench storage access points.
Source these cabinets from Habitat for Humanity ReStores, Facebook Marketplace kitchen teardowns, or IKEA SEKTION cabinets on clearance. Arrange two or three in an L or straight line, anchor them to the wall studs, add a 3/4-inch plywood top, and finish with a cushion. The cabinet doors face outward and function perfectly as bench storage access far more practical than hinged lids, because you don’t have to lift everything off the bench to open them.
This method also gives you the option to match existing kitchen cabinetry exactly, which makes the nook feel truly integrated rather than added on. If you’re already updating your kitchen cabinets, save two or three base units specifically for this purpose before the teardown. The cost-to-outcome ratio on this approach is exceptional often producing a $3,000-looking banquette for under $400.
Real-Life Scenario
Marcus in Chicago sourced four IKEA SEKTION cabinets from a neighbor’s renovation for $80 total. He built an 8-foot banquette against a dining room wall, painted it to match his kitchen uppers, and added a custom cushion for $60. His total investment was $160 plus two weekends of work. Contractors quoted the same project at $2,800.
Click Here
Best for: kitchens undergoing a partial refresh · Budget: $200–$800
Don’t Skip: Trendy DIY Living Room Curtain Ideas for a Fresh and Elegant Look
Built-In Bookshelf Nook for Multifunctional Spaces
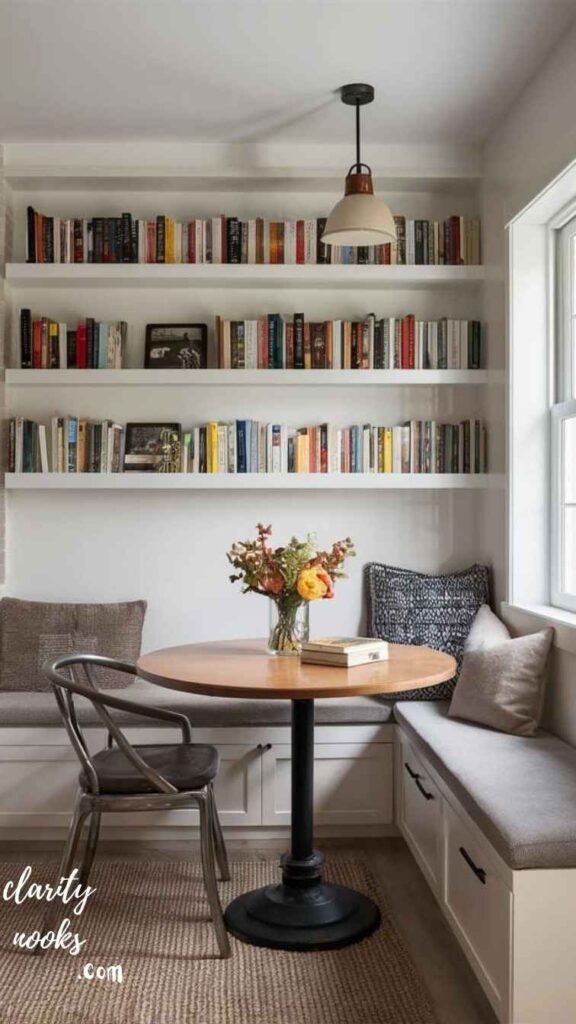
In open-plan homes where the kitchen flows into a living area, a nook needs to earn its keep visually from multiple angles. A bookshelf nook a bench seat flanked or backed by built-in shelving creates a room divider that earns its place as furniture. It’s a design-forward solution that turns a nook into a destination rather than just a corner seat.
The construction uses standard open shelving units (BILLY from IKEA works well) placed on either side of a center bench, then trimmed with face-frame molding to make the assembly look like a single custom piece. Add a back panel in a contrasting paint color to create visual depth on the shelving. The bench itself can be a simpler floating construction since the shelving units provide structure on both sides.
The functional upside of this design is that it genuinely serves two rooms. From the kitchen side, it’s a nook for eating and morning coffee. From the living room side, it’s a display shelf, a small library, or media storage. Households with children particularly benefit because the bench seat doubles as a reading nook and the shelves hold toys and books within easy reach. This multifunctionality is what elevates this idea above others in terms of long-term daily usefulness.
Click Here👈
Best for: open-plan homes, kitchen-living combos · Budget: $400–$1,000
Read More:DIY Baby Nursery Ideas on a Budget: Affordable & Adorable Room Makeovers
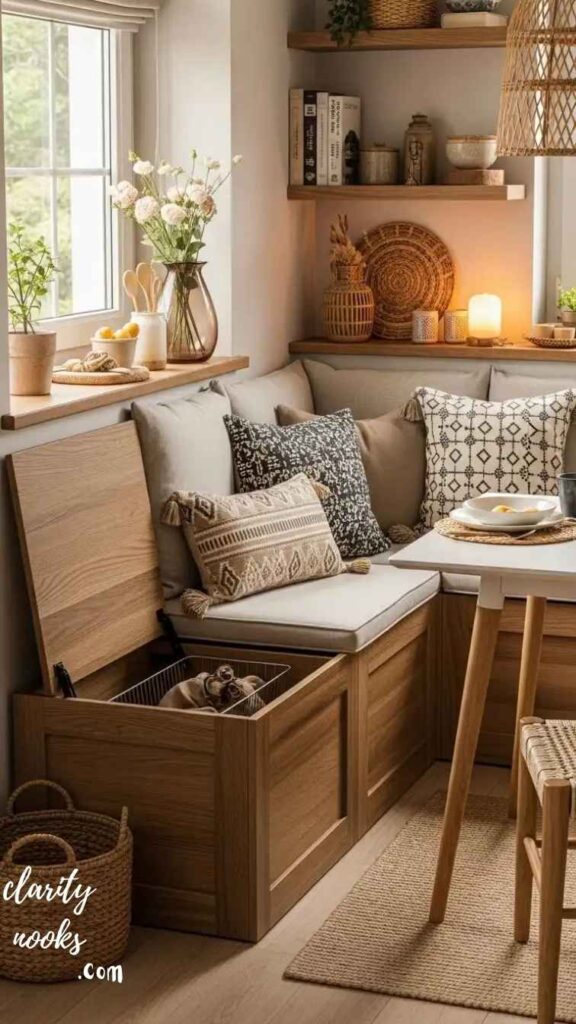
No-Build Styled Nook Using Existing Furniture
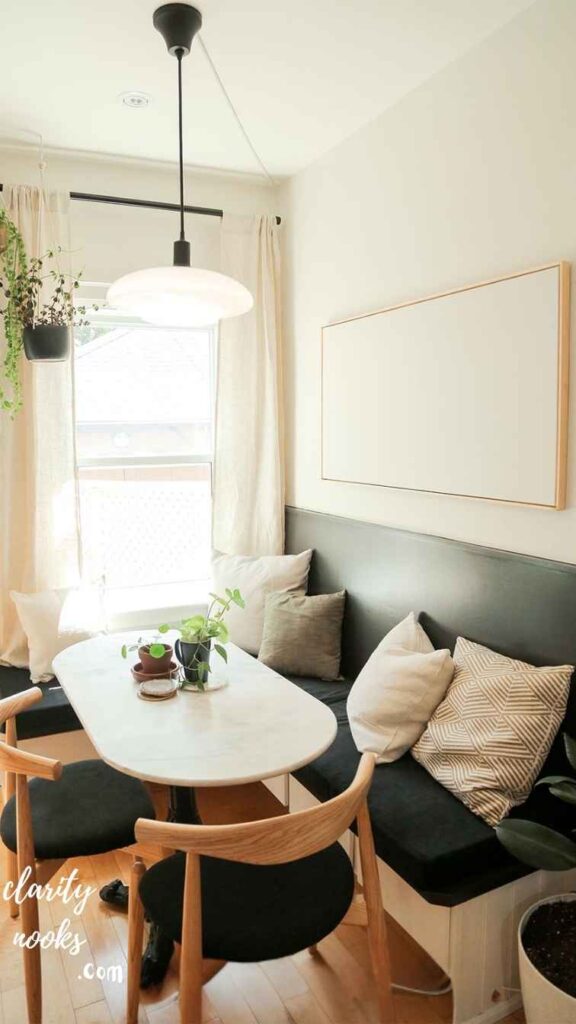
Not every great kitchen nook involves power tools. This idea is consistently underrepresented in competitor articles: a thoughtfully arranged grouping of off-the-shelf furniture pieces can read as a built-in nook without a single structural modification. This is especially valuable for renters who can’t permanently alter their space, or for homeowners who want to test the concept before committing to a real build.
The formula is simple: two identical benches or settees placed in an L arrangement (or a single long bench against a wall), a round or square table scaled to the seating, and a pendant light or wall sconce directly overhead to define the zone. Add a large area rug beneath the table to visually anchor the space. The rug is critical it signals “this is a defined area” in a way that furniture placement alone cannot achieve.
The finishing details make this look intentional rather than improvised. Mount a simple shelf above the bench, add a few plants, hang a piece of art at the correct height (center at 57 inches from the floor), and choose cushion covers that coordinate with kitchen textiles. A string of warm Edison bulbs overhead costs $25 and immediately transforms the mood. Many homeowners who start with this no-build approach end up keeping it for years because it works so well.
Renter Success Story
Priya in New York City created a nook in her 400-square-foot apartment kitchen using a $79 IKEA KALLAX bench, a thrifted round table, and $30 worth of cushion fabric. She mounted two removable adhesive shelves above and added a $25 clip-on pendant. The nook cost $150 and photographs so well she’s been approached by three home accounts to feature it on Instagram.
Click Here 👈
Best for: renters, beginners, low budgets · Budget: $50–$300
Conclusion
DIY Kitchen Nook ideas can change how your kitchen feels and works. They help you use small spaces in a smart way. With simple materials and a little effort, you can create a cozy corner for meals. These ideas bring comfort, style, and function together in one space.
Try different styles that match your home and your needs. DIY Kitchen Nook ideas are flexible and easy to adjust over time. You can add storage, lighting, or soft seating. In the end, a small nook can become your favorite place to relax, eat, and spend time with family every single day.
Trend Analysis:
Where Kitchen Nooks Are Heading (2026–2028)
Kitchen nooks aren’t just surviving in modern design they’re accelerating. Three converging forces explain why: remote work normalization, the “deinfluencing” of open-plan kitchens, and a renewed cultural appetite for cozy, human-scale spaces.
- 2026 Japandi-influenced nooks dominate low benches, natural wood tones, linen cushions, and pendant washi lighting. Built-in nooks are replacing breakfast bars in new construction at a measurable rate, according to NKBA design trend reports.
- 2027 Multifunctional nooks with integrated charging stations, fold-flat work surfaces, and acoustic panels emerge as WFH-adjacent features. Homeowners are designing nooks that serve morning meals and afternoon video calls equally well.
- 2028 Smart material integration self-healing upholstery fabrics, UV-resistant indoor-outdoor cushion textiles, and scratch-resistant table surfaces makes nooks low-maintenance enough for daily heavy use by families with young children.
Expert Insights
Practical Tips from Real Builds
These are the lessons that separate a great nook from a frustrating one and they almost never appear in standard how-to guides.
Cushion Mistake
Always use 3–4 inch high-density foam (1.8 lbs/ft³ minimum). Budget foam collapses within six months of daily use and creates an uncomfortable, sunken seating experience.
Lighting Rule
The pendant or sconce serving your nook should hang 28–34 inches above the tabletop. Higher and it loses intimacy; lower and it obstructs sightlines across the table.
Paint Strategy
Paint the interior of the nook’s back wall one shade deeper than the surrounding kitchen. This optical trick makes the nook feel intentionally recessed a designed alcove rather than a corner.
Moisture Guard
In kitchens, always seal your MDF or plywood bench box with at least two coats of oil-based primer before painting. Steam and food moisture will warp unsealed wood within a year.
Long-Term Strategy
Building a Nook That Grows With You
The smartest DIY kitchen nooks are designed with change in mind. Young couples become families; kids grow up and move out; remote work needs shift. A nook built with modularity in mind adapts to these life changes rather than becoming obsolete.
Prioritize removable cushions over fixed upholstery they can be replaced or reupholstered as tastes change. Choose table styles with clean, era-agnostic lines (round pedestal, simple rectangle) rather than heavily trendy forms that date quickly. If you’re building a banquette, use paint rather than stained wood for the exterior paint can be refreshed or changed in a weekend, while stained wood is a more permanent commitment.
From a sustainability standpoint, sourcing reclaimed wood, repurposed cabinets, and secondhand furniture for your nook significantly reduces both material cost and environmental impact. Sourcing locally from ReStores or Marketplace also means your nook has a lower carbon footprint than one built entirely from new big-box materials a consideration that resonates increasingly with today’s homeowner.
Future Predictions
The Next Generation of Kitchen Nooks
AI-assisted design tools are already changing how homeowners plan nooks. Tools like room-planning AI can generate photorealistic renders of a proposed nook in your specific kitchen within minutes, allowing you to test configurations, color palettes, and furniture scales before buying a single board. This dramatically reduces the “bought the wrong table” problem that plagues most DIY kitchen projects.
Modular furniture systems particularly those from emerging brands designed around the flat-pack, reconfigurable model will make nook building increasingly accessible to non-DIYers. Expect to see more plug-and-play nook kits by 2027: pre-cut bench panels, integrated storage hardware, and cushion sets sold as complete nook systems at the $400–$800 price point.
Voice-controlled and sensor-activated lighting specifically designed for nooks is another near-term development. Occupancy-sensing under-bench LEDs that activate when someone sits down, and warm-dimming pendants that shift color temperature through the day, will become standard features in high-end nooks and trickle down to DIY implementations shortly after.
Common Mistakes
Common Mistakes and Hidden Gaps
- Building before measuring traffic flow. A beautiful nook that blocks the path from the kitchen to the back door will be the source of daily frustration. Mock up the footprint with painter’s tape on the floor and live with it for a day before building.
- Choosing a table that’s too large. Most first-time nook builders overestimate how much table they need. A 36-inch round seats four in a nook setting; a 48-inch round feels crowded. When in doubt, go smaller you can always add a drop-leaf extension.
- Skipping the permit question. Most cosmetic bench builds don’t require permits, but if you’re adding electrical for integrated lighting or moving any plumbing, check your local requirements. This is the mistake that causes the most expensive problems later at resale.
- Under-lighting the space. The most common gap in nook designs is inadequate lighting. Overhead kitchen recessed lights are designed for task illumination, not ambiance. Your nook needs its own dedicated light source pendant, sconce, or floor lamp positioned specifically for that zone.
- Using standard floor paint on benches. Cabinet paint or furniture-specific enamel is essential for bench surfaces. Floor paint is brittle under flexing; interior wall paint chips and peels within months under regular use. The $15 upcharge for the right product saves a repaint within the year.
FAQ’S about DIY Kitchen Nook ideas
How much does it cost to build a DIY kitchen nook?
A basic DIY kitchen nook costs between $150 and $800, depending on materials and whether you build from scratch or repurpose existing furniture. Custom built-in nooks with professional finishes can reach $1,000–$1,500. Contractor builds typically start at $2,500.
What size table works best for a kitchen nook?
A 36-inch round table works well for 2–4 people in a nook setting. For L-shaped banquettes, a 42×30-inch rectangular table seats four comfortably. Allow at least 36 inches between the table edge and any wall or obstacle for comfortable movement.
Can I build a kitchen nook in a small kitchen?
Yes. Nooks actually perform better in small kitchens than freestanding dining sets because they fit into corners and don’t require pull-out chair clearance on all four sides. A corner L-bench with a round table can fit in a 6×6 ft area.
What is the standard height for a kitchen nook bench?
Standard nook bench seat height is 18 inches from the floor, which pairs with a 30-inch-high dining table to leave a 12-inch clearance the ideal ratio for comfortable seated dining. Add cushion thickness on top of the 18-inch frame height.

Rameen Zara is the founder of Clarity Nooks, bringing over five years of experience in home décor and interior styling. She shares simple yet practical design ideas that suit real homes and everyday living. Her approach focuses on cozy aesthetics, soft color palettes, and natural textures that create warm, inviting spaces.


