

DIY Gaming Desk Ideas: Creative Designs for a Powerful Gaming Station
The truth is, your gaming desk is the foundation of your entire setup and a bad one will affect your posture, your focus, and honestly, your mood. The good news? You don’t need to drop $600 on a pre-built gaming desk. With the right DIY gaming desk idea, you can build something more functional, more personal, and more impressive than anything sitting on a showroom floor.
This guide covers six practical, well-tested DIY gaming desk ideas from ultra-budget builds to L-shaped battlestations with real-world tips, material lists, and pro insights you won’t find in a generic listicle.
What Makes a Great DIY Gaming Desk?
Before you pick up a drill, it helps to understand what separates a great gaming desk from a bad one. The ideal DIY gaming desk should offer enough surface area for your monitor(s), keyboard, mouse, and accessories, while keeping cables managed and your body ergonomically supported.
Quick definition: A DIY gaming desk is any custom-built or assembled desk using off-the-shelf materials like IKEA tabletops, pipe frames, or plywood that you put together yourself to match your specific space, budget, and aesthetic.
The core factors to plan for: surface width (at least 55 inches for dual monitors), depth (24–30 inches minimum), height (adjustable if possible), and structural strength (it needs to hold your monitor arms, PC, and accessories without flexing).
The IKEA LINNMON Hack The Ultimate Budget Build
Best for: First-time builders, small rooms, tight budgets (under $80)
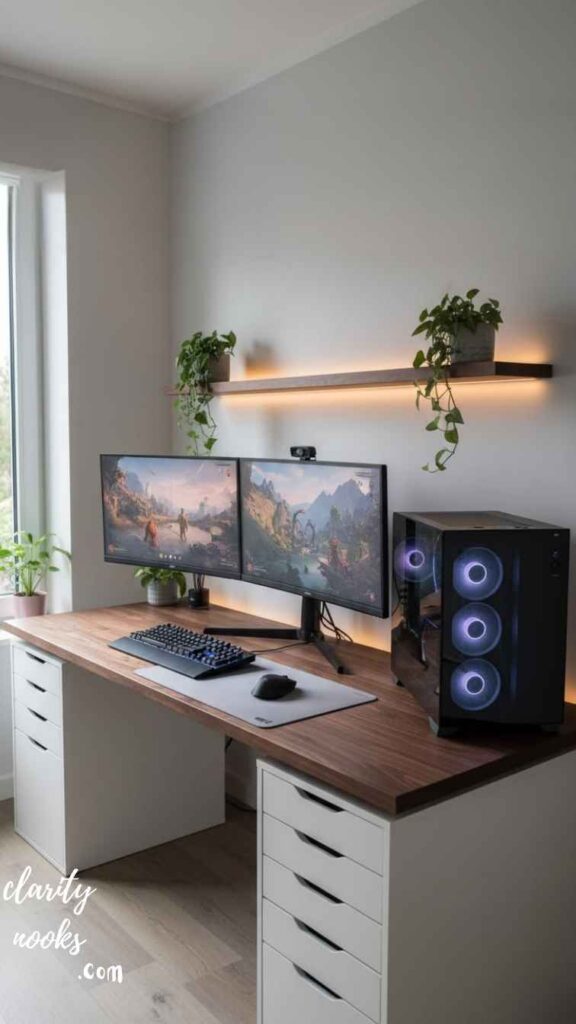
The IKEA LINNMON hack has been a staple of the Reddit gaming community for years and for good reason. You grab a LINNMON tabletop (usually $25–$40 depending on size), add ADILS legs or ALEX drawer units, and you’ve got a solid, spacious desk in under an hour.
What separates a great LINNMON build from a mediocre one is the add-ons. A cable management tray mounted underneath ($15 on Amazon), a monitor riser or arm bolted through the surface, and a pegboard panel attached to the back wall can transform a plain white tabletop into a professional-looking battlestation. One Reddit user, u/deskgod2022, documented their $74 LINNMON + pegboard build that received 12,000 upvotes proof that budget doesn’t mean basic.
The one downside? LINNMON tops use a honeycomb cardboard interior, which limits how many holes you can drill. Plan your cable routing and monitor arm placements before you start drilling, and use a stud finder or tap the surface to find solid mounting points.
Click Here👈
Estimated cost: $60–$120 | Skill level: Beginner | Time: 1–2 hours
Must Read: DIY Living Room Carpet Ideas: Transform Your Space Without Breaking the Bank
The Pipe and Plywood Industrial Desk Raw, Rugged, and Rock-Solid
Best for: People who want a unique aesthetic, heavy setups, workshop/garage-style rooms
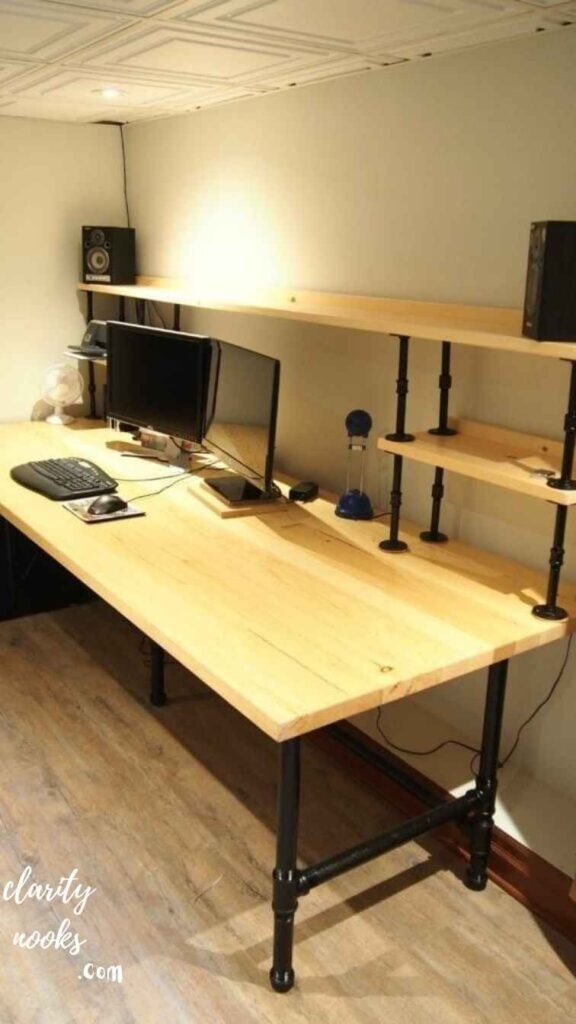
If you’ve ever browsed gaming setup subreddits and thought, “that metal pipe desk looks insane” this is the one. Using standard black iron plumbing pipes from Home Depot and a custom-cut plywood top, you can build a desk with incredible load-bearing capacity and a distinctive industrial look.
The basic frame uses floor flanges, pipe nipples, T-fittings, and elbows all available at hardware stores for around $80–$120 total. Cut a 2-inch thick plywood slab to your desired dimensions (60×30 inches is a sweet spot), sand it down, and apply a walnut stain or dark poly finish. The result is a desk that can hold a full tower PC, multiple monitors, and arms without flinching.
One practical tip: pre-assemble the pipe frame dry (without tightening everything) and mock up your desk height before you commit. Standard desk height is 28–30 inches, but if you’re taller than 6’1″, bumping up to 31–32 inches can make a dramatic ergonomic difference. Pipe builds are also highly modular you can add shelving, monitor risers, or a secondary tier later.
Click Here👈
Estimated cost: $150–$220 | Skill level: Intermediate | Time: 4–6 hours
Read More: Simple DIY Boys Bedroom Ideas with Easy Decor and Storage Hacks
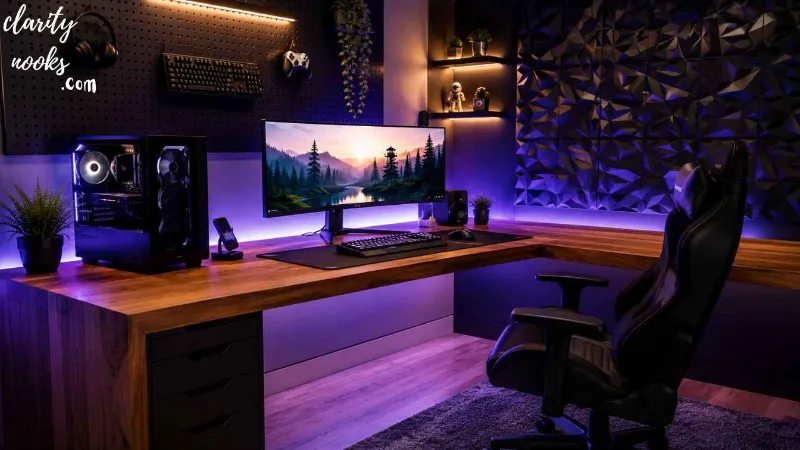
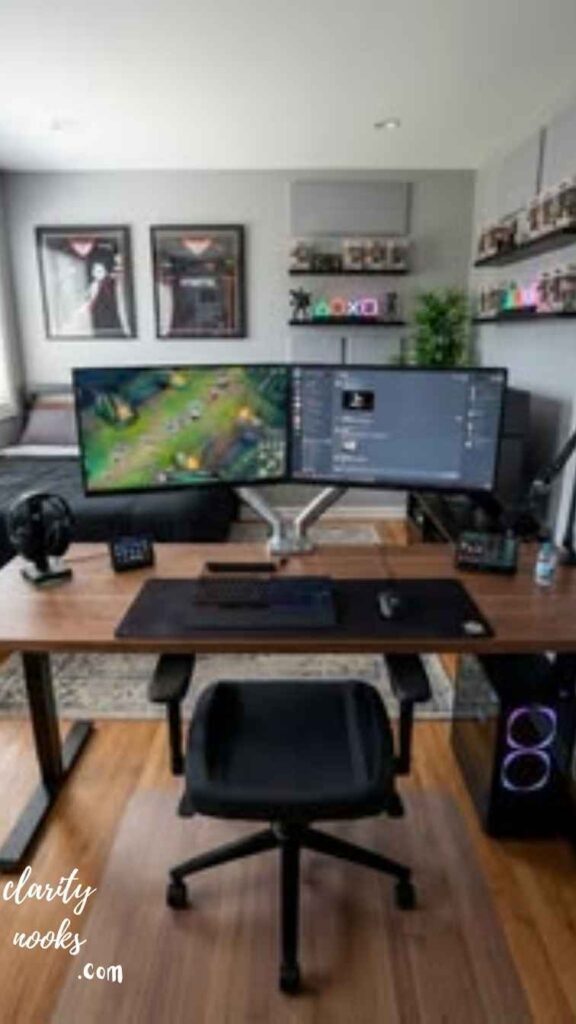
The L-Shaped Corner Battlestation Maximum Real Estate
Best for: Dual-monitor or triple-monitor setups, streamers, creators who need screen space
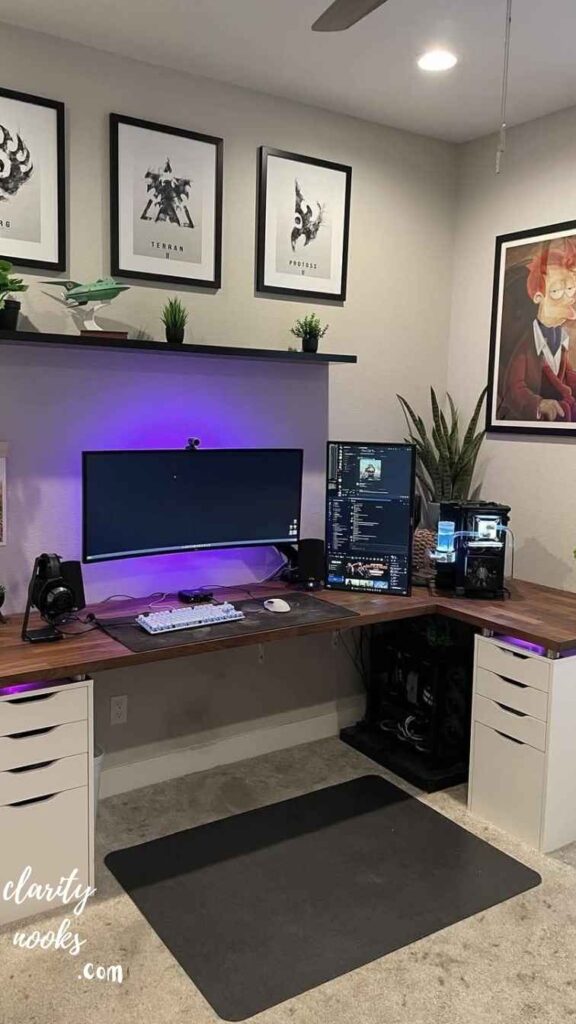
An L-shaped gaming desk gives you something a straight desk never can: spatial separation. You can dedicate one side to your gaming rig and the other to your streaming console, capture card, secondary monitor, or creative work. The corner becomes a natural hub where your main monitor sits directly in front of you.
The easiest DIY approach is to use two IKEA KARLBY or LINNMON countertop panels arranged in an L-shape, supported by ALEX drawer units on each end and a shared leg or wall-mounted bracket at the corner. For a more polished look, clamp or pocket-screw the two panels together underneath, then fill and sand the seam before finishing. Some builders add a curved corner piece cut from MDF for a seamless look.
A real-world example: a creator named Marco documented his $310 L-shaped build using two 74-inch KARLBY tops (oak veneer finish) on a custom steel bracket system. It holds three 27-inch monitors and a full streaming deck without any noticeable flex. He noted that the most critical step was leveling the corner support before anchoring anything even a 2mm height difference creates a visible lean across a 74-inch span.
Click Here👈
Estimated cost: $200–$400 | Skill level: Intermediate | Time: 4–8 hours
Don’t Miss: Creative DIY Beach Bedroom Ideas for a Cozy Nautical Style Bedroom
The Motorized Standing Desk Frame Upgrade The Ergonomic Smart Play
Best for: Long gaming sessions, health-conscious gamers, hybrid work-from-home setups
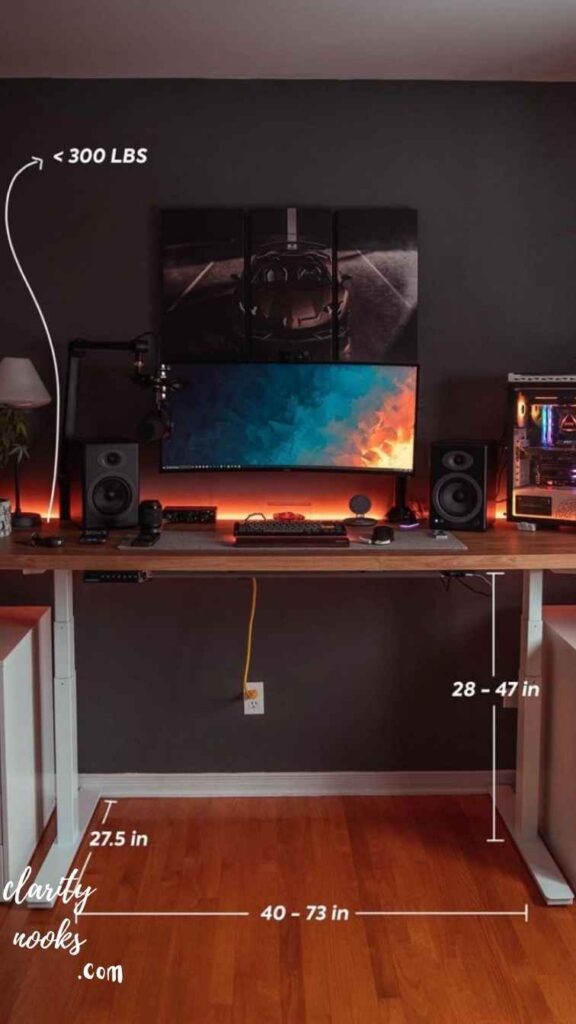
Standing desk frames have dropped dramatically in price. Brands like FLEXISPOT, Vari, and Uplift now sell just the motorized frame without a top starting around $200. Pair that with a solid wood tabletop or a butcher block from IKEA (the BROR shelf works perfectly), and you’ve got a sit-stand gaming desk for significantly less than buying a complete unit.
The health benefits are real. Research published in occupational health journals consistently shows that alternating between sitting and standing during long sessions reduces lower back pain, improves circulation, and maintains focus over extended periods. For gamers who log 4–6 hours daily, this isn’t a luxury it’s a legitimate long-term health investment.
The key consideration when building this setup is weight capacity. Most mid-range motorized frames support 150–275 lbs. Add up your monitors, PC, and accessories before buying a frame. Also, ensure your tabletop is at least 1.5 inches thick so the frame clamps have enough material to grip. A too-thin top will wobble at full extension, and that’s both annoying and bad for your monitor alignment.
Click Here👈
Estimated cost: $280–$550 | Skill level: Beginner-Intermediate | Time: 2–3 hours
Also Read: Smart DIY Bathroom Tile Ideas to Make Any Bathroom Look Bigger
The Wall-Mounted Floating Desk Perfect for Small Spaces
Best for: Apartments, small bedrooms, minimalist setups, space-constrained gamers
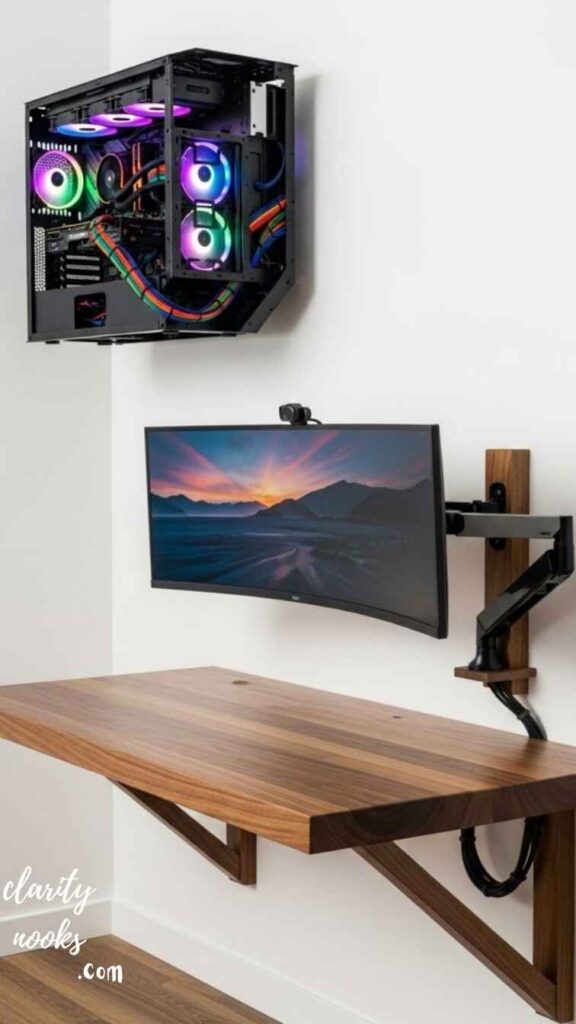
A floating gaming desk is exactly what it sounds like: a surface mounted directly to the wall with no legs. Done right, it looks incredibly clean no visible supports, no bulky frame, just a sleek panel extending from your wall with everything you need on top of it.
The simplest version uses heavy-duty floating shelf brackets (rated for 150+ lbs per bracket) and a solid wood panel cut to size. Use at least three brackets spaced evenly for a 55-inch span, and anchor every bracket into wall studs drywall anchors alone will not hold the weight of a PC and monitors over time. This is non-negotiable. Stud finders are $15 at any hardware store, and skipping this step has destroyed more than a few desks.
For a more advanced approach, build a recessed shelf with a French cleat system. The French cleat a pair of angled wooden strips, one on the wall, one on the desk distributes weight evenly and allows you to remove and reposition the desk without tools. It’s a popular technique in woodworking and works beautifully for gaming desk installations. The final result feels intentional and architectural rather than improvised.
Click Here👈
Estimated cost: $80–$180 | Skill level: Intermediate | Time: 3–5 hours
The Reclaimed Wood Desk The Most Unique Build on This List
Best for: Gamers who want a one-of-a-kind setup, DIY enthusiasts, rustic or natural aesthetic lovers
Reclaimed wood desks are having a major moment and not just in interior design. Gaming setup communities have embraced live-edge slabs, barn wood panels, and salvaged hardwood as desk surfaces that make a setup feel genuinely custom and alive. No two pieces of wood are the same, which means your desk literally cannot be copied.
You can source reclaimed slabs from local lumber yards, Facebook Marketplace, or specialty suppliers like Etsy. A live-edge walnut or oak slab in the 55–72 inch range runs $150–$400 depending on your region. From there, the build process involves flattening (with a router sled if needed), sanding through multiple grits (up to 220), and finishing with food-safe oil or water-based poly for protection. Support the slab with hairpin legs, steel tube legs, or a pipe frame.
One important practical note: wood moves with humidity. If you live in a high-humidity region or you’re building this desk for a room without climate control, choose a species like oak or ash (more stable) over something like cherry or mahogany, which can warp significantly. Apply finish to all sides top and bottom to slow moisture absorption and keep the slab flat over time.
Click Here👈
Estimated cost: $250–$600 | Skill level: Intermediate-Advanced | Time: Full weekend project
Conclusion
DIY Gaming Desk Ideas can help you build a smart and comfortable gaming space at home. You do not need expensive furniture. With simple tools and creativity, you can design a desk that fits your room and style. These ideas make gaming more fun, organized, and enjoyable every day attractive.
With DIY Gaming Desk Ideas you can upgrade your gaming experience without spending too much money. These projects are easy and fun for beginners. You can customize lighting, storage, and layout as you like. A good desk setup improves focus, comfort, and performance during long gaming sessions at home easily.
Trend Analysis
DIY Gaming Desks in 2026 and Beyond
The DIY gaming desk space has evolved significantly over the past two years. In 2026, three major trends are reshaping how gamers approach their setup builds.
Modular and reconfigurable systems are replacing fixed desk builds. Gamers increasingly want the ability to rearrange, expand, or downsize without starting over. Systems inspired by industrial shelving where sections bolt together and can be reconfigured in hours are gaining traction on platforms like YouTube and TikTok. Expect this trend to grow sharply through 2027–2028 as remote work and gaming continue to overlap.
Eco-conscious building materials are entering the conversation. Reclaimed wood, FSC-certified plywood, and water-based finishes are no longer niche choices they’re actively marketed in gaming communities. Brands like IKEA have accelerated this shift by promoting sustainability in their product lines, and DIY builders are following.
Integrated cable management from the design stage is becoming a standard expectation, not an afterthought. Builders now route cables through channels built into the desk structure, use wireless charging pads embedded into the surface, and design cord-free zones using magnetic cable clips. The “clean desk” aesthetic isn’t just about looks it’s about reducing desk clutter that affects focus and productivity.
Looking ahead to 2027–2028, expect AI-assisted desk planning tools to emerge apps where you photograph your room, input your setup specs, and receive a generated cut list, materials list, and 3D model of your ideal DIY gaming desk.
Practical Tips & Expert Insights
Measure your room before you measure your desk. The single most common mistake is building a desk that physically fits but disrupts traffic flow, blocks power outlets, or sits too close to a radiator. Tape out your desk footprint on the floor first.
Ergonomics are not optional. Your monitor should sit at eye level when you’re seated with a straight back. Your elbows should rest at roughly 90 degrees when your hands are on the keyboard. If your current desk forces you to hunch, tilt your neck, or reach too far, it’s actively harming you during long sessions. Build ergonomics into the design from day one.
Invest in the surface finish. Whatever material you choose for your tabletop, the finish determines how it ages. Raw wood without sealer will absorb oils from your hands, stain from drinks, and swell with humidity. A quality polyurethane or oil-wax finish takes two hours to apply and extends the desk’s life by years.
Plan cable management before you build, not after. Drill cable pass-through holes before your surface is mounted. Route channels under the surface during construction. It’s ten times harder to manage cables after a desk is fully assembled.
Long-Term Strategy: Building a Setup That Scales
A smart DIY gaming desk isn’t just built for today it’s designed to accommodate upgrades. The most future-proof desks share a few characteristics: they’re wider than you currently need (a 70-inch surface gives you room to grow), they have integrated grommet holes for cable routing, and they’re built on frames that support monitor arms rather than requiring cheap monitor stands.
If you’re building on a limited budget now, consider a phased approach. Start with a solid LINNMON base and add better legs, a cable management system, and monitor arms over the next 6–12 months. This approach spreads the cost without sacrificing long-term quality, and each upgrade immediately improves your experience.
Durability matters more than aesthetics in the long run. A $180 butcher block top will outlast a $60 melamine board by a decade. A $250 motorized frame will protect your posture and remain useful if you switch from gaming to professional work. Think in 5-year increments when you’re choosing materials and components.
Future Predictions & Innovations
The next generation of DIY gaming desks will be shaped by several converging forces. Integrated display technology is already beginning to appear in concept builds surfaces embedded with secondary displays, lighting panels, or touch-sensitive zones that connect to PC software. Within 2–3 years, affordable DIY kits for these features will likely exist on platforms like Kickstarter.
Wireless power delivery embedded in desk surfaces is progressing rapidly. Qi2 and similar standards are making it realistic to build charging zones directly into a desk surface with minimal woodworking expertise. Expect off-the-shelf routing templates and flush-mount charging pads designed specifically for DIY desk builders by 2027.
AI-personalized ergonomics where sensors in your chair and desk track your posture and automatically adjust desk height, monitor angle recommendations, or lighting throughout a session are already emerging in premium standing desk ecosystems. These technologies will trickle into the DIY space as component costs fall.
The core principle won’t change: the best gaming desk is the one designed around you. That’s something mass manufacturers will never fully deliver which is exactly why DIY gaming desk builds will remain relevant no matter how the market evolves.
Common Mistakes & Hidden Gaps
Underestimating weight. A dual-monitor setup with a full tower PC, speakers, and accessories can easily exceed 80–100 lbs on the surface alone. Many beginner builders choose legs or brackets rated for “light” loads that flex or fail under real gaming conditions. Always choose structural support rated for at least 2x your expected load.
Choosing the wrong height. Most standard desks are built at 29–30 inches. That’s fine for someone 5’7″ to 5’11”. If you’re taller or shorter, a standard height forces poor posture. Measure your seated elbow height and build your desk to match even a 2-inch difference is transformative.
Skipping surface sealing. Raw or unfinished surfaces even “smooth” plywood will roughen over time under mouse movement. This degrades your mouse pad, creates an uneven surface feel, and looks worn quickly. Always finish your surface, even with a simple spray lacquer.
Ignoring monitor placement in the design phase. A desk that’s 20 inches deep won’t let you sit far enough from a 32-inch monitor for comfortable viewing. Plan your monitor size, arm reach, and viewing distance before finalizing desk depth.
The hidden gap most guides miss: acoustic planning. A hard wood or glass desk surface dramatically increases echo and keyboard noise in a room, which matters enormously for streamers and content creators. Consider a large desk mat, or plan for a soft surface zone before your build is complete. It’s easy to accommodate during construction and nearly impossible to fix after the fact.

Rameen Zara is the founder of Clarity Nooks, bringing over five years of experience in home décor and interior styling. She shares simple yet practical design ideas that suit real homes and everyday living. Her approach focuses on cozy aesthetics, soft color palettes, and natural textures that create warm, inviting spaces.


