

DIY Family Room Ideas: 10 Budget-Friendly Transformations That Actually Work
You walk into your family room and feel it that quiet frustration. The space is functional, sure, but it doesn’t feel like yours. It’s cluttered, outdated, or just plain uninspiring. You’ve scrolled through Pinterest for hours, but every gorgeous room seems to require a $20,000 renovation budget or a professional designer on speed dial.
Here’s the truth: the most inviting, stylish family rooms aren’t the most expensive ones. They’re the most intentional ones. With the right DIY approach, some focused effort, and a smart budget, you can completely transform your family room in a weekend or even an afternoon.
This guide gives you 10 proven, budget-friendly DIY family room ideas, each with step-by-step instructions, real material lists, estimated costs, and the kind of practical insight that comes from people who’ve actually done the work. Whether you’re renting or own your home, starting from scratch or refreshing what you have, there’s something here for you.
What Makes a Great DIY Family Room?
Before diving into specific ideas, let’s answer a foundational question: What is a family room, and how is it different from a living room?
A family room is the informal, everyday gathering space in your home the place where kids do homework, adults unwind after work, and everyone piles onto the sofa for movie night. Unlike a formal living room, it prioritizes comfort, durability, and function over polish and formality.
A great DIY family room balances three things: visual appeal, practical storage, and personal character. The best projects address all three at once.
Build a DIY Shiplap Accent Wall for Instant Character
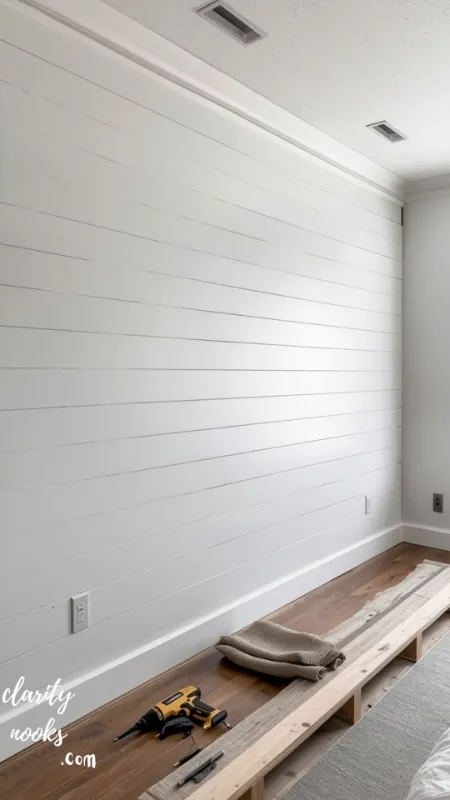
A shiplap accent wall adds architectural texture and a warm, designer-quality look that dramatically elevates any room. Once synonymous with farmhouse style, shiplap has evolved into a versatile design element that works in modern, transitional, and even eclectic spaces.
Why It Works: Flat, featureless walls are one of the biggest reasons family rooms feel boring. Adding dimension with shiplap creates an instant focal point especially behind a TV or sofa without requiring full room renovation.
Materials Needed:
- Primed pine boards (1×6 or 1×4), approximately 8-foot lengths
- Finishing nails or a nail gun
- Wood filler
- Sandpaper (120-grit)
- Paint or stain of your choice
- Level and tape measure
- Penny spacers (for consistent gaps)
Step-by-Step Process:
- Measure your wall and calculate total board footage needed (add 10% for waste).
- Cut boards to length using a miter saw or have the hardware store do it.
- Find and mark wall studs with a stud finder you’ll nail into these.
- Starting from the bottom, nail the first board level to the wall.
- Use pennies as spacers between each row for that signature shiplap gap.
- Fill nail holes with wood filler, sand smooth when dry, then paint or stain.
Estimated Cost: $150–$350 for a 12×9 foot wall, depending on board choice and finish.
Pro Tip: White or off-white paint gives the cleanest, most versatile look. But if you’re feeling bold, a dark navy or forest green shiplap wall behind the TV creates a stunning, moody backdrop that photographs beautifully.
Real-Life Scenario: Sarah, a DIY blogger from Tennessee, transformed her 14-foot builder-grade wall in one Saturday using $180 worth of pine boards and a rented nail gun. “It looked like something out of a magazine,” she said. “My guests thought we hired a contractor.”
Read More: Cozy DIY Balcony Privacy Ideas for Peaceful Apartment Living
Create a Built-In Bookshelf Using IKEA Billy Hack
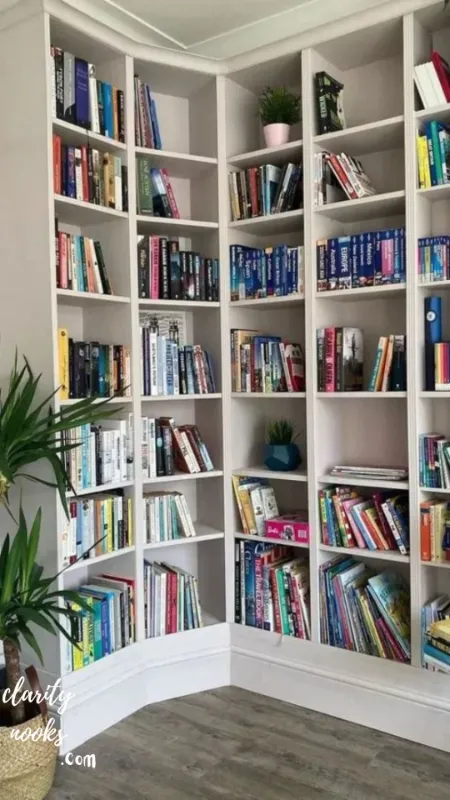
The “IKEA Billy hack” is one of the most popular DIY transformations in the design world and for good reason. You take standard IKEA Billy bookcases, add custom trim and crown molding, paint everything a uniform color, and suddenly you have what looks like expensive, built-in cabinetry.
Why It Works: Built-in shelving adds tremendous visual value and storage functionality. A custom version from a carpenter can cost $3,000–$8,000. The Billy hack delivers 85% of the visual impact at roughly 15% of the cost.
Materials Needed:
- IKEA Billy bookcases (standard or tall) typically 2–6 units
- MDF or pine boards for filler panels and top caps
- Crown molding and base molding
- Wood glue, finishing nails, caulk
- Paint (satin or semi-gloss finish)
- Sandpaper
Step-by-Step Process:
- Measure your wall space and determine how many Billy units you need.
- Assemble and position bookcases, securing them to the wall for safety.
- Cut MDF panels to fill gaps between cases and at the sides.
- Add crown molding at the top and base molding at the bottom.
- Caulk all seams and nail holes for a seamless look.
- Paint everything cases, molding, filler panels in one unified color.
Estimated Cost: $400–$900 for a full wall of built-ins, depending on number of units and molding choice.
Featured Snippet Answer: “How do you make IKEA Billy look built-in?” To make IKEA Billy look built-in: fill side gaps with MDF panels, add crown molding on top and base molding at the bottom, caulk all seams, and paint everything the same color. The unified paint color is the single most important step.
Learn More: DIY Birthday Party Ideas That Make Home Parties Feel Special
Refresh Old Furniture with Paint and New Hardware
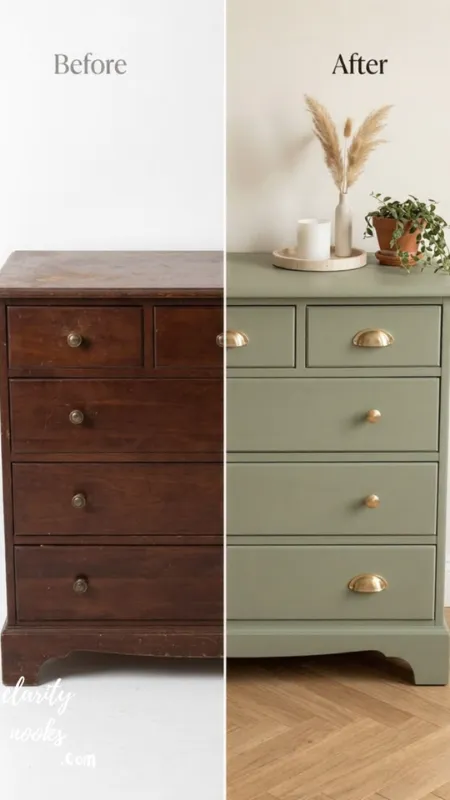
Before you replace that tired coffee table, entertainment center, or side cabinet paint it. A fresh coat of furniture paint and updated hardware is the single highest-ROI DIY project in any home.
Why It Works: Most people don’t realize how dramatically a piece of furniture can change with the right paint color and new pulls or knobs. A $0 thrift-store dresser with a $30 paint job and $20 worth of brass hardware becomes a $400-looking accent piece.
Materials Needed:
- Chalk paint or furniture-specific paint (Rust-Oleum Chalked, Annie Sloan, etc.)
- Fine-grit sandpaper (220-grit)
- A quality brush or foam roller
- Primer (if needed, based on paint type)
- New hardware (drawer pulls, knobs, handles)
- Wax or polycrylic sealant for protection
Step-by-Step Process:
- Clean the piece thoroughly with TSP or a degreaser.
- Lightly sand all surfaces to help paint adhere.
- Apply 1–2 coats of primer if using latex paint (chalk paint often skips this step).
- Apply paint in thin, even coats usually 2–3 coats for full coverage.
- Let dry completely (24 hours between coats for best results).
- Swap hardware: unscrew old pulls, fill holes if needed, install new ones.
- Seal with wax or polycrylic for durability.
Estimated Cost: $30–$100 depending on paint brand and hardware quality.
Decorating Tip: Dark green, navy, charcoal, or terracotta are trending furniture paint colors in 2025–2026. Pair any of these with warm brass or brushed gold hardware for a sophisticated, collected look.
Explore More: Smart DIY Bookshelf Decor Ideas for a Clean and Stylish Look
Design a DIY Gallery Wall That Tells Your Story
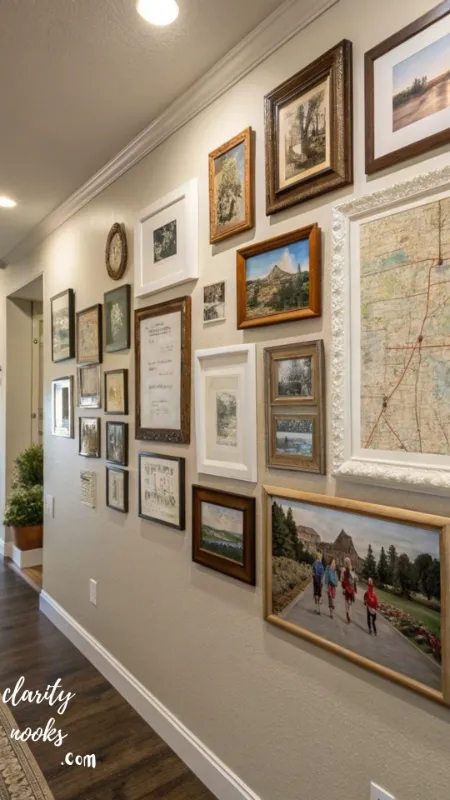
A gallery wall is one of the most impactful, completely reversible DIY projects you can do. Done well, it transforms a blank wall into the emotional heart of your family room.
Why It Works: Family rooms are personal spaces. A gallery wall filled with meaningful photos, art prints, and mementos creates a sense of warmth and identity that no store-bought decor can replicate.
Materials Needed:
- Assorted frames (mix sizes: 4×6, 5×7, 8×10, 11×14)
- Printed photos or art prints
- Level and measuring tape
- Painter’s tape
- Hammer and nails (or picture-hanging strips for renters)
- Kraft paper (for layout planning)
Step-by-Step Process:
- Choose your frames a mix of sizes creates visual interest. Stick to 2–3 frame colors maximum for cohesion.
- Lay frames on the floor and experiment with arrangements until you find one you love.
- Trace each frame on kraft paper and cut out the shapes.
- Tape the paper cutouts to your wall using painter’s tape and step back to evaluate the arrangement.
- Mark nail positions through the paper templates, then remove paper and hammer nails.
- Hang frames, checking level as you go.
Estimated Cost: $50–$200 depending on frame source (thrift vs. new) and whether you print your own photos.
Mini Case Study: Marcus and Lisa transformed the 8-foot blank wall behind their sectional into a gallery wall over a single Sunday afternoon. “We mixed family photos with prints we downloaded for $3 each from Etsy,” Marcus shared. “Everyone who visits comments on it. It’s become the centerpiece of our whole first floor.”
Design Guide: Cozy DIY Balcony Privacy Ideas for Peaceful Apartment Living
Install Floating Shelves for Style and Storage
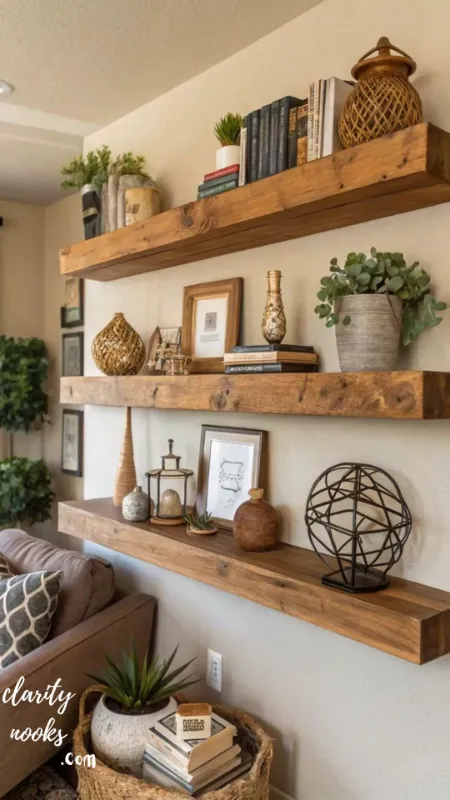
Floating shelves are the Swiss Army knife of DIY home decor. They add storage, display space, and visual interest without consuming floor space which is especially valuable in smaller family rooms.
Why It Works: Floating shelves create vertical interest, which draws the eye upward and makes rooms feel taller. They also solve one of the biggest family room challenges: where to put everything.
Materials Needed:
- Floating shelf brackets (heavy-duty for loaded shelves)
- Wood boards or pre-made shelf boards
- Stud finder
- Level and drill
- Sandpaper and paint or stain
- Screws appropriate for your wall type
Step-by-Step Process:
- Determine shelf placement consider eye level and TV clearance.
- Locate studs and mark their positions (this is critical for load-bearing shelves).
- Hold a level against the wall and mark your bracket holes.
- Drill pilot holes and secure brackets into studs.
- Sand and finish your wood board, then slide or secure onto brackets.
- Style with a balanced mix of books, plants, and decorative objects.
Estimated Cost: $25–$80 per shelf, depending on bracket quality and wood choice.
Styling Tip: The “Rule of Thirds” works beautifully on floating shelves. Divide each shelf into thirds mentally and place one tall item, one medium item, and one small item in each section. Mix textures a ceramic vase next to a stack of books next to a trailing plant for a natural, curated feel.
Decor Tips: DIY Girly Room Ideas: Trendy Decor Hacks for a Soft Glam Bedroom Look
Add a DIY Statement Ceiling for Unexpected Drama
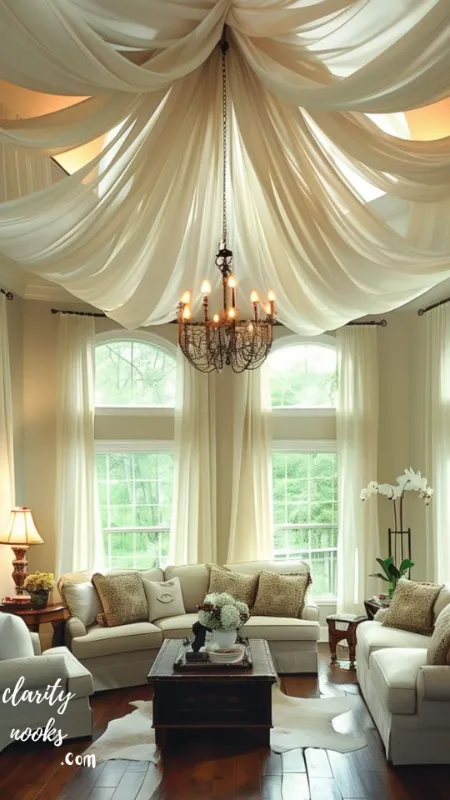
Most DIYers focus entirely on walls and floors, completely ignoring the “fifth wall” the ceiling. A DIY beadboard ceiling, painted ceiling (even just in white vs. a soft color), or simple wood plank ceiling creates a stunning element that most rooms simply don’t have.
Why It Works: Ceilings are the one surface guests always notice but rarely see. When you do something interesting there, it elevates the entire room and makes people feel like they’re in a genuinely designed space.
Materials Needed (for a painted statement ceiling):
- Quality ceiling paint (flat or eggshell finish)
- Extension roller and brush
- Painter’s tape
- Drop cloths
- Optional: beadboard panels for a textured look
Step-by-Step Process:
- Choose your direction: a painted contrast ceiling (same color as walls in a deeper shade, or a complementary color) or beadboard panels for texture.
- For a painted ceiling, tape off the edges at the wall/ceiling junction carefully.
- Use an extension roller to apply two coats of ceiling paint.
- For beadboard, measure and cut panels, apply adhesive and finish nails, fill seams with caulk, and paint.
Estimated Cost: $40–$120 for a painted ceiling; $200–$500 for beadboard.
Pro Insight: A soft, warm white ceiling (not stark bright white) in a room with warm-toned walls creates an enveloping, cozy atmosphere that feels intentional and inviting. This is one of the most overlooked DIY improvements with the highest visual payoff.
Discover More: Easy DIY Funky Bathroom Ideas to Refresh Your Bathroom on a Budget
Build a DIY Storage Ottoman or Coffee Table
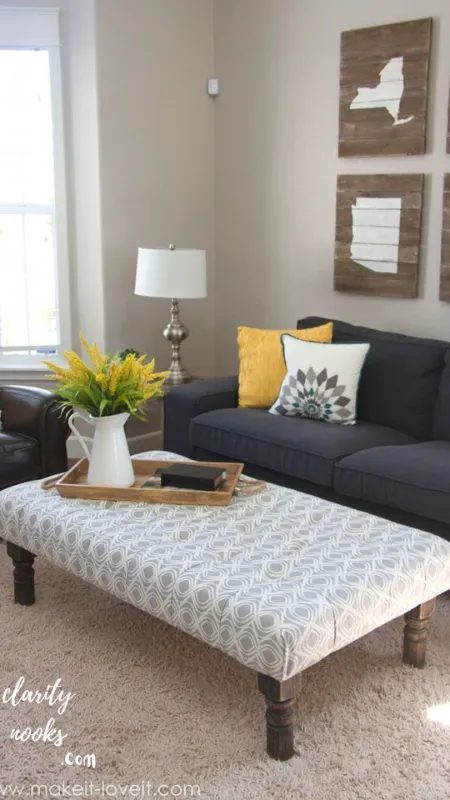
A storage ottoman is one of the hardest-working pieces of furniture in any family room. It serves as a footrest, extra seating, a coffee table with a tray on top, and hidden storage for blankets, remotes, and toys. Building one yourself allows you to customize the size, fabric, and storage capacity exactly to your needs.
Why It Works: Off-the-shelf ottomans with good storage capacity can cost $300–$600. A DIY version with custom dimensions and fabric can be built for $60–$150 while fitting your space perfectly.
Materials Needed:
- Plywood (¾ inch) for the base and lid
- 3–4 inch upholstery foam
- Batting (poly-fil)
- Upholstery fabric (at least 2 yards)
- Staple gun and staples
- 4 furniture legs and mounting plates
- Hinges for the lid (optional)
- Jigsaw and drill
Step-by-Step Process:
- Cut plywood into: bottom panel, four sides, and a lid all to your desired dimensions.
- Assemble the box using wood glue and screws.
- Attach furniture legs to the bottom corners.
- Cut foam to fit the lid, add a layer of batting over it, and wrap with fabric.
- Staple fabric to the underside of the lid, pulling taut to avoid wrinkles.
- Add hinges if you want a hinged lid, or leave it as a removable top.
Estimated Cost: $60–$150 depending on fabric choice and leg style.
Transform Lighting with DIY Lampshade Upcycling and Smart Placement
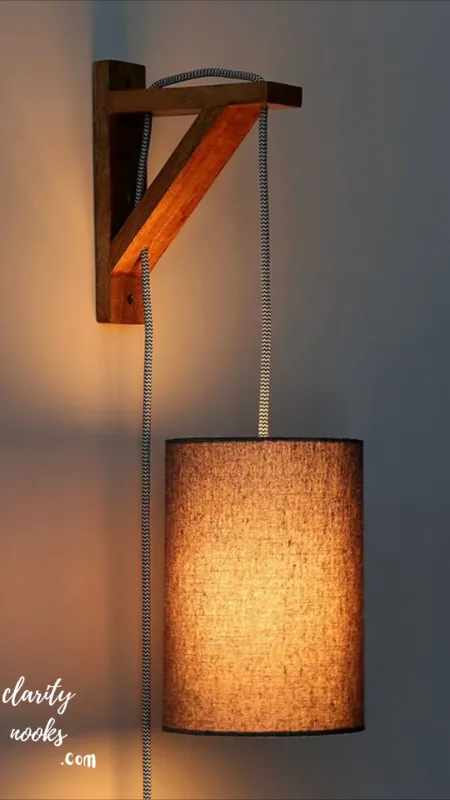
Lighting is the most underrated element in family room design and also one of the most affordable to change. Replacing dated lampshades, adding floor lamps to dark corners, and creating a layered lighting strategy (ambient + task + accent) completely changes how a room feels.
Why It Works: Single overhead lighting creates flat, unflattering light that makes rooms feel institutional. Layered lighting with multiple sources at different heights creates warmth, depth, and the kind of ambiance that makes people want to stay.
Materials Needed:
- Drum or empire-style replacement shades
- Floor lamp (thrift stores often have great frames for $10–$20)
- LED bulbs with warm color temperature (2700K–3000K)
- Dimmer switch (if compatible with your fixtures)
- Optional: spray paint for lamp base updates
Step-by-Step Process:
- Audit your current lighting: identify where your room is too dark or too harshly lit.
- Replace all bulbs with warm-white LEDs (2700K is ideal for family rooms).
- Add a floor lamp in any dark corner aim to have at least three light sources in the room.
- Swap outdated lampshades for fresh drum shades in linen, cotton, or patterned fabric.
- Install a dimmer switch on your overhead light to make it a supporting player rather than the star.
Estimated Cost: $40–$150 depending on whether you buy new or thrift.
Expert Insight: Interior designers consistently identify lighting as the single most transformative change in any room, yet it’s the last thing most homeowners address. A $50 floor lamp and $20 worth of warm LED bulbs can make a $5,000 sofa look even better and a $500 sofa look designer.
Create DIY Custom Window Treatments
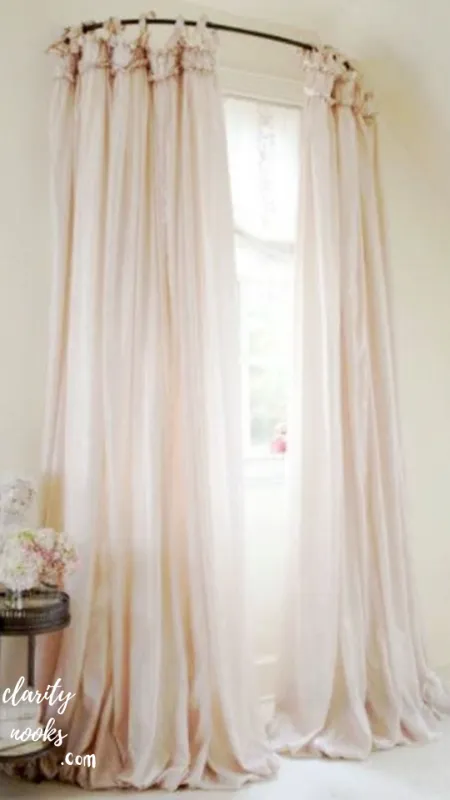
Windows frame your family room’s connection to the outside world. Cheap, short curtains hung at window height are one of the most common design mistakes in home décor. DIY curtains hung at ceiling height, floor to floor are surprisingly simple and dramatically more elegant.
Why It Works: Curtains hung at ceiling height and extending to the floor create the illusion of taller ceilings and larger windows. This simple change can make a room feel significantly more expensive without changing anything structural.
Materials Needed:
- Curtain rods (installed just below ceiling molding or at ceiling)
- Fabric panels (linen, velvet, or outdoor fabric for durability with kids/pets)
- Curtain clips or rod pocket sewn into fabric
- Iron and ironing board
- Sewing machine or iron-on hem tape (no-sew option)
Step-by-Step Process:
- Mount curtain rods 4–6 inches below the ceiling (or at the ceiling for maximum height illusion).
- Measure from rod to floor you want panels to just touch or pool slightly on the floor.
- Cut fabric panels to width (usually 2.5x the window width for fullness) and height.
- Hem the bottom with a sewing machine or iron-on hem tape.
- Attach to rod using clips, rings, or a sewn rod pocket.
- Steam or press finished panels before hanging.
Estimated Cost: $40–$120 per window depending on fabric choice.
Pro Tip: For families with kids and pets, outdoor fabric especially Sunbrella or similar performance fabrics is a game-changer. It resists stains, fades slowly, cleans easily, and comes in beautiful textures and colors that work perfectly indoors.
DIY a Cozy Reading Nook or Media Corner
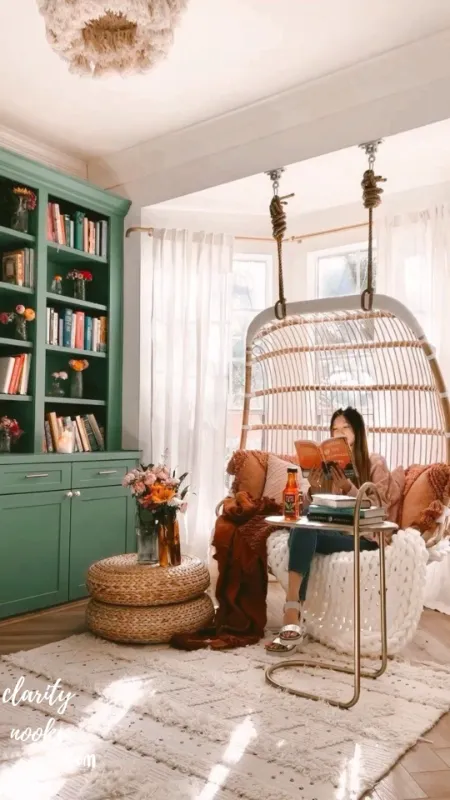
Carving out a dedicated functional zone within your family room a reading corner, a homework station, or a media nook creates a room that works harder for your family. A built-in bench with storage, a hanging chair, or even a simple floor cushion arrangement can transform an underused corner into the most-loved spot in the house.
Why It Works: Zoning a room gives everyone in the family a sense of ownership over a space. Kids are more likely to actually read in a special reading nook than on the main sofa. A defined corner also helps the room feel purposeful and organized, not just a dumping ground for everyone’s stuff.
Materials Needed (for a window seat bench):
- Plywood (¾ inch) for base structure
- Foam pad cut to size (3–4 inch density foam)
- Upholstery fabric
- Drawer slides and fronts (for under-bench storage)
- Finish nails, wood glue, and screws
- Paint to match trim
Step-by-Step Process:
- Measure your target corner or window bay carefully.
- Build a basic box from plywood the height should be 17–19 inches for comfortable seating.
- Add internal dividers for storage compartments, or install drawer slides for pull-out storage.
- Cut foam to fit the top surface, wrap in batting, cover with fabric, staple to the underside.
- Place the seat cushion on top it can be removable for easy cleaning.
- Add throw pillows and a small side table or built-in shelf for a complete nook.
Estimated Cost: $100–$250 depending on storage complexity and fabric choice.
Conclusion
Transforming your family room doesn’t require a contractor, a massive budget, or years of design experience. With the right DIY family room ideas from a shiplap accent wall to smart lighting layering to a built-in bookshelf hack you can create a space that genuinely reflects your family’s personality and actually works for your daily life.
The key is to start with intention: choose one or two projects, do them well, and build from there. The best family rooms are built over time, not all at once. Pick the idea on this list that excites you most, gather your materials this weekend, and start. You’ll be surprised how quickly momentum builds and how good it feels to live in a space you actually created.
Trend Analysis: Where DIY Family Room Design Is Headed (2026–2028)
The family room has undergone a significant identity shift over the past several years, and that evolution is accelerating. Understanding these trends helps you make design choices that remain fresh for years rather than feeling dated within 18 months.
Biophilic Design Integration is moving from a luxury trend to a mainstream expectation. Expect to see more DIYers incorporating live edge wood elements, potted trees, moss walls, and natural stone accents into family rooms. The goal isn’t just aesthetics it’s about creating a psychological sense of connection to nature that research consistently shows improves mood, reduces stress, and increases focus.
Multifunctional Spaces with Flexibility are becoming essential as remote work and hybrid schooling remain normalized. Family rooms need to work as entertainment spaces and homework zones and occasional office spaces. DIY modular furniture, fold-down desks built into shelving units, and adaptable storage solutions that can shift roles quickly are gaining significant traction on platforms like YouTube and TikTok.
Vintage and Thrifted Integration is experiencing its biggest cultural moment in decades, driven by sustainability awareness and the rise of “thrift flip” content creators. By 2026–2027, expect thrift-sourced furniture as a design choice (not just a budget compromise) to become fully mainstream, with DIY paint and upholstery transformations positioned as creative expression rather than necessity.
Practical Tips and Expert Insights for DIY Family Rooms
After reviewing dozens of completed DIY family room transformations and consulting design research, several patterns emerge consistently among the most successful projects.
Start with a Mood Board, Not a Shopping Cart. The most common mistake in DIY home projects is buying items as you discover them, without a cohesive vision. Spend 2–3 hours on Pinterest or Houzz curating a mood board before purchasing anything. When every piece is evaluated against the same visual reference, the final result is dramatically more cohesive.
The 60-30-10 Color Rule Still Works. Professional designers use a consistent formula: 60% of the room in a dominant neutral, 30% in a secondary color (often in furniture or larger textiles), and 10% in an accent color (pillows, decor, art). This simple framework prevents the most common DIY mistake a room that feels visually chaotic because too many competing colors are fighting for attention.
Prioritize Scale Above Everything Else. A beautiful rug that’s too small, a sofa too large for the room, or shelves hung too high scale mistakes are immediately visible even to untrained eyes, and they undermine every other design decision. Always measure twice and use painter’s tape on the floor to simulate furniture placement before purchasing.
Long-Term Strategy: Making Your DIY Investment Last
Smart DIY home improvements aren’t just about how a room looks on Day One they’re about choosing materials, techniques, and designs that hold their value over time and adapt as your family’s needs evolve.
Choose Timeless Over Trendy for Major Investments. Your shiplap wall, built-in shelving, and custom window treatments are semi-permanent investments. Stick to classic colors and natural materials for these. Save trend-forward choices for lower-cost, easily changeable elements like throw pillows, artwork, and small decor items.
Think in Systems, Not Individual Projects. The most effective DIY family rooms are designed with a systems approach storage that expands modularly, furniture that can be rearranged, lighting that can be adjusted seasonally. When you’re building that storage ottoman, make it sized to stack with a second one you might build later. When you install those floating shelves, use the same bracket system so you can add more shelves consistently.
Document Everything. Keep a folder (digital or physical) with paint color codes, material sources, and measurements for every DIY project. When you move, repaint, or want to expand, having this reference saves enormous time and ensures perfect color matching.
Future Predictions and Innovations in DIY Family Room Design
The DIY home improvement space is being reshaped by technology, sustainability pressures, and changing family structures. Several innovations are already influencing how people approach family room transformations.
AI-Powered Design Tools are making the planning phase dramatically more accessible. Apps like Houzz’s AI room planner, IKEA’s Kreativ, and emerging tools from Pinterest and Wayfair allow homeowners to photograph their actual rooms and virtually test paint colors, furniture arrangements, and decor choices before spending a dollar. By 2027, expect these tools to provide real-time cost estimates and shoppable recommendations integrated with local inventory.
Sustainable and Low-VOC Materials are becoming not just ethically preferable but actively better performing products. The newest generation of zero-VOC paints, bio-based adhesives, and FSC-certified lumber options match or exceed the performance of traditional materials. As these products achieve price parity with conventional options (already happening in paint, coming soon in flooring), sustainable DIY will become the default rather than the premium choice.
Modular and Adaptable Furniture Systems will become increasingly DIY-friendly as companies like USM, String, and newer direct-to-consumer brands develop systems specifically designed for owner assembly and reconfiguration. The era of buying a piece of furniture that looks the same for 20 years is giving way to adaptable systems that evolve with your life.
Common Mistakes and Hidden Gaps: What Beginners and Intermediate DIYers Get Wrong
Even experienced DIYers fall into predictable traps that undermine otherwise excellent projects. Knowing these pitfalls in advance is worth more than most tutorials.
Mistake #1: Underestimating Prep Work. The most common cause of a disappointing paint job, a shelf that won’t stay level, or furniture that looks “homemade” instead of hand-crafted is insufficient preparation. Sanding, priming, and properly cleaning surfaces before painting or staining makes a more significant difference than the quality of the paint itself. Give prep work the same time budget as the project itself.
Mistake #2: Ignoring the Ceiling and Floors. Most DIY family room makeovers focus entirely on walls and furniture while completely ignoring the ceiling and floor. A freshly painted room with a dingy carpet or bare concrete immediately reveals the ceiling gap. Even simple improvements a quality area rug sized correctly to anchor the seating area, or a coat of fresh white on the ceiling complete the transformation in ways the walls alone never can.
Mistake #3: One-and-Done Lighting. Beginners install a single overhead light and consider the job done. Intermediate DIYers upgrade the overhead fixture but still leave corners dark. The hidden gap most people miss: ambient, task, and accent lighting need to work together as a layered system. A $40 floor lamp in the right corner can do more for a room’s atmosphere than a $400 ceiling fixture in the wrong position.
Mistake #4: Buying Cheap Anchors for Wall-Mounted Projects. Floating shelves, gallery walls, and TV mounts all depend entirely on proper wall anchoring. Using drywall anchors when you should be hitting studs or using insufficient anchors for the weight load is both a safety risk and a project-destroying mistake. Always use a stud finder, and when anchors are necessary, use toggle bolts or toggle anchors rated significantly above your expected load.
Mistake #5: Neglecting Acoustic Comfort. Hard floors, bare walls, and sparse furniture create echoey, acoustically harsh spaces. This is a hidden gap almost every DIY guide misses. Soft furnishings rugs, curtains, upholstered furniture, cushions absorb sound and make a family room feel warmer and more comfortable in a way that’s purely physical, not just visual. If your family room sounds like a gymnasium, no amount of decorating will make it feel cozy.
FAQs: DIY Family Room Questions Answered
What is the most impactful DIY change I can make to my family room on a budget under $100?
Lighting. For under $100, you can add a floor lamp, replace all bulbs with warm-white LEDs, and install a dimmer switch. The atmospheric change is immediate and significant and more transformative than most furniture or decor purchases at the same price point.
How do I make my small family room look bigger?
Use light, neutral paint colors on walls. Hang curtains at ceiling height to draw the eye upward. Choose furniture with legs rather than pieces that sit on the floor (this creates visual breathing room). Use mirrors strategically to reflect light. Keep the floor as clear as possible with good storage solutions.
Can I do DIY family room improvements as a renter?
Focus on removable and non-permanent improvements: gallery walls using picture-hanging strips, removable wallpaper, peel-and-stick floor tiles (in low-traffic areas), area rugs, window treatments that use tension rods, and furniture improvements like paint and hardware swaps. These all leave zero permanent impact on the rental.
What is the best paint finish for family room walls?
Eggshell or satin finish is ideal for family room walls. Flat/matte paint marks easily and is difficult to clean a significant problem in high-traffic family spaces. Satin is washable, has a slight sheen that reflects light attractively, and holds up well to daily wear.

Rameen Zara is the founder of Clarity Nooks, bringing over five years of experience in home décor and interior styling. She shares simple yet practical design ideas that suit real homes and everyday living. Her approach focuses on cozy aesthetics, soft color palettes, and natural textures that create warm, inviting spaces.


