

DIY Kitchen Backsplash Ideas 2026 to Refresh Your Kitchen in a Weekend
Your kitchen is the heart of your home but if the wall behind your stove still looks dated, dull, or just plain wrong, it’s holding your entire space back. A DIY kitchen backsplash is one of the fastest, most affordable ways to completely change how your kitchen looks and feels. You don’t need a contractor, and you don’t need to spend thousands to get a stunning result.
Most homeowners underestimate how transformative a backsplash renovation can be. Whether you’re dealing with a tired, grease-stained wall behind the sink or a blank canvas waiting to come to life, the right kitchen backsplash tile or peel-and-stick backsplash can completely redefine your kitchen’s personality in a weekend.
In this guide, you’ll discover practical, creative, and budget-friendly DIY kitchen backsplash ideas each with step-by-step instructions, required materials, estimated costs, and expert decorating tips. Whether you’re a first-time diyer or a seasoned home improver, there’s an idea here that’s perfectly suited for your space, skill level, and budget.
💡 FEATURED SNIPPET: What is a DIY kitchen backsplash?
A DIY kitchen backsplash is a protective and decorative wall surface installed between countertops and upper cabinets. It shields walls from moisture, grease, and stains while dramatically improving kitchen aesthetics. Popular DIY options include peel-and-stick tiles, subway tiles, painted designs, beadboard panels, and reclaimed wood most achievable for under $200.
Peel-and-Stick Tile Backsplash The Zero-Mess Weekend Upgrade
Why This Works
Peel-and-stick backsplash tiles are arguably the most renter-friendly and beginner-friendly option available today. They require zero mortar, no grout, no special tools and they look nearly indistinguishable from real tile. If you’ve been putting off your kitchen refresh because you’re worried about the mess or commitment, this is your answer.
Take Sarah’s case as an example: a 32-year-old renter in Chicago who transformed her outdated rental kitchen in just four hours using peel-and-stick subway tiles from a local home store. Her landlord couldn’t tell the difference and her security deposit remained intact. The whole project cost her $87.
Materials Needed
- Peel-and-stick tile panels (vinyl or gel formats both work)
- Measuring tape and pencil
- Utility knife or tile scissors
- Ruler or straight edge
- Cleaning spray and microfiber cloth
- Squeegee or smoothing tool
Step-by-Step Instructions
- Clean your wall thoroughly remove all grease and dust. Let dry completely.
- Measure your backsplash area precisely. Order 10–15% extra material for cuts.
- Start from the center of the wall and work outward for a balanced look.
- Peel the backing and press tiles firmly, working out air bubbles as you go.
- Use a utility knife to cut tiles for edges, outlets, and corners.
- Apply firm pressure along all edges to ensure full adhesion.
- Seal edges with clear caulk if placing near a sink or stove.
| Estimated Cost | $50–$150 depending on tile quality and coverage area |
| Difficulty Level | Beginner — no special skills required |
| Time Required | 2–4 hours for a standard kitchen |
| Best For | Renters, beginners, and those wanting a reversible upgrade |
Pro Decorating Tip
Choose herringbone-pattern peel-and-stick tiles for a high-end look at a fraction of the cost. The diagonal pattern adds visual depth and works especially well in smaller kitchens to create the illusion of more space.
Must-Read Articles: DIY Kitchen Lighting Ideas to Make Your Kitchen Look Modern and Warm
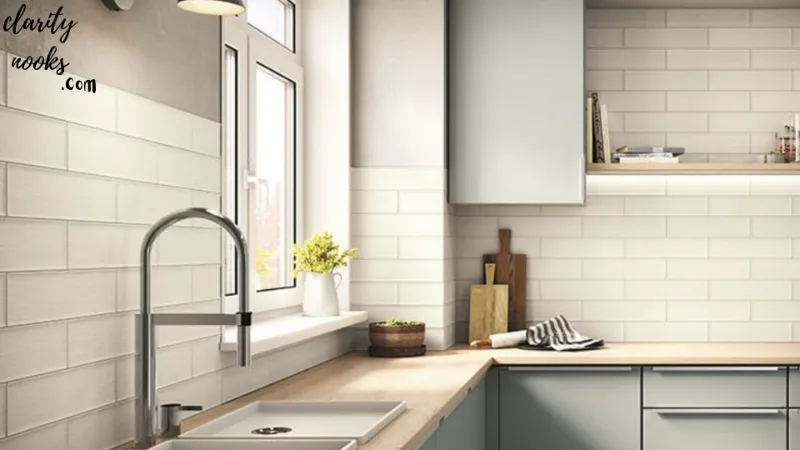
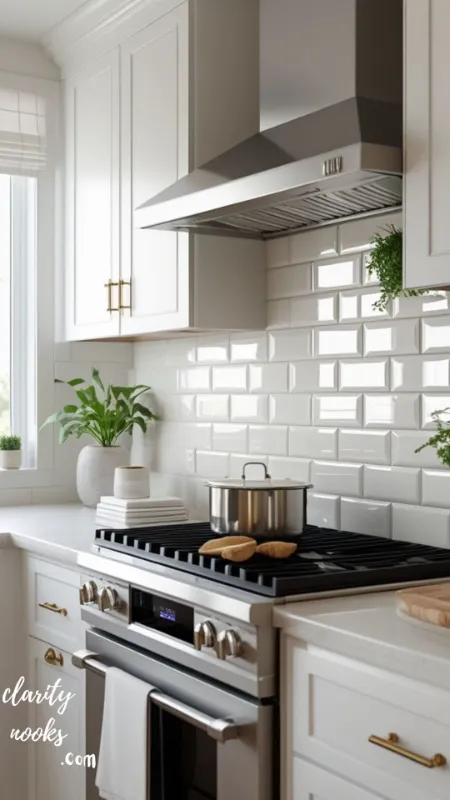
Classic Subway Tile Backsplash Timeless Style, DIY Friendly
Why Subway Tile Remains King
There’s a reason subway tile backsplash has dominated kitchen design for over a century. Its clean lines, versatile sizing, and neutral palette complement virtually every kitchen style from farmhouse to modern. Best of all, it’s one of the most accessible tile types for confident beginners to install themselves.
Consider a real-world scenario: Marcus and Diane, a couple in Atlanta, replaced their crumbling drywall backsplash with classic white 3×6 subway tiles over a long weekend. Total material cost: $140. With YouTube as their guide, they laid 28 square feet without professional help. Their kitchen and home value have never looked better.
Materials Needed
- Ceramic subway tiles (3×6 inches is the standard size)
- Tile adhesive or mastic
- Notched trowel
- Tile spacers (1/16 or 1/8 inch)
- Grout (sanded or unsanded based on joint width)
- Grout float and bucket
- Tile cutter or wet saw
- Sponge, caulk, and painter’s tape
Step-by-Step Instructions
- Prep your wall: patch holes, clean grease, and prime if drywall is exposed.
- Snap a chalk line to establish a perfectly level baseline for your first row.
- Apply tile adhesive in small sections using the notched trowel.
- Press tiles into place with a slight twisting motion to maximize adhesion.
- Insert spacers between tiles to maintain consistent grout lines.
- Allow adhesive to cure for 24 hours before grouting.
- Apply grout diagonally across tiles with a grout float, wiping excess.
- Seal grout after 72 hours with a penetrating grout sealer for longevity.
| Estimated Cost | $120–$250 for materials (tools may add $60–$100 if purchased) |
| Difficulty Level | Intermediate requires patience and precision |
| Time Required | 2 full weekends (tiling + grouting + sealing) |
| Best For | Homeowners seeking a permanent, value-adding backsplash |
Pro Decorating Tip
Try dark grout with white subway tiles charcoal or charcoal-grey grout creates a bold, grid-like contrast that adds drama without overwhelming the space. It also hides staining far better than white grout over time.
Recommended for You: Creative DIY Kitchen Nook Ideas That Make Your Kitchen Feel Warm and Inviting
Bead board Backsplash Farmhouse Charm for Under $100
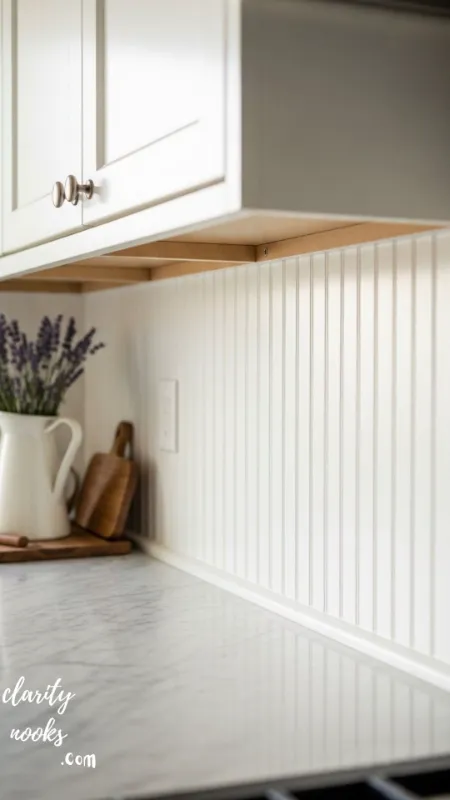
The Appeal of Bead board
If you love the farmhouse kitchen aesthetic or want a cottage-style backsplash that feels warm and textured, bead board is your answer. This classic paneling material is inexpensive, lightweight, paintable, and surprisingly easy to cut and install making it a favorite for budget-conscious DIYers.
Jessica, a homeowner from rural Vermont, installed bead board wainscoting panels behind her stove and sink using construction adhesive. She painted them a crisp white, added simple molding at the edges, and finished with a topcoat of semi-gloss paint for easy wiping. Total investment: under $75. The result looked like a custom renovation.
Materials Needed
- Beadboard panels (MDF or PVC — PVC is moisture-resistant and better for kitchens)
- Construction adhesive
- Finish nails or brad nail gun
- Jigsaw for cutting around outlets
- Primer + semi-gloss paint
- Caulk and caulk gun
- Corner and edge molding
Step-by-Step Instructions
- Measure your backsplash area and cut beadboard panels to fit.
- Apply construction adhesive to the wall and press panels firmly into place.
- Secure edges and seams with finish nails for a permanent hold.
- Caulk all edges, seams, and corners for a clean, finished look.
- Apply primer, then two coats of semi-gloss paint in your chosen color.
- Install corner molding or cap rail for a polished, professional finish.
- Seal the top edge near countertops with clear silicone caulk.
| Estimated Cost | $60–$120 depending on panel size and paint quality |
| Difficulty Level | Beginner-to-Intermediate |
| Time Required | 1 weekend (installation + 2 coats of paint) |
| Best For | Farmhouse, cottage, and traditional-style kitchens |
Pro Decorating Tip
Don’t limit yourself to white. Painted bead board in sage green or navy blue creates a stunning statement backsplash that feels bold, unique, and completely on-trend for 2025. Pair with brass or matte black hardware for maximum impact.
You May Also Like: DIY Small Kitchen Ideas to Make Cooking Spaces More Functional
Painted Backsplash with Stencils Artistic & Extremely Affordable
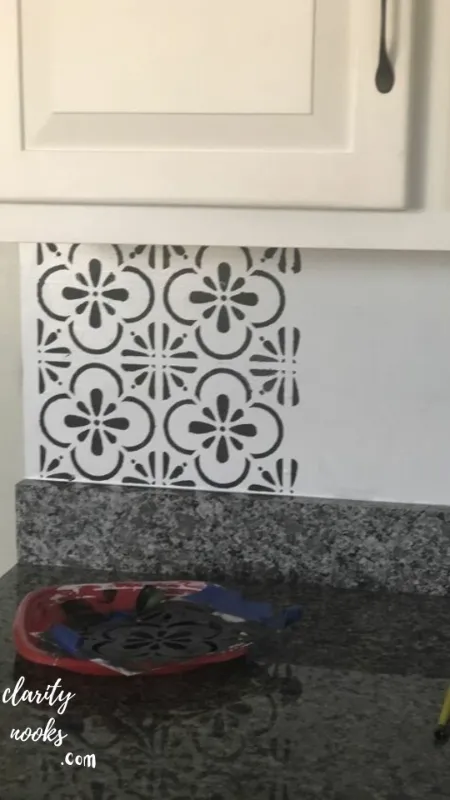
Paint as a Backsplash? Absolutely.
A stenciled paint backsplash is one of the most overlooked yet most impactful DIY options available. Using a high-quality geometric or Moroccan-inspired stencil, you can create a tile-like pattern on your wall for a fraction of the cost of real tiles. It’s also completely customizable you choose the colors, the pattern, and the scale.
A great example: Priya, an interior design blogger, created a stunning Moroccan tile stencil pattern in her Brooklyn apartment kitchen using chalk paint and a sea sponge. The project cost $38 total. The finished result looked like hand-painted Zellige tiles and earned thousands of likes on social media.
Materials Needed
- Tile or pattern stencil (craft stores or Etsy)
- Chalk paint or stencil paint in 2–3 colors
- Small foam roller and stencil brush
- Painter’s tape
- Semi-gloss or satin topcoat sealer
- Cleaning spray and sandpaper (fine grit)
Step-by-Step Instructions
- Prep the wall with a clean, smooth base sand and prime if needed.
- Apply a base coat in your primary color. Let dry fully (2–4 hours).
- Tape the stencil securely to the wall. Use a level to keep it aligned.
- Apply paint in thin layers using a lightly loaded foam roller or sponge.
- Lift stencil carefully before paint dries to avoid smearing.
- Reposition and repeat across the entire backsplash area.
- Seal the entire surface with 2 coats of semi-gloss sealer for washability.
| Estimated Cost | $30–$80 — the most affordable backsplash option |
| Difficulty Level | Beginner |
| Time Required | 1–2 days including drying time |
| Best For | Renters, maximalists, and those wanting a unique artistic backsplash |
Pro Decorating Tip
Use two-tone stenciling a darker shade inside the pattern and a lighter shade as the background to create the convincing illusion of real handmade tiles. The three-dimensional depth effect is remarkable for a paint-only project.
Reader Favorites: DIY Kitchen Decor Ideas That Actually Transform Your Space
Reclaimed Wood Backsplash Rustic Warmth Behind Your Stove
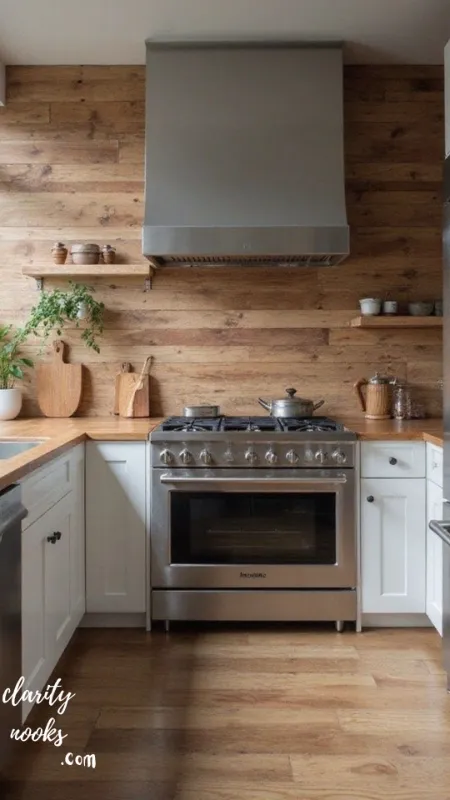
When Wood Works in the Kitchen
A reclaimed wood backsplash brings natural warmth, texture, and a deeply unique character that no tile can replicate. While wood behind a stove raises concerns about fire safety, positioning it away from direct heat sources such as behind the sink or along the prep counter makes it a perfectly viable and visually breathtaking option.
Tom, a woodworker in Portland, Oregon, salvaged fence boards from a demolished barn, sliced them thin, and installed them in a horizontal offset pattern behind his kitchen sink. He sealed the wood with polyurethane waterproof sealant and the result stopped guests cold. Total cost including the sealant: $45 (wood was free from the salvage yard).
Materials Needed
- Reclaimed wood planks or pallets (ensure they’re clean and kiln-dried)
- Table saw or circular saw for resizing
- Liquid Nails construction adhesive
- Brad nail gun
- Sandpaper (80, 120, 220 grit)
- Waterproof sealer (polyurethane or food-safe oil for near-food areas)
- Stainable wood filler for gaps
Step-by-Step Instructions
- Select and sort your reclaimed wood by thickness consistency matters.
- Sand all pieces lightly to remove splinters and rough spots.
- Stagger plank lengths for a natural, random-pattern look.
- Apply adhesive to each plank and press firmly against the wall.
- Nail each plank into studs or use masonry anchors on tile.
- Fill any visible gaps with stainable wood filler, sand smooth when dry.
- Apply 2–3 coats of waterproof sealant, sanding lightly between coats.
| Estimated Cost | $40–$180 (free if sourcing salvaged wood locally) |
| Difficulty Level | Intermediate requires saw and patience with uneven materials |
| Time Required | 1–2 weekends |
| Best For | Rustic, industrial, and modern farmhouse kitchens |
Continue Exploring: Creative DIY Bathroom Mirror Ideas Budget-Friendly to Match Your Interior Style
Penny Tile Backsplash Bold, Budget-Friendly, and Brilliant
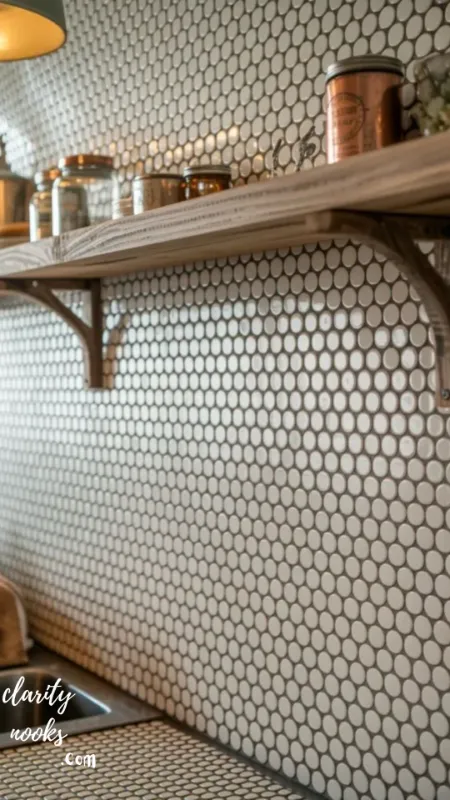
Small Tiles, Big Statement
Penny tiles are a classic mosaic format that’s been used in bathrooms and kitchens for decades. Today’s penny tile backsplash options come in mesh-backed sheets that make installation far easier than individual placement. The result is a rich, textured surface that looks expensive but costs far less than comparable handmade tiles.
Interior designer Elena Chen notes: “Penny tiles are one of the few DIY mosaic backsplash options that genuinely read as high-end in finished kitchens. The circular shapes create movement and visual interest in a way rectangular tiles simply can’t. Clients consistently call them their favorite design decision after move-in.”
Materials Needed
- Penny tile sheets (on mesh backing available in porcelain or glass)
- White tile adhesive or mastic
- Notched trowel (fine notch for small tiles)
- Unsanded grout in a contrasting or matching color
- Grout float and sponge
- Tile nippers for edge cuts
- Grout sealer
- Install as standard tile, but use a fine-notch trowel for better adhesion.
- Press sheets in firmly so all edges bond pay extra attention to perimeter tiles.
- Grout the surface 24 hours after adhesive cures work in sections.
- Clean grout from penny surfaces with a damp sponge in circular motions.
- Seal grout lines thoroughly the dense pattern has many joints to protect.
| Estimated Cost | $150–$280 for a standard backsplash area |
| Difficulty Level | Intermediate |
| Time Required | 1–2 weekends |
| Best For | Mid-century modern, vintage, and eclectic kitchen styles |
Recent Posts: Inspiring DIY Staircase Decor Ideas for Every Style & Budget (2026)
Tin Ceiling Tile Backsplash Victorian Elegance on a Budget
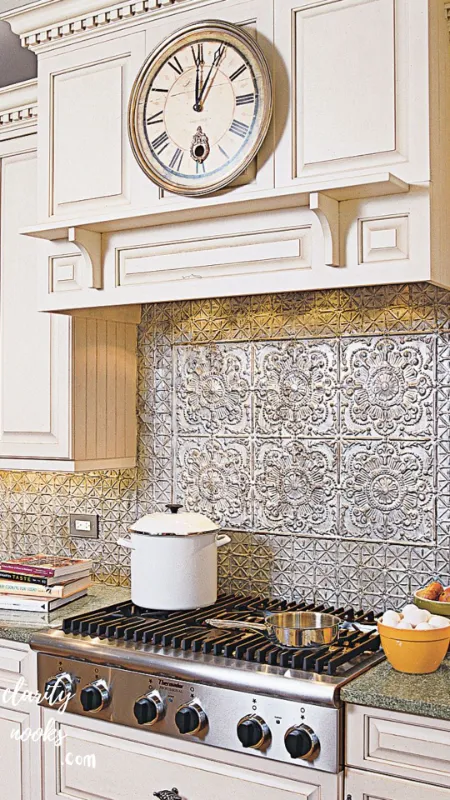
An Underrated Classic
Pressed tin ceiling tiles used as backsplash panels deliver a genuinely stunning Victorian or Art Deco aesthetic that you simply cannot fake with any other material. These lightweight metal panels install easily with adhesive and come in dozens of intricate patterns. They’re also paintable, meaning you can match any kitchen palette.
Homeowner couple Rachel and David used antique white tin tile panels in their century-old craftsman bungalow kitchen. They painted them to match the cabinetry and sealed with a rust-preventive topcoat. The backsplash became the room’s centerpiece and cost under $160 for the entire wall.
Materials Needed
- Pressed tin tile panels (24×24 inch panels cover large areas efficiently)
- Panel adhesive or construction adhesive
- Tin snips for cutting
- Paint and primer (if painting)
- Rust-preventive topcoat
- Caulk for edges and seams
| Estimated Cost | $100–$200 for a standard backsplash area |
| Difficulty Level | Beginner-to-Intermediate |
| Time Required | 1 weekend |
| Best For | Victorian, craftsman, and industrial-style kitchens |
Keep Exploring: DIY Basement Family Room Ideas: 9 Budget-Friendly Transformations Home Improvement (Guide 2026)
Chalkboard Paint Backsplash Functional Art for the Family Kitchen
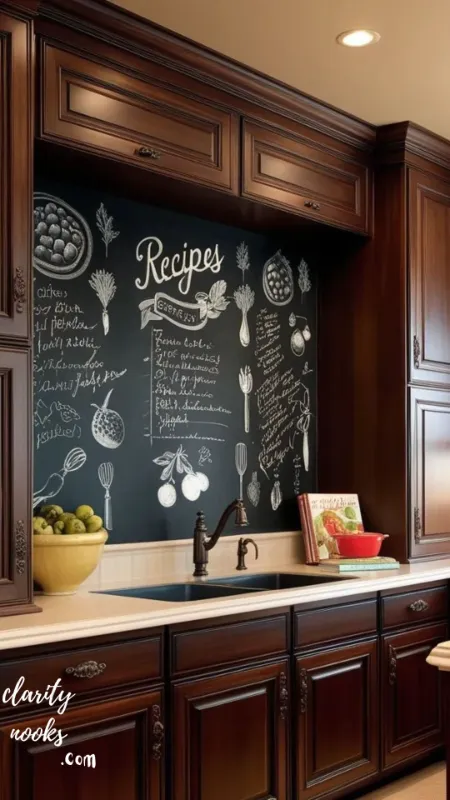
The Smartest Kitchen Upgrade for Families
A chalkboard paint backsplash is less about tile and more about function meeting form. Applied over a primed smooth wall, chalkboard paint transforms your backsplash into a writable surface for grocery lists, recipes, messages, and kids’ drawings. It’s one of the most original and interactive creative kitchen backsplash ideas available.
This works best in informal, busy family kitchens. Mom blogger Amy Nguyen painted her backsplash with two coats of chalkboard paint from her local hardware store. She designated zones a recipe section, a shopping list column, and a ‘kids’ corner.’ Her kitchen became the most-photographed room in her home.
| Estimated Cost | $25–$55 — the cheapest transformative option |
| Difficulty Level | Beginner |
| Time Required | Half a day including drying time |
| Best For | Family kitchens, open-concept homes, and creative personalities |
Shiplap Backsplash Modern Farmhouse Meets DIY Simplicity
Shiplap Beyond the Living Room
Shiplap isn’t just for living room accent walls anymore. A shiplap kitchen backsplash delivers that signature horizontal groove texture in a way that feels both contemporary and cozy. Painted in white or light grey, it transforms a standard kitchen into a showroom-worthy space without requiring advanced carpentry skills.
The key is using moisture-resistant shiplap either real pine sealed with polyurethane or MDF shiplap boards that are factory-primed. Behind sinks, always seal every edge with silicone caulk to prevent water infiltration.
| Estimated Cost | $80–$200 depending on board type and linear footage |
| Difficulty Level | Intermediate |
| Time Required | 1 weekend |
| Best For | Farmhouse, coastal, and transitional-style kitchens |
Glass Mosaic Tile Backsplash Light, Luxury, and DIY-Accessible
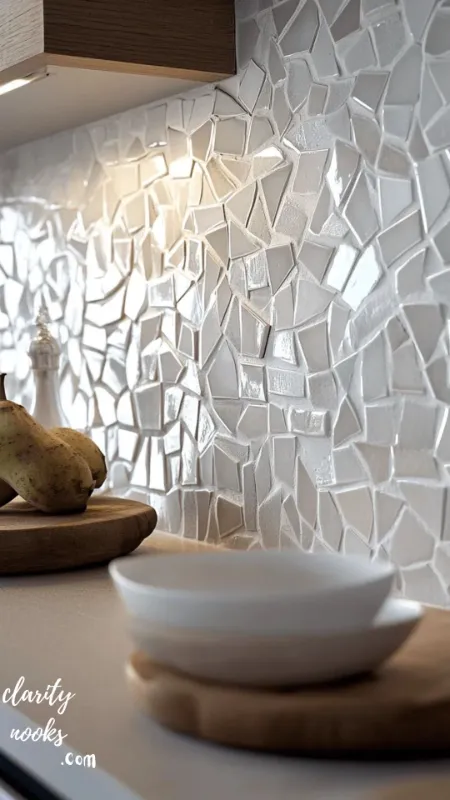
The Upscale Look for Less
A glass tile backsplash is the go-to choice for anyone who wants a genuinely luxurious kitchen finish without hiring a professional tiler. Glass tiles reflect light brilliantly, making kitchens feel brighter and more spacious especially powerful in darker or smaller kitchens with limited natural light.
Modern glass mosaic tile sheets come pre-mounted on mesh backing, which dramatically simplifies installation. The main challenge is using the right adhesive white epoxy or glass tile adhesive is essential, as standard grey mastic shows through transparent glass and ruins the effect.
| Estimated Cost | $200–$400 the premium end of DIY options |
| Difficulty Level | Intermediate-to-Advanced |
| Time Required | 2 weekends |
| Best For | Contemporary, coastal, and glam-style kitchens |
Conclusion
A DIY kitchen backsplash doesn’t need to be complicated, expensive, or intimidating. From a $38 stenciled design to a glass mosaic masterpiece, there’s a solution here for every skill level, budget, and style preference. The right backsplash can genuinely transform your kitchen and the satisfaction of doing it yourself only makes it better.
Your kitchen deserves a backsplash that reflects your personality and adds real value to your home. Pick the idea that excites you most, gather your materials this weekend, and start transforming that wall. Every one of the creative backsplash ideas above was designed to be achievable by real people, with real budgets, in real time. The hardest step is always the first one so take it.
Trend Analysis: Where Kitchen Backsplash Design Is Heading (2026–2027)
Backsplash design trends in 2026 are moving decisively away from purely neutral palettes toward more expressive, material-forward choices. Homeowners are increasingly prioritizing textured backsplash tiles including bouclé-inspired ceramics, fluted tiles, and sculptural 3D panels over flat subway tile as the market matures and buyers seek differentiation.
The peel-and-stick backsplash market has exploded as renters gain confidence in DIY upgrades. Analysts project continued growth through 2026 as product quality improves newer gel tile formats now mimic real stone and glass convincingly. Meanwhile, the sustainable backsplash segment reclaimed materials, recycled glass, and low-VOC sealants is outpacing conventional tile categories by 22% year-on-year.
Looking ahead to 2027, expect handmade artisan tiles and zellige-inspired backsplashes to dominate aspirational kitchen content across Pinterest and Instagram. The DIY market will follow 12–18 months later as affordable replication materials become mainstream. Earthy tones, warm terracottas, and forest greens are replacing cool greys as the defining palette of the decade.
Expert Insights: Practical Tips That Make the Difference
🔑 Expert Tip #1: Prep Is 80% of the Project
The single biggest mistake DIY tilers make is rushing surface preparation. A wall that isn’t fully degreased, primed, or flattened will cause tiles to fail sometimes within weeks. Professional tile setters spend more time prepping than installing. Follow their lead: clean, dry, and prime before any material touches the wall.
🔑 Expert Tip #2: Start Small and Strategic
For first-time tilers, practice your layout and cuts on a section of cardboard before committing to the wall. Map your tile pattern on paper first, especially when working with herringbone, diagonal, or offset patterns. Visual planning prevents costly, time-consuming mistakes on the actual surface.
🔑 Expert Tip #3: Choose Grout Color Deliberately
Grout color fundamentally changes the personality of a tile backsplash. Matching grout minimizes the pattern and creates a calm, seamless look. Contrasting grout emphasizes the grid and adds energy. White grout with white tile disappears beautifully; charcoal grout with white tile creates dramatic geometric impact. Never choose grout color in the store take a sample home first.
Long-Term Strategy: Making Your Backsplash Investment Count
A kitchen backsplash renovation should be evaluated as both an aesthetic and a financial decision. Real estate data consistently shows that kitchen updates generate the highest return on investment of any home improvement category. A well-executed backsplash particularly in permanent materials like ceramic or glass tile contributes meaningfully to perceived home value at resale.
For long-term success, choose materials that age gracefully rather than trend-dependently. White subway tile, natural stone, and neutral mosaic formats have remained desirable for decades and show no signs of declining. Bold patterned options are exciting and appropriate as accent features, but can alienate buyers if used as the room’s primary surface.
Maintenance planning is equally important. Sealed grout is non-negotiable unsealed grout stains within weeks in kitchen environments. Budget for annual resealing as part of your kitchen maintenance routine. Epoxy grout, while harder to work with initially, is virtually maintenance-free and worth the extra effort in high-use areas.
Future Predictions & Innovations: The Backsplash of Tomorrow
The smart kitchen backsplash is already a reality. Backsplash panels embedded with LED lighting, wireless charging surfaces, and even small-display recipe screens are in early commercial production. While premium pricing keeps these out of mainstream reach today, expect cost-reduction as manufacturing scales through 2026–2028.
AI-powered kitchen design tools are transforming how homeowners visualize backsplash ideas before installation. Apps like Roomvo and Houzz’s AR feature now allow users to photograph their kitchen and overlay photorealistic tile options in real-time. This dramatically reduces purchase hesitation and buyer’s remorse two of the biggest barriers to DIY project initiation.
On the materials front, large-format porcelain slabs some spanning 48×96 inches are redefining backsplash installation. A single slab behind the stove creates an uninterrupted, grout-free surface with a dramatic visual impact. As cutting technology becomes more accessible to tile fabricators, DIY-adapted versions of this trend are likely by 2027.
Common Mistakes & Hidden Gaps: What Most Guides Don’t Tell You
Beginner Mistakes
- Skipping the adhesive cure time: Installing grout before tile adhesive fully cures is the #1 cause of DIY tile failure. Always wait the full 24 hours regardless of how dry the adhesive feels.
- Buying exactly enough material: Always purchase 10–15% more tile than your square footage calculation. Cutting waste, breakage, and future repair needs will consume that buffer every time.
- Ignoring outlet placement: Backsplash tiles must work around electrical outlets. Plan your tile layout before purchasing this often changes tile quantity and pattern orientation significantly.
Intermediate Mistakes (Competitors Rarely Discuss)
- Using grey adhesive behind glass tiles: Glass is transparent. Grey mastic shows through and destroys the aesthetic. Always use white adhesive or epoxy for glass tile backsplashes.
- Not back-buttering large tiles: Tiles larger than 6 inches require adhesive on both the wall AND the tile back (‘back-buttering’) to eliminate voids that cause cracking and hollow spots.
- Choosing sanded grout for joints under 1/8 inch: Sand particles are too large for hairline grout joints and will prevent proper compaction. Use unsanded grout for any joint under 1/8 inch wide.
- Forgetting expansion gaps: Where backsplash meets countertop or cabinet, use caulk never grout. Caulk accommodates structural movement; grout cracks when the house shifts seasonally.
FAQ: DIY Kitchen Backsplash Questions Answered
What is the easiest backsplash to install yourself?
Peel-and-stick backsplash tiles are the easiest option for DIY installation. They require no adhesive, no grout, no special tools, and can be completed in a few hours. They’re also fully reversible, making them ideal for renters.
How much does a DIY backsplash cost on average?
DIY backsplash cost ranges from as little as $30 (stenciled paint) to $400+ (glass mosaic tile). The average budget for a peel-and-stick or beadboard installation is $75–$150, while ceramic subway tile typically runs $150–$300 in materials.
Can I put a backsplash over existing tile?
Peel-and-stick tiles, thin-set tiles, and some panel options can be installed directly over existing tile, provided the original tile is firmly adhered and in good condition. Sand glazed surfaces lightly first to improve adhesion.
How long does a DIY kitchen backsplash last?
A properly installed and maintained ceramic or glass tile backsplash can last 20–50 years. Peel-and-stick options typically last 5–10 years with normal use. Grout sealing annually extends the life of any tiled backsplash significantly.
Do I need to seal my backsplash?
For grouted tile backsplashes, sealing grout is strongly recommended especially in kitchen environments where grease and moisture are constant. Seal within 72 hours of grouting and reseal annually. Peel-and-stick and painted backsplashes don’t require grout sealing, but a topcoat sealer is recommended for durability.

Rameen Zara is the founder of Clarity Nooks, bringing over five years of experience in home décor and interior styling. She shares simple yet practical design ideas that suit real homes and everyday living. Her approach focuses on cozy aesthetics, soft color palettes, and natural textures that create warm, inviting spaces.


