

Modern DIY Outdoor Bar Ideas for the Perfect Summer Setup
very summer, millions of homeowners look out at their backyard and think the same thing: this space could be so much more. A flat patch of grass. A lonely patio table. Maybe a rusting grill. It’s functional, but it’s not a destination. That’s exactly what a DIY outdoor bar can change and it doesn’t take a contractor’s budget or a carpenter’s skill to do it.
The backyard bar boom is real. According to a 2026 Houzz outdoor renovation report, outdoor entertainment spaces were the top home improvement priority for the third consecutive year. But the most popular builds weren’t expensive stone islands they were smart, personal, and mostly DIY. People are building bars from old pallets, fence boards, repurposed dressers, and concrete blocks. The results are stunning.
Whether you have a 6×6 balcony or a sprawling half-acre, this guide covers 11 outdoor bar ideas that actually work. Not just inspiration but the real-world details: materials, costs, space requirements, and the pitfalls most guides skip entirely.
What is a DIY Outdoor Bar?
A DIY outdoor bar is a self-built entertainment station designed for outdoor use, typically featuring a countertop, storage for drinks and glassware, and sometimes seating. They range from simple pallet builds (under $100) to full outdoor kitchen bar setups ($1,000–$5,000+), and can be permanent, semi-permanent, or fully portable.
$150Avg. pallet bar cost
73%Homeowners want outdoor entertaining space
2–3×ROI of outdoor living additions
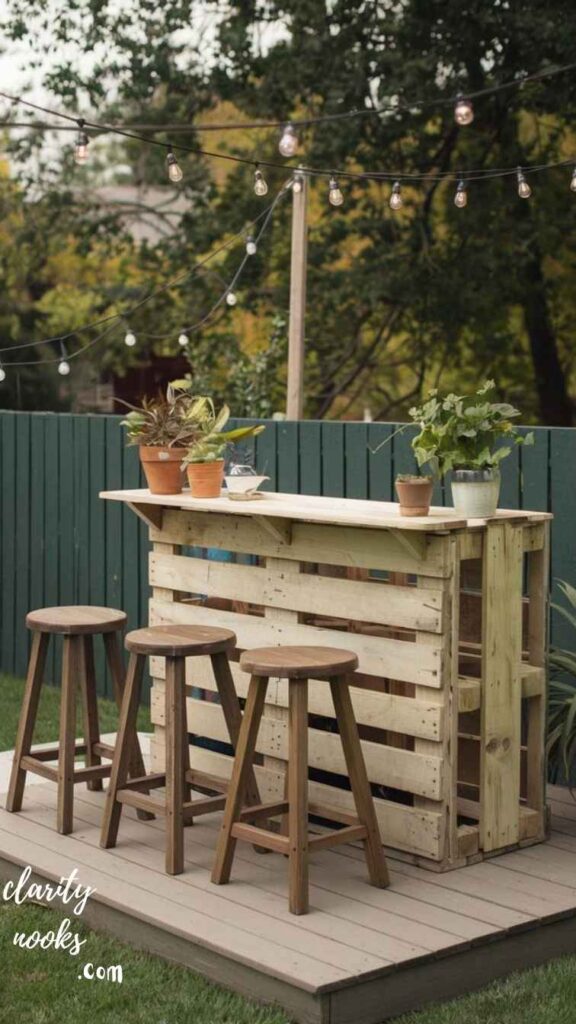
The Classic Pallet Bar
Budget King of Backyard Builds
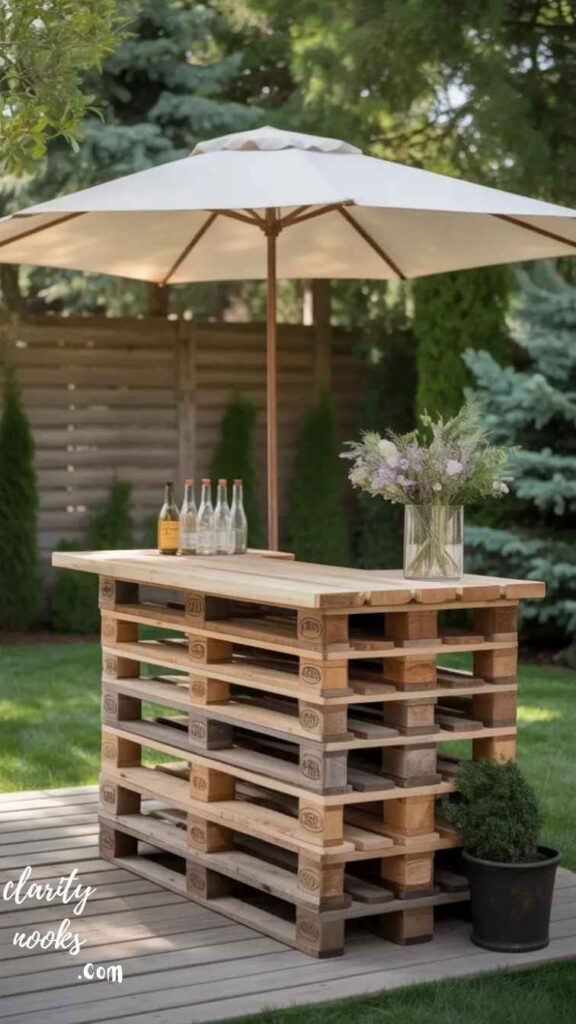
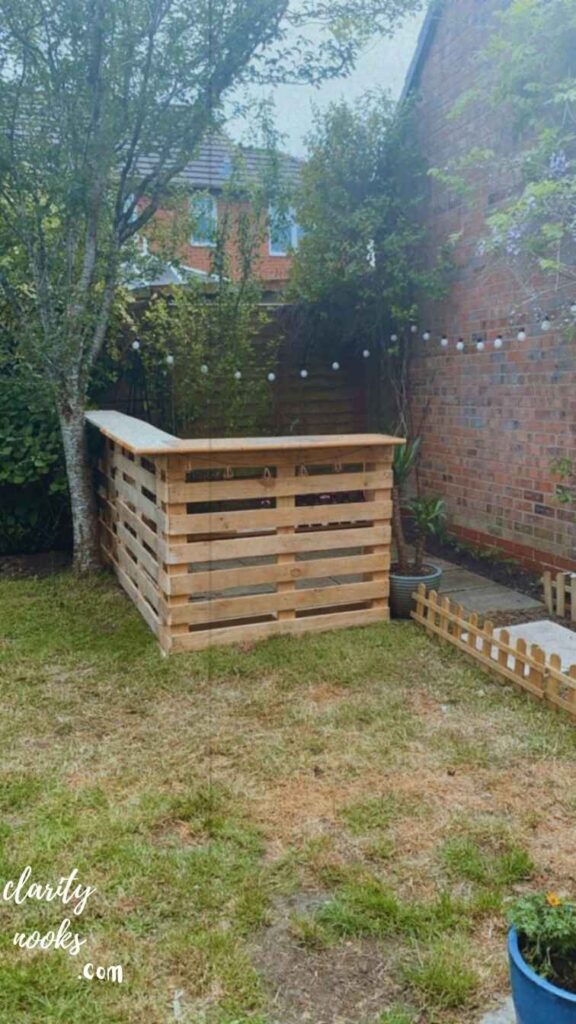
If you’ve never built anything before, the pallet bar is your best first project. Wooden pallets are free or nearly free from warehouses, hardware stores, and Facebook Marketplace. Stack two pallets vertically for the base, add a third across the top as a countertop frame, and finish with cedar planks or reclaimed wood boards. Sand, stain, and seal and you have a bar that looks like it cost $600 for under $100.
The key is choosing heat-treated (HT) pallets, not chemically treated (MB) ones. HT pallets are stamped on the side and are safe for home use. Always sand thoroughly to prevent splinters, and use a waterproof exterior stain to protect the wood from seasonal moisture. Add a strip of LED rope lights under the countertop overhang for instant ambiance.
Real-World Scenario: Jake, a first-time DIYer in Austin, TX, built a pallet bar for his apartment balcony in a single weekend. Total cost: $87. He sourced 4 pallets free from a local tile shop, bought cedar boards from Home Depot, and used leftover deck stain. Two years on, it’s still standing and regularly hosts his Sunday NFL watch parties.
Must Read: DIY Basement Bar Ideas to Create a Fun Entertainment Corner
The Cinder Block and Wood Bar Industrial Meets Rustic
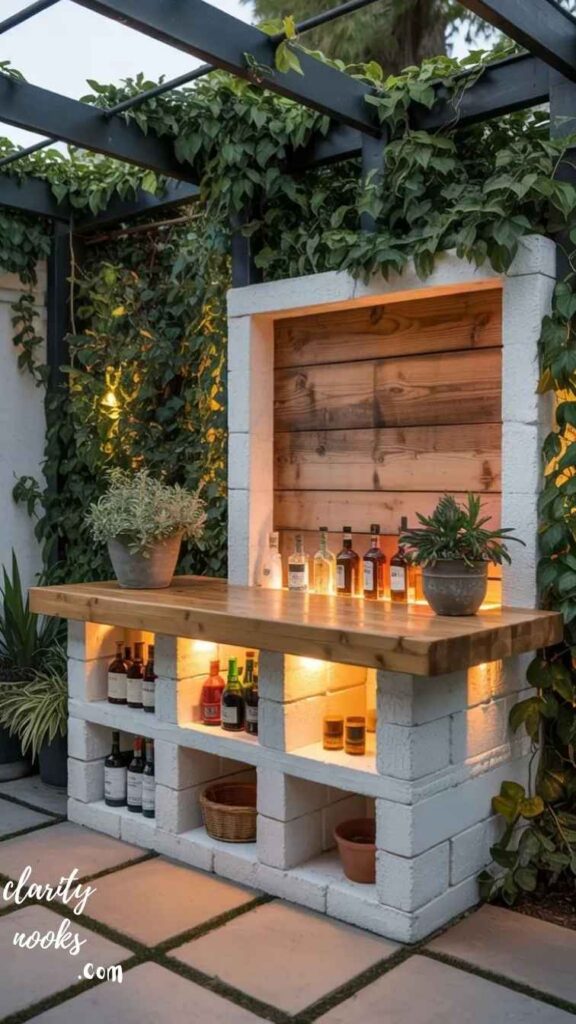
This is one of the most underrated DIY outdoor bar ideas, and one of the most structurally sound. Stack cinder blocks (also called concrete masonry units) in an L-shape or straight bar configuration, add wooden beams across the top as a countertop base, and finish with butcher block or sealed wood planks. No mortar needed for a basic build the blocks’ weight keeps them locked in place. For a permanent installation, use a dry-stack mortar or construction adhesive between layers.
The beauty of this design is modularity. You can adjust the height precisely by choosing different block sizes. Standard 8-inch blocks make a comfortable bar height of about 42 inches when stacked three high, which is ideal for bar stools. Paint the blocks with masonry paint to match your outdoor color scheme, or leave them raw for an industrial look. Add wooden shelves between the blocks for built-in bottle storage.
Mini Case Study: Maria and her partner built a 10-foot cinder block bar in Phoenix over one weekend. Cost: around $320 for 60 blocks and a 10-foot butcher block countertop from IKEA. The thermal mass of the concrete actually keeps their drinks cooler in the desert heat an unexpected bonus.
Read More: DIY Gaming Chair Ideas for a Cool and Comfortable Setup at Home
The Repurposed Console or Dresser Bar
Thrift Store Gold
Hunt your local thrift store, estate sale, or online marketplace for a solid wood console table, sideboard, or old dresser. With waterproofing and the right finish, these can become stunning outdoor bar carts or stationary bars at a fraction of the cost of new furniture. The key is thorough prep: strip the old finish, fill any cracks, and apply multiple coats of a marine-grade or exterior polyurethane finish. Add casters to the base for mobility.
This approach works especially well for covered patios and screened porches where direct rain exposure is limited. A vintage dresser with deep drawers becomes incredible storage for bar tools, napkins, and bottle openers. The top drawer can even be fitted with a cooler insert Xjust line it with a plastic bin, add drainage holes, and fill with ice. This is a unique feature most store-bought bars don’t offer.
Also Read: DIY Gaming Desk Ideas: Creative Designs for a Powerful Gaming Station
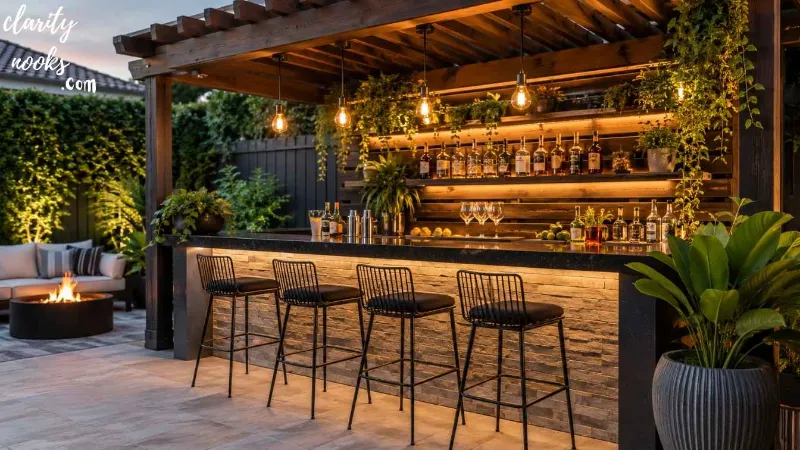
The Pergola-Integrated Bar
Structure Meets Style
If you already have a pergola or plan to build one integrating a bar directly into the structure is a game-changer. This means building a bar counter along one interior wall of the pergola, with the pergola posts serving as structural anchors. You can hang shelving from the crossbeams for glassware and bottle display, and even run hanging string lights directly overhead. The result feels like a purpose-built outdoor room, not an afterthought.
This design benefits from the overhead shade the pergola provides, which extends your usable hours into the afternoon without harsh sun. For the bar surface, consider concrete board finished with tile or natural stone both handle weather beautifully and look high-end. A pergola-integrated bar is the closest DIY equivalent to a professional outdoor kitchen bar, and it can easily be expanded by adding a mini-fridge or sink if your local codes permit outdoor plumbing.
Don’t Miss:DIY Living Room Carpet Ideas: Transform Your Space Without Breaking the Bank
The Rolling Portable Bar Cart
Flexibility First
Not every outdoor space calls for a permanent build. If you rent, have a small patio, or simply want flexibility, a DIY rolling bar cart is the ideal solution. Build a simple frame from 2×4 lumber, add a lower shelf for storage, a mid-level wine rack, and a plywood top finished with waterproof epoxy or tile. Add heavy-duty locking casters to the base so it stays put when in use but moves easily when you need the space.
The biggest advantage of a portable bar cart is that it goes where the party is. Move it toward the pool in summer, toward the firepit in fall, or inside during winter. For a polished look, use hairpin legs (available cheaply on Amazon) instead of lumber for the frame the industrial style is on-trend and takes less woodworking skill to execute cleanly. Seal all wood joints with exterior caulk to keep moisture out of the end grain.
“The best outdoor bar isn’t the most expensive one it’s the one that fits your life, your space, and your Saturday afternoon.”
The Fence Board Bar
Making Use of What You Have

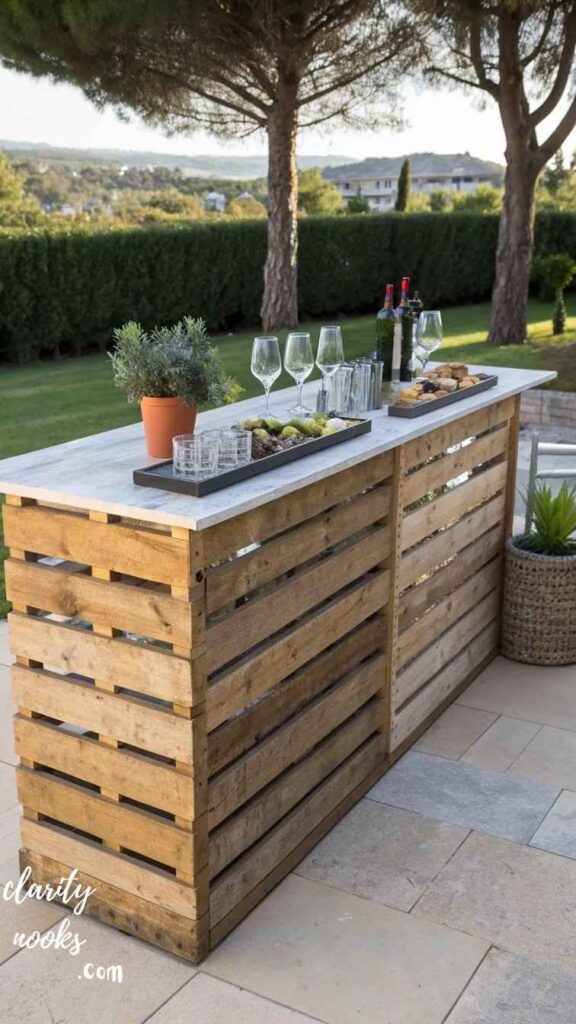
If you have leftover cedar or pine fence boards from another project or can pick them up cheaply at any home improvement store you already have most of what you need for a beautiful outdoor bar. Fence boards are pre-treated, relatively durable, and come in uniform sizes that make cutting and assembly straightforward. The typical approach: build a simple rectangular box frame from 2×4s, then clad the exterior with vertical fence boards for a classic shiplap look.
This design works remarkably well because fence boards have a slight rustic texture that hides imperfections and weathers gracefully. Stain them a dark walnut or ebony for a moody, upscale look, or whitewash them for a coastal cottage feel. Add a granite or marble-look tile countertop available as peel-and-stick tiles for under $30 to elevate the whole build without significant cost or skill.
The Tiki Bar Tropical Escapism in Your Backyard
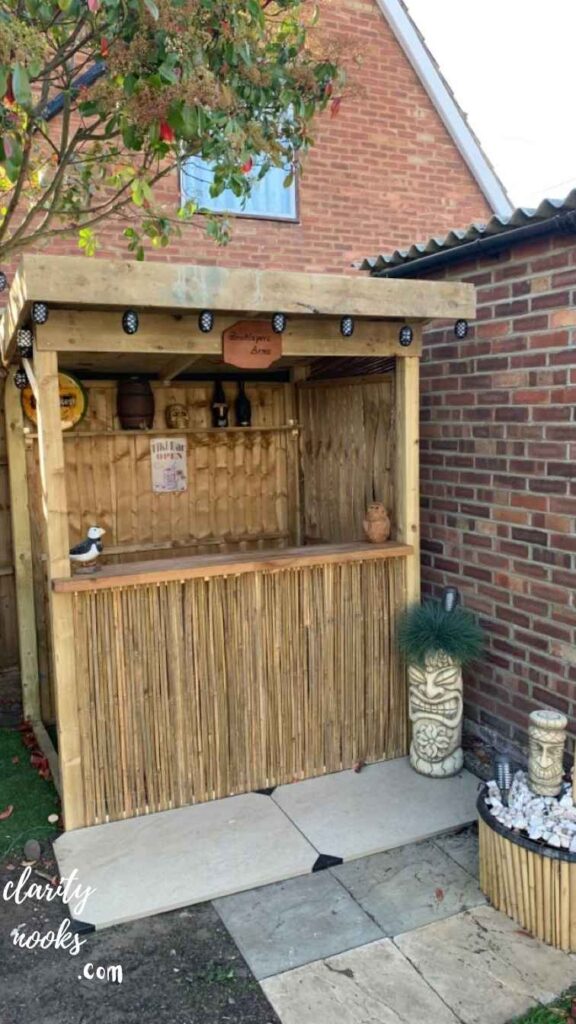
Few DIY outdoor bars generate as much conversation as a well-built tiki bar. The construction is surprisingly simple: bamboo poles form the structural pillars (lashed together with natural jute rope or industrial zip ties hidden beneath), and bamboo fencing or reed panels wrap the exterior. A thatched or palm-frond roof overhang completes the look. Tiki bars work beautifully as standalone pavilion-style structures with a circular or L-shaped bar and built-in tiki torches along the perimeter.
The key challenge with tiki bars is weatherproofing. Bamboo needs to be treated with an outdoor sealant every year or two, and natural thatch degrades in climates with heavy rain or frost. Artificial thatch roofing panels (sold at most tropical décor retailers) are virtually indistinguishable from the real thing and last 10–15 years. For a creative touch, hang a surfboard above the bar, install a bluetooth speaker inside a carved pineapple, or paint a chalkboard menu on a reclaimed wood plank.
Real-World Scenario: A family in Tampa built a 12-foot tiki bar for their pool deck for $520 total bamboo poles, artificial thatch, and a plywood bar top finished with epoxy resin mixed with crushed seashells. The resin surface is waterproof, heatproof, and one of the most visually stunning DIY bar tops you can create.
Expert Insight Epoxy Resin Counter tops
Epoxy resin poured countertops have become one of the most popular DIY bar top finishes. Mix in shells, coins, bottle caps, or river stones before pouring for a completely custom look. Use a self-leveling epoxy and pour in two stages a thin seal coat first, then a flood coat to avoid bubbles. Cost for a 4-foot bar top: roughly $60–$90 in materials. Durability: excellent. Heat resistance with a bartop epoxy rated for outdoor use: very good.
The Repurposed Bar From Old Doors or Windows
Upcycled Charm
Old solid wood doors from an architectural salvage yard or a demolition sale make extraordinary outdoor bar tops and side panels. A wide, flat door hollow-core doors won’t work, look for solid core cut to bar height creates an instant countertop with incredible character. Old window frames with frosted or antique glass panels can be mounted as a decorative back bar between open shelving. The weathered paint and aged grain of salvage materials gives your bar an authenticity that brand new lumber simply cannot replicate.
The practical consideration here is sealing. Salvage wood from interior use hasn’t been protected for outdoor exposure, so you’ll need to strip it thoroughly and apply multiple coats of a penetrating exterior oil finish (teak oil or Danish oil work well) before exposing it to the elements. Reseal annually. This design rewards those who are comfortable with a slightly imperfect, lived-in aesthetic which, honestly, is exactly what a great backyard bar should feel like.
The Sunken Fire Pit Bar
Entertainment Redefined
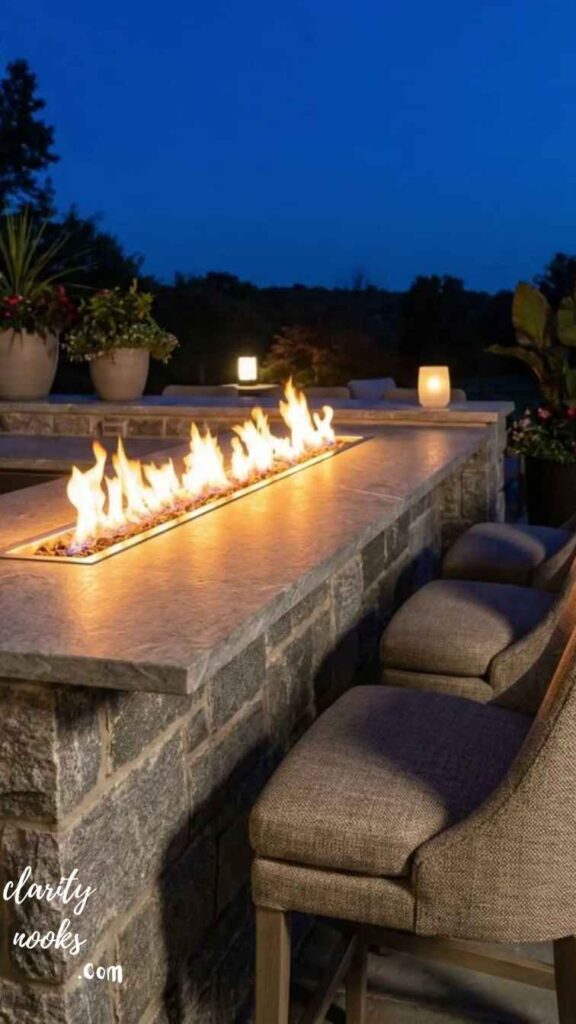
This is one of the more ambitious DIY outdoor bar ideas, but it’s also the most dramatic. A sunken fire pit seating area essentially a lowered patio section with a central fire pit, surrounded by built-in bench seating can be extended on one side with a bar ledge built at ground-level seating height. The bar surface doubles as a wide armrest and drink station for everyone sitting around the fire, and the sunken design creates an intimate enclosure that feels like a private resort.
Excavation is the main challenge. For a sunken patio that drops 24–30 inches, you’ll either need to rent a small excavator for a day ($300–$500) or plan for several weekends of manual digging. The retaining walls can be built from natural stone, landscaping blocks, or poured concrete. Once the structure is complete, the bar addition is straightforward a flat ledge surface with a waterproof finish that runs along the retaining wall edge at the outer seating level.
The Shed-to-Bar Conversion
The “Shabby to Chic” Transformation
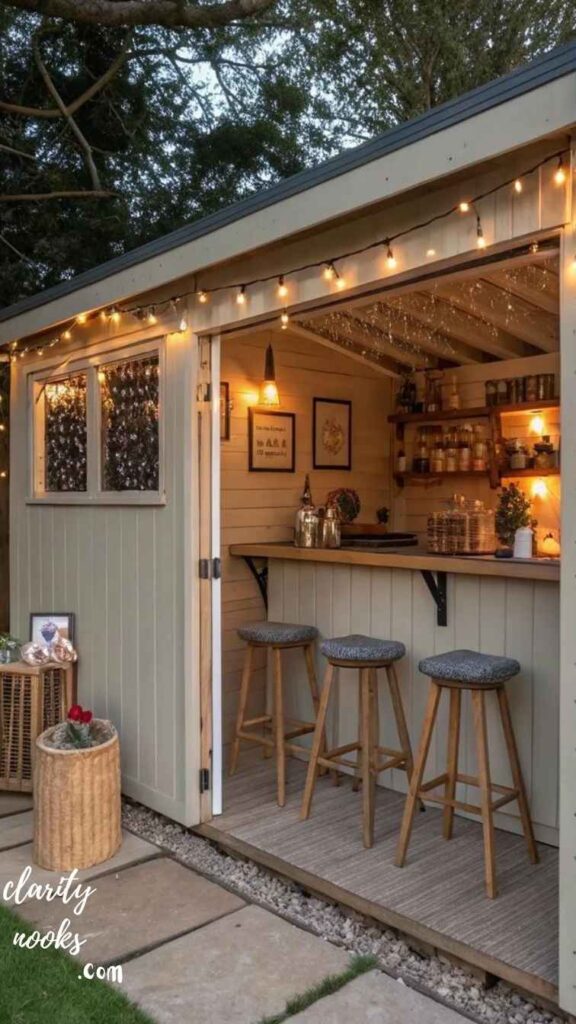
If you have an underused garden shed that’s become a junk collector, a shed-to-bar conversion might be your most satisfying weekend project ever. The basic formula: gut the interior, install a pass-through window cut into the front wall (this becomes the bar counter), add a long countertop along the interior front wall, install shelving on the back wall for bottles, and wire in lighting. The exterior gets a fresh coat of paint, a new sign, and some hanging string lights.
What makes shed bar conversions so compelling is the enclosed, private feel. You can add a mini-fridge, a small kegerator, and even a Bluetooth speaker system without worrying about weather exposure. The shed structure protects everything. Insulate the walls for year-round use in colder climates, or simply enjoy it seasonally. Many shed bars feature a fold-down exterior serving counter a hinged panel that lays flat when closed, drops down to create a bar ledge when open. Simple, clever, and very functional.
Mini Case Study: Mia in Seattle converted a 6×8 wooden shed into a fully functional bar space she calls “The Hiding Spot.” She added an 18-inch pass-through window with a hinged shelf, painted the exterior black with a hand-lettered sign, and installed reclaimed wood shelving inside. Total budget: $380 (the shed was already there). It’s now her most-used feature on the property, including in the rain which is, of course, most of the year in Seattle.
The Outdoor Bar With Built-In Cooler
The Ultimate Entertainer’s Setup
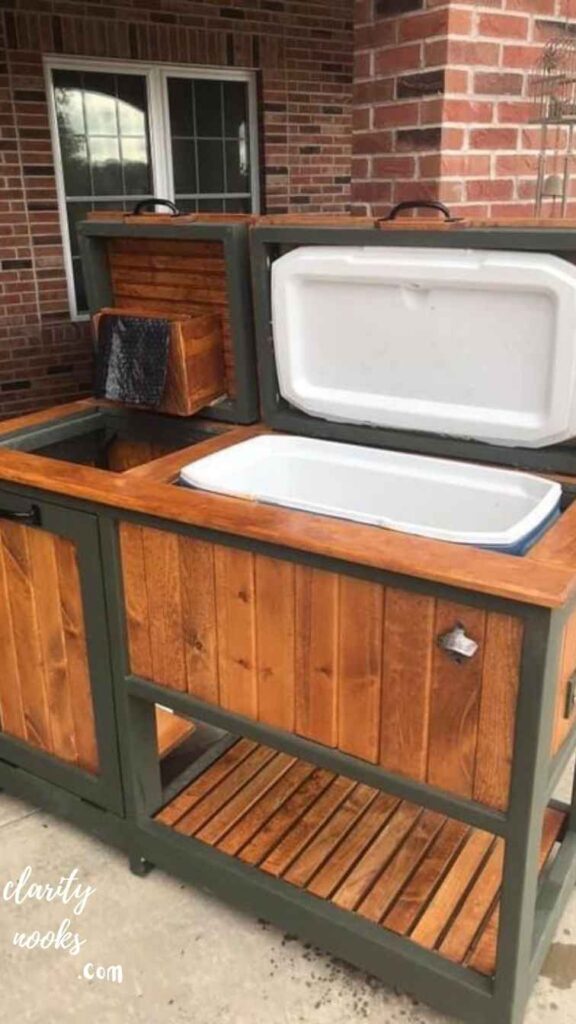
Every serious outdoor bar benefits from on-site cold storage, and a built-in cooler takes the setup from casual to professional. The simplest approach: frame a plywood box into the bar structure (or cut an opening in an existing bar), then drop in a marine-grade cooler liner or a repurposed metal tub. Add a hinged lid that doubles as extra counter space when closed. Line the interior with closed-cell spray foam insulation for dramatically improved ice retention.
For a more polished version, a drop-in ice chest the kind installed in commercial bar counters can be purchased for $150–$300 and installed into any bar with a standard router and jigsaw. These stainless-steel inserts have drain plugs, fit most countertop thicknesses, and give your DIY bar a genuinely professional look. If you entertain large groups frequently, add two: one for beer and water, one for your mixers. Your guests will never have to leave the bar to grab something cold.
Featured Snippet Opportunity Voice Search Ready
How much does it cost to build a DIY outdoor bar?
A basic DIY outdoor bar built from pallets costs $75–$200. A mid-range wood-frame bar with a proper countertop runs $300–$800. A full outdoor bar with built-in cooler, pergola, and lighting can reach $1,500–$4,000, still far below the $8,000–$20,000 cost of a professionally built outdoor kitchen bar.
Conclusion
DIY Outdoor Bar Ideas can change your backyard into a fun and relaxing space. You can build simple or stylish bars using budget-friendly materials. These ideas are perfect for gatherings, parties, and family time. A small effort can create a beautiful outdoor area you will enjoy every day.
Overall, DIY Outdoor Bar Ideas help you upgrade your home without spending too much money. They add comfort, style, and value to your outdoor living space. With a little creativity, you can design a bar that fits your taste and needs. Start building today and enjoy your outdoor moments more fully now.
Trend Analysis
Where Outdoor Bars Are Heading (2026–2028)
The backyard entertainment category has been one of the fastest-growing segments in home improvement since 2022, and that trajectory continues. However, the trends are evolving. Early pandemic-era builds were functional but rough people just wanted a place to gather. Now, homeowners are building for longevity, aesthetics, and utility.
| Trend | Current (2026) | Trajectory (2027–28) |
|---|---|---|
| Bar Materials | Pallet & fence wood dominant | Concrete, tile & composite growing |
| Lighting | String lights & basic LED strips | Smart color-tunable LED integration |
| Technology | Bluetooth speakers added after build | Built-in speaker & USB charging design |
| Style | Rustic farmhouse & tiki dominant | Modern minimalist & biophilic design rising |
| Sustainability | Repurposed materials gaining popularity | Reclaimed & certified sustainably sourced wood becoming standard |
One significant behavioral shift worth noting: homeowners are increasingly designing outdoor bars with year-round use in mind, not just summer. This is driving demand for insulated pergola roofs, outdoor heaters integrated into bar structures, and all-weather materials like powder-coated aluminum and polished concrete. The “three-season outdoor room” concept is moving the goalposts for what an outdoor bar can be.
Practical Tips & Expert Insights
Most DIY outdoor bar guides tell you what to build. Few tell you how to avoid the mistakes that force you to rebuild. After surveying dozens of backyard builds and speaking with experienced makers, here are the insights that separate great bars from frustrating renovation projects.
⚠️
Seal the End Grain First
The end grain of any wood piece absorbs water 10–50 times faster than the face grain. This is where wood rot begins. Before assembling your bar, seal all cut ends with exterior wood glue, end-grain sealer, or even a thick coat of exterior paint. This single step can extend your bar’s life by 5+ years in wet climates.
📈
Plan for Water Drainage
Your countertop must slope very slightly (1/8 inch per foot) away from the bar back toward the serving side so liquids run off rather than pooling. Flat countertops develop standing water that seeps into seams and destroys the substrate underneath within 1–2 seasons. Build the slope in from day one.
🔧
Anchor to a Surface, Not Soil
Bars placed directly on soil will shift as the ground freezes, thaws, and settles. Build on pavers, a concrete slab, or a deck surface. If that’s not possible, use adjustable post bases sunk into concrete footings to give your structure a fixed, level foundation that won’t move with the seasons.
Long-Term Strategy & Sustainability
A DIY outdoor bar is not just a weekend project it’s a long-term investment in your property and your lifestyle. The most durable outdoor bars share a few common characteristics: they use weather-resistant materials, they’re designed to be maintained rather than replaced, and they’re built with expansion in mind.
Choose materials that age gracefully rather than deteriorate quickly. Cedar, teak, and ipe wood all develop a beautiful silver-gray patina over time and resist rot naturally. Concrete and tile are virtually permanent. By contrast, pine and untreated plywood, while cheap, will require complete replacement within 3–5 years in most climates. Spend 30% more on materials upfront and save 200% in rebuild costs over a decade.
Sustainability is also an increasingly important consideration. Building from reclaimed wood, salvaged architectural elements, or repurposed furniture not only reduces cost it reduces the embodied carbon of your build. Some of the most beautiful outdoor bars in existence are assembled entirely from materials that were destined for landfill. It’s a philosophy that aligns with both environmental values and the handcrafted aesthetic that gives DIY bars their unique character.
Future Predictions & Innovations
(2026 and Beyond)
The next wave of DIY outdoor bar technology is already emerging. Modular outdoor bar kits flat-pack systems designed for non-builders are growing in popularity and quality. Companies like VEBA and various Etsy makers are selling precision-cut CNC kits that assemble in hours with minimal tools, then accept any countertop material you choose. These bridge the gap between true DIY and professional furniture.
AI-powered design tools are beginning to make outdoor bar planning dramatically more accessible. Apps like Roomsketcher and newer AI spatial planning tools let you photograph your patio, input your dimensions, and receive a 3D-rendered bar design with materials list and cost estimate in minutes. By 2028, expect these tools to also suggest local material sourcing, generate cut lists automatically, and even simulate how your bar will age under your specific climate conditions.
Solar-integrated outdoor bars are another frontier. Compact solar panels disguised as pergola roofing panels, or woven into shade sails above the bar, can power LED lighting, small refrigeration units, and USB charging ports entirely off-grid. This makes outdoor bars viable in more remote backyard locations without running expensive electrical conduit from the house.
Common Mistakes & Hidden Gaps
Skipping the Foundation
Building directly on grass or bare soil is the single most common DIY bar mistake. Within one season, the structure shifts, doors (if any) won’t close, and the wood rots from contact with damp soil. Always start with a proper base: pavers, a concrete pad, or a gravel bed.
Wrong Wood Species
Using interior-grade pine or MDF for an outdoor bar is a recipe for failure. These materials swell, warp, and delaminate when exposed to moisture even under cover. Use only exterior-rated lumber (cedar, redwood, pressure-treated) or composite materials for any outdoor build.
No Electrical Planning
Most builders add lighting as an afterthought, which means visible cords, extension cables across the patio, and GFCI issues. Plan your electrical needs before building conduit can be run through bar legs or behind siding panels invisibly if you think about it in the design phase.
Ignoring Bar Height Ergonomics
A proper bar counter sits at 40–42 inches high for use with 28–30 inch bar stools. Many DIY builders default to standard table height (30 inches), which feels wrong with bar stools. Measure and calculate based on your actual seating before you cut a single board.
Hidden Gap Intermediate Builders Forget About Permits
A small pallet bar? No permit needed. A structure over 120 square feet, a shed conversion, or anything with electrical or plumbing? Many municipalities require a permit. Skipping permits isn’t just legally risky it can affect your homeowner’s insurance and your ability to sell your home. Always check local codes for structures in your climate zone.
FAQ’S About DIY Outdoor Bars
How long does it take to build a DIY outdoor bar?
A simple pallet or cinder block bar can be completed in one weekend (8–16 hours). A more complex build like a shed conversion or pergola-integrated bar typically takes 2–4 weekends, depending on your skill level and the complexity of the design.
What is the cheapest way to build an outdoor bar?
The cheapest DIY outdoor bar options are pallet bars (often under $100 if pallets are sourced for free) and cinder block bars (typically $150–$400). Combining free or salvaged materials with budget countertop finishes like epoxy or tile can produce a professional-looking bar for very little.
What wood should I use for an outdoor bar?
Cedar, redwood, teak, and ipe are the top choices for outdoor bar construction. All have natural rot-resistant properties. Pressure-treated lumber (rated for ground contact) is the most affordable durable option. Avoid untreated pine, MDF, or any interior-grade wood for outdoor applications.
Can I build an outdoor bar on my apartment balcony?
Yes a lightweight pallet bar or rolling bar cart is ideal for apartment balconies. Check your lease for restrictions on structural modifications, and always verify your balcony’s weight limit with your building management before installing anything heavy or permanent.
Do outdoor bars add value to your home?
Well-built outdoor entertainment spaces consistently return 70–90% of their cost in home resale value, according to the 2025 National Association of Realtors Remodeling Impact Report. A permanent, professionally finished outdoor bar can return more than its full cost in markets where outdoor living is highly valued.

Rameen Zara is the founder of Clarity Nooks, bringing over five years of experience in home décor and interior styling. She shares simple yet practical design ideas that suit real homes and everyday living. Her approach focuses on cozy aesthetics, soft color palettes, and natural textures that create warm, inviting spaces.


