

Inspiring DIY Staircase Decor Ideas for Every Style & Budget (2026)
Most homeowners walk past their staircase every single day without ever giving it a second glance. It sits there functional, forgettable, completely ignored. Yet your staircase is one of the most visible architectural features in your home, and leaving it bare is one of the biggest missed décor opportunities you will ever find inside four walls.
Whether you live in a cramped apartment with a tight spiral staircase or a two-story colonial with a sweeping grand staircase, the same truth applies: a little creativity and a modest budget can turn those steps into a genuine design statement. The best part? Most of these projects require zero professional help and can be completed over a single weekend.
This guide covers practical DIY staircase decor ideas each with step-by-step instructions, materials lists, realistic cost estimates, and decorating tips drawn from real projects. Whether your style is modern farmhouse, bohemian, or minimalist Scandinavian, there is something here that will make your staircase the first thing guests notice when they walk through your door.
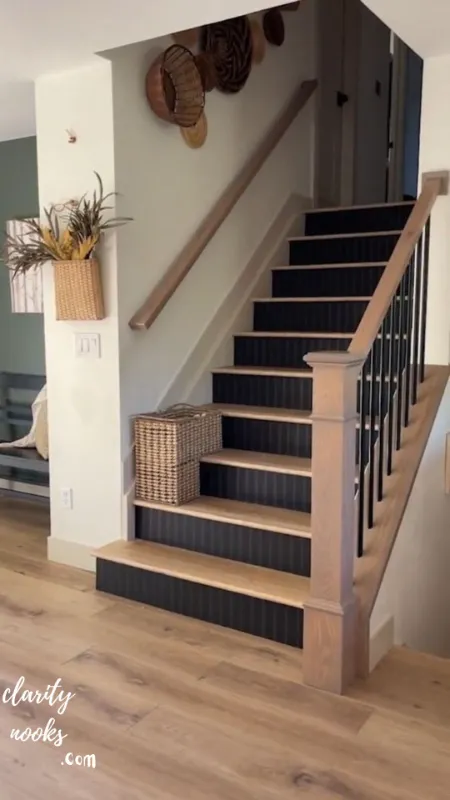
Painted Stair Risers: The Fastest Visual Upgrade
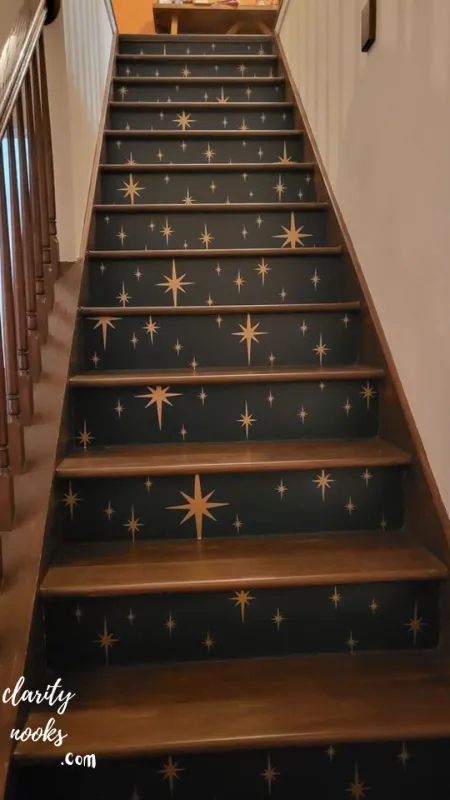
Painted stair risers are the most impactful, budget-friendly way to transform a staircase in a single afternoon. The riser is the vertical face of each step usually plain white or bare wood and painting it with a bold color, geometric pattern, or faux tile design instantly makes the entire staircase feel intentional and styled.
A popular technique right now is the ombre riser approach: painting each riser in a progressively deeper shade of the same color family. For example, starting with a pale sage green at the bottom and building to a deep forest green at the top. This creates a cohesive, professional-looking gradient that looks custom-designed but costs almost nothing.
Step-by-Step Instructions
- Clean risers thoroughly with TSP cleaner or a degreaser and let dry completely.
- Sand lightly with 120-grit sandpaper to help paint adhere, then wipe off dust.
- Apply painter’s tape along the edge where risers meet treads.
- Prime each riser with a shellac-based primer (especially important on dark wood).
- Apply 2 coats of semi-gloss or satin paint high-traffic areas need a durable finish.
- Remove tape while paint is still slightly tacky to get a clean edge.
- Seal with polyurethane floor finish for long-lasting protection against foot traffic.
Materials & Cost
- TSP cleaner: $6–$10
- Sandpaper (120-grit): $4–$8
- Shellac primer: $14–$20
- Semi-gloss latex paint (1 quart): $12–$25
- Painter’s tape: $6–$9
- Polyurethane sealer: $15–$22
- Estimated total: $55–$95
Decorating Tip:
Use stencils from craft stores to add a Moroccan tile pattern or floral motif on every other riser for a high-end look that costs under $20 extra. This technique photographs beautifully and consistently ranks among the most-shared staircase makeover ideas on Pinterest and Instagram.
Must-Read Articles: DIY Entryway Decor Ideas That Make a Stunning First Impression
Staircase Gallery Wall: Turn Your Stairwell Into a Living Art Gallery
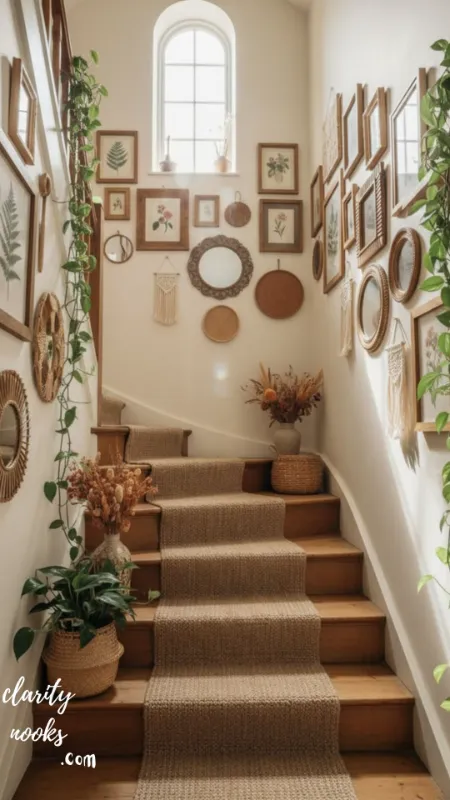
A staircase gallery wall takes advantage of the natural diagonal line created by your stairway and fills it with framed photos, artwork, mirrors, or wall-mounted shelves. Done well, it creates a rich, personal narrative that guides visitors through your home’s story as they climb each step.
The key difference between a gallery wall that looks curated and one that looks cluttered is planning. Professional interior designers always lay out their arrangements on the floor first arranging and rearranging frames until the visual weight feels balanced before a single nail goes into the wall. Mixing frame sizes (large anchors, medium fillers, small accents) in a consistent finish all black, all natural wood, or all white keeps the look cohesive without feeling rigid
Step-by-Step Instructions
- Measure your stairwell wall and sketch a rough layout on paper (or use painter’s tape on the floor to mock it up).
- Choose a unifying element matching frame color, a single color palette for prints, or a consistent mat color.
- Start with your largest piece first, positioning it as the visual anchor.
- Use a picture-hanging strip or level to ensure horizontal rows stay even despite the stair diagonal.
- Space frames 2–4 inches apart for a clean, intentional look.
- Fill gaps with smaller decorative elements small mirrors, wall sconces, or botanical prints.
Materials & Cost
- Assorted frames (set of 10–15): $30–$80 (IKEA, thrift stores, Amazon)
- Prints/artwork: $0–$40 (Canva printables, public domain art)
- Picture-hanging strips: $12–$18
- Level: $8–$15
- Estimated total: $50–$150
Real-Life Scenario:
A homeowner in Austin, Texas, used a combination of family photos printed through Walmart’s online service ($0.10 each), black IKEA frames, and free botanical prints downloaded from the Biodiversity Heritage Library. Total cost: under $60 result looked like a professionally styled designer staircase gallery wall
Related Reads: DIY Home Decoration Ideas to Add a Personal Touch to Your Space
Stair Runner Installation: Add Warmth, Safety, and Style
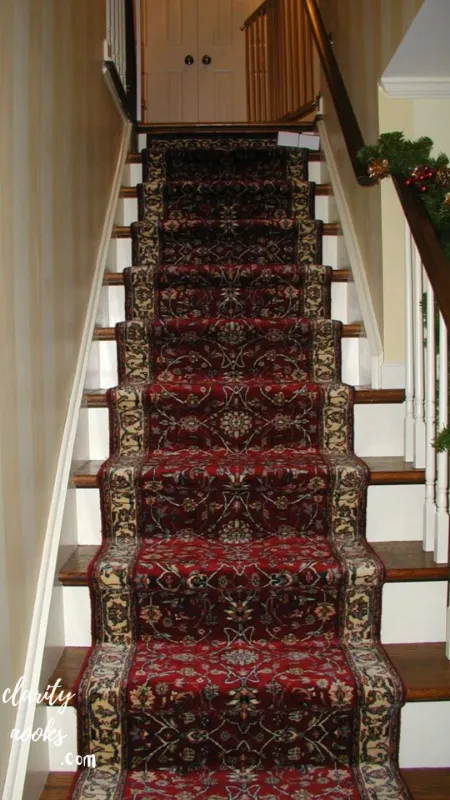
A stair runner is a long, narrow rug that runs down the center of your staircase, leaving a border of exposed wood on each side. It serves triple duty: adding warmth and texture to the space, reducing noise on hardwood or tile stairs, and dramatically improving slip resistance a genuine safety upgrade for families with young children or elderly members.
The DIY version of runner installation has become dramatically more accessible thanks to stair runner rods and double-sided carpet tape. You no longer need to staple or tack a runner down. Many homeowners now use the “loose lay with rods” method which looks polished, holds firmly, and can be lifted and washed when needed a massive advantage over permanently installed runners.
Step-by-Step Instructions
- Measure your full stair run: multiply the depth + height of each step by the total number of steps, then add 12 inches extra.
- Choose a runner at least 27–32 inches wide for standard stairs (leaves a 3–4 inch wood border on each side).
- Pre-cut runner to length and fold under 2 inches at the top step to create a clean finished edge.
- Apply double-sided carpet tape every 6 inches along the back of the runner, or use stair rods every 3–4 steps.
- Start at the bottom step and work upward, pressing firmly at each riser/tread junction.
- Install stair rods across the riser face for a traditional, decorative look.
Materials & Cost
- Stair runner (10 ft × 30 in): $40–$120 (IKEA, Ruggable, Lowe’s)
- Double-sided carpet tape: $10–$16
- Stair rods (optional, set of 13): $30–$80
- Estimated total: $50–$200
Decorating Tip:
A natural jute runner pairs beautifully with farmhouse, coastal, and Scandinavian interiors. For a bolder statement, choose a geometric or tribal pattern runner against dark-stained wood treads. The contrast creates a striking staircase focal point that anchors the entire entryway.
Recommended for You: DIY Wall Painting Ideas for Stylish and Cozy Home Walls
Wallpaper or Peel and Stick Panels on the Stairwell Wall
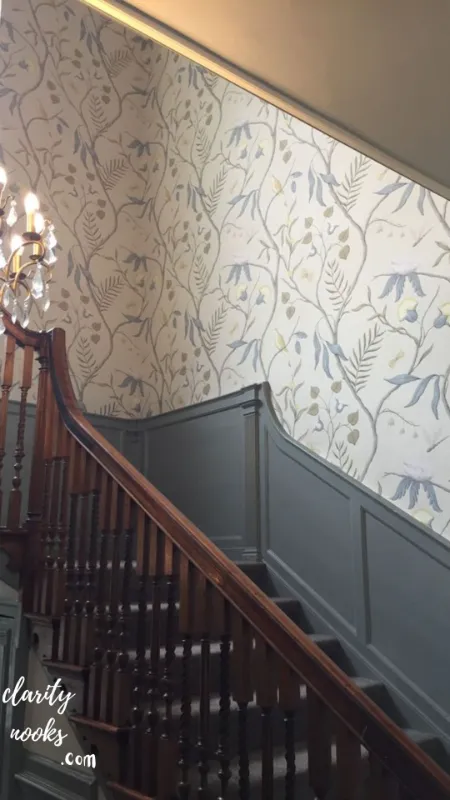
The wall running parallel to your staircase often called the stairwell wall is one of the largest blank canvases in your entire home, yet most people leave it completely plain. Applying wallpaper, peel-and-stick panels, or even a single accent wall treatment here creates an immediate wow factor that extends through multiple floors.
Modern peel-and-stick wallpaper has removed every barrier to this project. Brands like Chasing Paper, Tempaper, and Walls Need Love offer removable, repositionable options that are perfect for renters or those who like to redecorate seasonally. The installation is straightforward, mistakes are fixable, and the visual transformation is dramatic enough to make the stairwell feel like a designer showroom feature
Step-by-Step Instructions
- Clean the wall thoroughly, fill any holes, and let dry completely.
- Measure wall area and order wallpaper with 10–15% extra for pattern matching and waste.
- Use a plumb line or level to draw a perfectly vertical guide line before starting stairs create optical illusions that make verticals look slanted.
- Start at the top of the stairwell and work downward for peel-and-stick; start at the top and work downward for traditional paste.
- Use a smoothing tool or credit card to remove air bubbles as you go.
- Trim excess at baseboards and ceiling with a sharp utility knife and straight edge.
Materials & Cost
- Peel-and-stick wallpaper (2 rolls): $40–$90
- Smoothing tool: $6–$10
- Utility knife + straight edge: $8–$14
- Level: $8–$15
- Estimated total: $60–$130
Reader Favorites: DIY Home Decor Ideas That Actually Transform Your Space
Under-Stair Storage and Display Nook
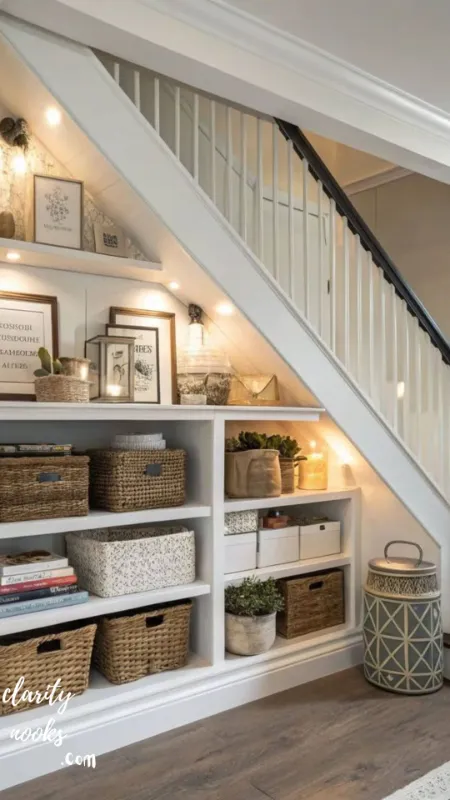
The space beneath a staircase often called the “dead zone” is arguably the most underutilized real estate in any home. Transforming it into a functional built-in storage area, a cozy reading nook, a home office alcove, or a stylish open shelving display adds both value and livability without touching your actual footprint.
For a DIY approach, the simplest version uses floating shelves installed in the triangular space at graduated heights. A more ambitious version involves framing in the opening with plywood, adding a door, and installing interior shelving for a clean built-in closet look that appears custom even though it costs a fraction of a true built-in.
Step-by-Step Instructions
- Measure the under-stair space carefully, accounting for the slanted ceiling and any structural elements.
- Decide on use: open display shelves, closed storage cabinet, or hybrid.
- For shelves: Install floating shelf brackets at staggered heights following the angle of the stairs above.
- For a cabinet: Frame the opening using 2×4 lumber, add a plywood face, hang a premade door, and finish with matching trim.
- Paint the interior of the nook a contrasting or complementary color to define the space visually.
- Add lighting plug-in LED puck lights or battery-operated strip lights transform the nook dramatically.
Materials & Cost
- Floating shelves (3–5): $25–$60
- LED puck lights or strip lights: $15–$30
- Paint (quart): $12–$20
- Optional door + hardware: $40–$120
- Estimated total: $50–$200
Decorative Baluster Makeover: New Look Without New Spindles
The balusters (also called spindles) on your staircase railing are often overlooked, but they cover a lot of visual real estate. Old, yellowed, or dated balusters can drag down the entire look of an otherwise stylish home. The good news: you do not need to replace them. A baluster makeover using paint, wrap, or simple cosmetic upgrades can make them look brand new in under a day.
One of the most popular trends right now is the wrought iron baluster swap removing old wooden spindles and replacing them with pre-made iron balusters available at any home improvement store. This single change transforms a staircase from builder-grade to custom-designed. However, for those on a tighter budget, simply spray painting existing balusters in a satin black or brushed gold finish achieves a nearly identical modern look for under $30.
Step-by-Step Instructions (Paint Method)
- Tape off the handrail and treads carefully with painter’s tape.
- Lightly sand all balusters with 180-grit sandpaper and wipe clean.
- Apply a bonding primer spray designed for previously painted surfaces.
- Apply 2–3 thin, even coats of spray paint in satin black or your chosen finish.
- Remove tape after final coat dries to reveal clean lines
- Optionally seal with a clear lacquer spray for extra durability.
Materials & Cost
- Spray paint (2 cans): $14–$22
- Bonding primer spray: $10–$16
- Painter’s tape + sandpaper: $8–$14
- Estimated total (paint method): $30–$55
- Iron baluster replacement set (13 balusters): $60–$180
Stair Tread Refinishing: Restore Natural Wood Beauty
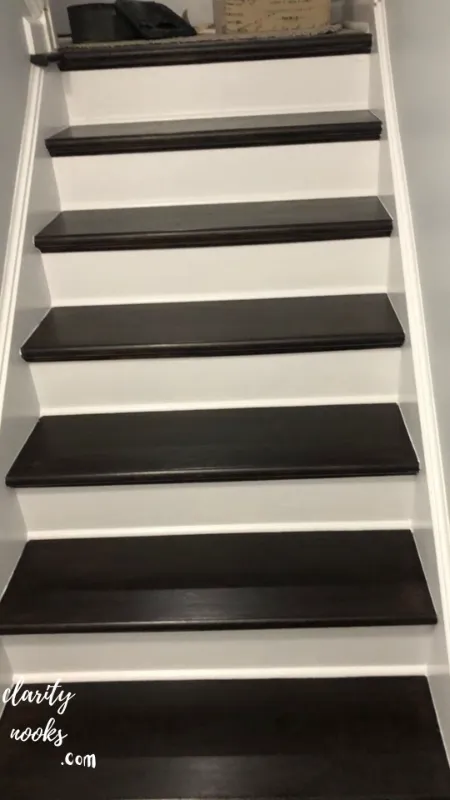
If your staircase has solid wood treads hiding beneath old carpet or layers of paint, refinishing them is one of the highest-ROI projects you can do. Refinished hardwood stair treads dramatically elevate the perceived value of a home real estate agents consistently note that exposed, well-finished hardwood floors and stairs are among the top features buyers respond to emotionally.
The DIY version of tread refinishing is manageable with a belt sander (rental: $35–$50/day), the right stain, and patience. The natural wood grain revealed after stripping old carpet or peeling paint is almost always far more beautiful than what replaced it. Popular finishes right now include whitewashed, ebony-stained, and natural walnut tones each lending a completely different personality to the staircase.
Step-by-Step Instructions
- Remove existing carpet, tack strips, and staples with a pry bar and pliers.
- Sand treads with a belt sander (rent at Home Depot) starting with 60-grit, then 80-grit, then 120-grit for a smooth finish.
- Vacuum thoroughly and wipe with a tack cloth.
- Apply chosen wood stain with a foam brush or lint-free cloth; wipe off excess after 5 minutes.
- Let dry 8+ hours, then apply 3 coats of oil-modified polyurethane (sanding lightly with 220-grit between coats).
- Allow full cure of 72 hours before heavy foot traffic.
Materials & Cost
- Belt sander rental (1 day): $35–$50
- Sandpaper assortment: $12–$20
- Wood stain (quart): $12–$20
- Oil-modified polyurethane (quart): $18–$28
- Estimated total: $75–$120
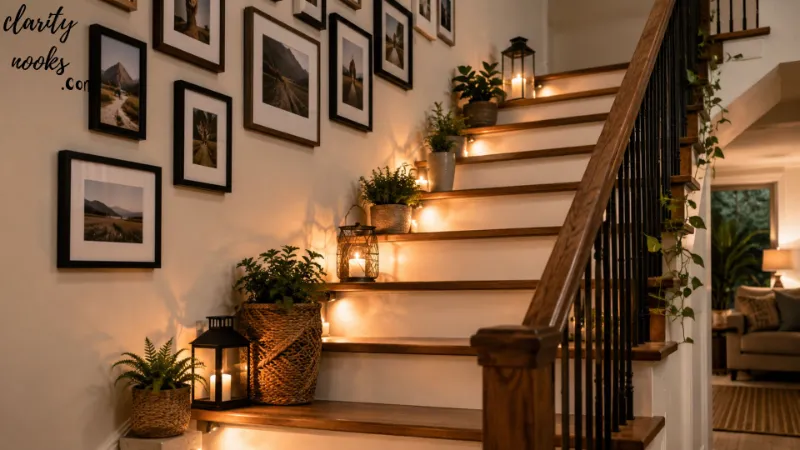
Staircase Lighting: LED Strip Lights Under Each Tread
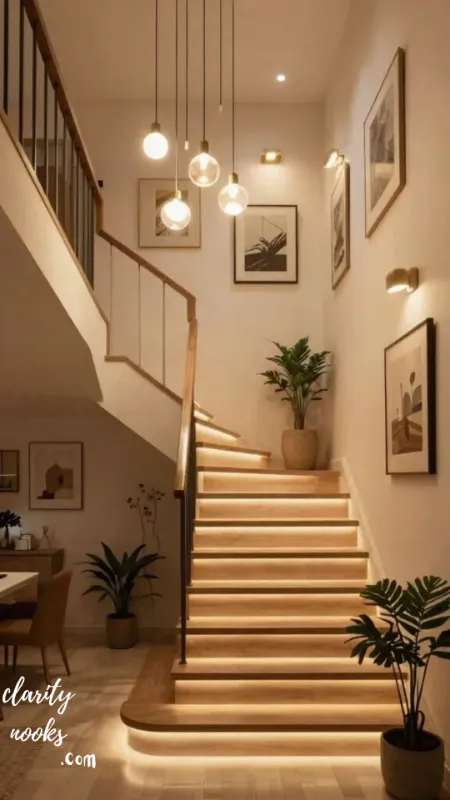
Few upgrades transform a staircase more dramatically after dark than under-tread LED lighting. Installed beneath the lip (nosing) of each stair tread, these lights cast a warm or cool glow across each step, creating a look that simultaneously feels luxurious, modern, and cinematically beautiful. They also serve a genuine safety function, guiding nighttime foot traffic without harsh overhead lighting.
The DIY version uses adhesive LED strip lights available on Amazon for $15–$40 for a full staircase set combined with a motion-activated switch or a simple smart plug. Installation takes about 2 hours and requires no electrician. For a more polished, permanent look, some homeowners route the LED strips through a small aluminum channel that hides the strip and diffuses the light more evenly across each tread.
Step-by-Step Instructions
- Clean the underside of each tread nosing with isopropyl alcohol to ensure adhesive bonds.
- Cut LED strip lights to the width of each tread (most strips cut every 3 LEDs).
- Peel the adhesive backing and press firmly to the underside of the nosing.
- Connect strips using jumper connectors (no soldering required) and route the wire along the side of the staircase.
- Connect to a 12V power adapter plugged into a nearby outlet, or hard-wire if you’re comfortable with basic electrical.
- Add a motion sensor switch or smart plug to automate lighting at night.
Materials & Cost
- LED strip light kit (full staircase): $18–$45
- Aluminum channel (optional): $15–$30
- Motion sensor switch or smart plug: $12–$25
- Estimated total: $45–$100
Featured Snippet Opportunity:
“How do you install LED lights under stair treads?” Clean the surface with alcohol, cut LED strips to tread width, peel and press adhesive strips to the underside of each tread nosing, connect with jumper clips, and plug into a power adapter. Total installation time: 2–3 hours. No electrician required.
Bookshelf Staircase: Integrate Storage Into Your Steps
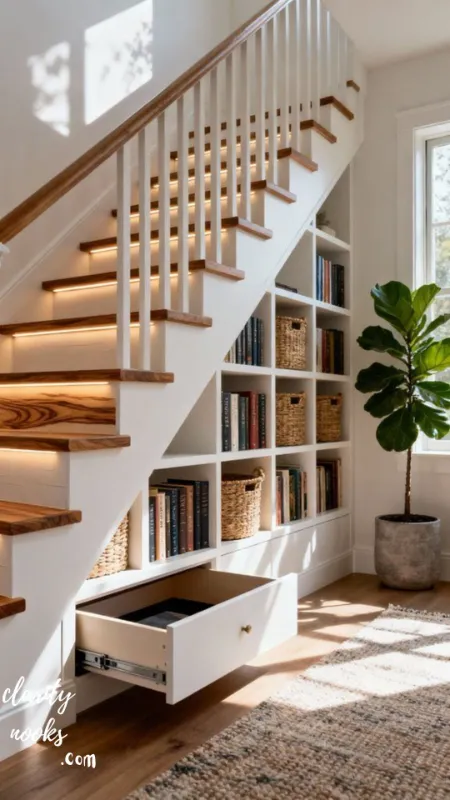
A bookshelf staircase also called library stairs or book stair storage integrates built-in shelves into the sides of a freestanding staircase, turning otherwise dead space into functional, aesthetically rich storage. This concept is especially popular in homes that value both design and practicality, and the results are consistently stunning in both modern industrial and warm traditional interiors.
The most achievable version for a DIYer involves fitting cube shelving units (like IKEA Kallax) flush against the side of an existing straight staircase and securing them safely to the wall. A more involved version building true integrated step-side shelves from scratch using plywood and pocket screws requires intermediate woodworking skills but delivers a result indistinguishable from a custom millwork installation.
Materials & Cost
- IKEA Kallax (2–3 units): $60–$160
- Mounting hardware + anti-tip straps: $10–$20
- Paint to match staircase: $10–$18
- Estimated total: $80–$200
Chalkboard or Magnetic Paint on Stair Risers
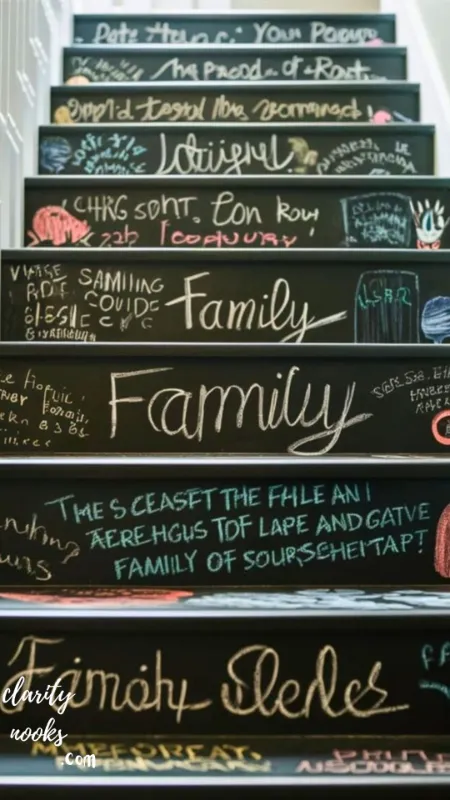
For families with children or anyone who loves playful, interactive design painting stair risers with chalkboard paint creates a functional art surface that changes with the seasons, moods, or occasions. Kids can draw on the risers, write motivational quotes, or create a seasonal mural that can be erased and redrawn anytime.
Chalkboard paint is available at any hardware store and applies exactly like regular paint two coats with a foam roller over a primed surface. Magnetic primer (applied first beneath chalkboard paint) upgrades the concept further, allowing magnetic letters, photos, and decorative magnets to stick to the risers effectively turning your staircase into a giant magnetic message board
Materials & Cost
- Chalkboard paint (quart): $12–$18
- Magnetic primer (if adding magnetic function): $18–$28
- Primer: $10–$16
- Estimated total: $40–$65
Wainscoting or Board and Batten Along the Stairwell Wall
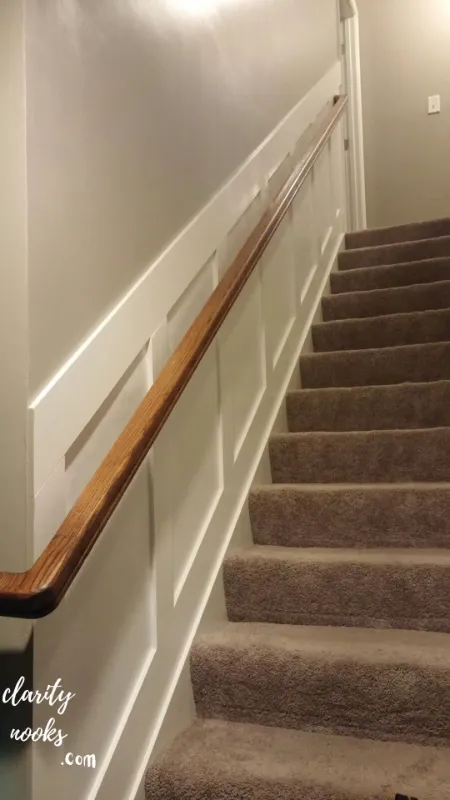
Wainscoting and board-and-batten wall treatments along the staircase wall add architectural interest, texture, and a sense of craftsmanship that makes even a builder-grade home feel distinctly upscale. The board-and-batten style vertical and horizontal strips of wood creating a paneled grid effect is particularly popular because it reads as high-end yet installs quickly with basic trim materials.
A full board-and-batten installation along a staircase wall costs a fraction of what crown molding or real wainscoting would often under $100 for materials but delivers a result that looks like it cost ten times more. The painted finish (typically a crisp white or deep navy) ties the entire entryway and staircase area together as a unified architectural feature
Step-by-Step Instructions
- Measure the stairwell wall and mark the top rail height (typically 32–36 inches from the floor/step surface).
- Cut MDF baseboard and top rail to length (running parallel to the stair angle).
- Nail vertical battens at equal spacing (every 12–18 inches) between the rail and base.
- Fill all nail holes and joints with wood filler, sand smooth.
- Prime the entire treatment, then apply 2 coats of semi-gloss paint.
- Paint the wall surface above or below the treatment a complementary tone to complete the finished look.
Materials & Cost
- MDF board (3 8-foot lengths): $18–$30
- Wood filler + sandpaper: $8–$14
- Primer + paint (quart): $20–$35
- Nails + nail gun rental (optional): $20–$40
- Estimated total: $65–$120
Conclusion
Your staircase deserves far more attention than most homeowners give it. These DIY staircase decor ideas prove that transforming this often-ignored space requires nothing more than a modest budget, a free weekend, and a willingness to try something new. From painted risers to under-tread LED lighting to board-and-batten paneling, every idea here is achievable without professional help and delivers results that look significantly more expensive than they actually are.
The takeaway is simple: start with one idea that excites you most, execute it well, and let the results inspire you to tackle the next. A beautiful staircase is not about having the most money it is about having a clear vision and the courage to act on it. Pick your first project today and start turning that overlooked hallway feature into the standout design moment your home has always deserved.
Trend Analysis: Where Staircase Décor Is Headed (2026–2028)
The staircase décor market is experiencing a measurable shift driven by three overlapping forces: the rise of social media visual culture, a renewed interest in DIY home improvement post-pandemic, and the growing influence of biophilic design principles. Google Trends data shows that searches for “staircase makeover ideas” and “DIY stair riser ideas” have grown approximately 34% year-over-year since 2022.
The dominant trends right now (2026) include mixed material handrails (wood top rail with steel or brass side rods), statement stair runners in bold patterns, and the emergence of smart staircase lighting integrated with home automation systems. Looking ahead to 2026–2028, expect sustainable materials (reclaimed wood treads, recycled composite balusters) to dominate premium renovations, while 3D-printed decorative elements begin appearing in high-end custom staircase design.
User behavior is also shifting. Homeowners are increasingly treating the staircase as a primary social media design moment a single, photographable feature that drives content engagement on Instagram and Pinterest. This is pushing the market toward bolder, more intentional choices and away from the safe, invisible builder-grade aesthetic that dominated for decades.
Expert Insights: Practical Strategies for a Successful Staircase Makeover
Interior design professionals consistently emphasize one principle above all others when advising homeowners on staircase renovation: start from the architecture, not the accessories. This means addressing the bones of the staircase tread condition, baluster integrity, handrail stability before adding any decorative layer. A beautifully wallpapered stairwell with a wobbly handrail is both aesthetically incomplete and genuinely dangerous.
A second critical strategy is design continuity. Your staircase connects multiple floors and is visible from multiple vantage points simultaneously. Every choice you make color, texture, material needs to read coherently from the bottom of the staircase, from the top, and from any adjacent rooms. This is why neutral base colors (white, greige, black, natural wood) outperform bold statement colors in long-term satisfaction they provide a stable foundation onto which seasonal or trending accessories can be layered.
Finally, experienced DIYers universally recommend tackling risers before treads when repainting or refinishing. Risers show more visual impact per dollar and square foot, they are easier to reach, and they allow you to test your color or technique choices before committing to the full tread treatment. This incremental approach also makes the project easier to pause and resume without visible break points.
Long-Term Strategy: Building a Staircase That Stays Beautiful and Functional
The most costly mistake in DIY staircase décor is optimizing entirely for aesthetics without accounting for durability. Stair treads take more concentrated foot traffic than almost any other surface in a home a kitchen floor distributes weight across a wide area, but a stair tread receives the full impact of every footfall in a 6-inch strip. This means that finish selection is not an aesthetic choice alone it is an engineering decision.
For long-term durability, oil-modified polyurethane outperforms water-based versions on high-traffic stair treads. Its longer dry time is a genuine inconvenience, but the resulting hardness and scratch resistance are measurably superior. On painted surfaces, alkyd (oil-based) enamel or a water-based enamel with a urethane fortifier added is the professional standard for stair riser durability
For sustainability, consider specifying low-VOC or zero-VOC finishes throughout your staircase project. These produce the same durability as traditional solvent-based products with significantly less off-gassing an important consideration in a high-traffic, enclosed space like a stairwell. Brands including Benjamin Moore Advance, Behr Marquee, and Sherwin-Williams Emerald now offer genuinely excellent low-VOC options across their full product ranges.
Future Predictions & Innovations in Staircase Design
The next wave of staircase design innovation will be driven by three technologies: AI-powered design tools, smart home integration, and advanced materials science. On the design side, platforms like Houzz, Planner 5D, and Room styler are already integrating AI room visualization that allows homeowners to see photorealistic renderings of proposed staircase makeovers before buying a single product dramatically reducing the risk of costly design mistakes.
Smart integration will go well beyond the LED lighting that is mainstream today. Within 2–3 years, expect pressure-sensitive stair sensors that automatically adjust lighting temperature and brightness based on time of day, integrated safety alerts for homes with elderly residents, and even stair-embedded wireless charging surfaces for devices set temporarily on a tread. The staircase is evolving from purely architectural to actively functional smart infrastructure
On the materials side, engineered composite treads that mimic the appearance of rare hardwoods at a fraction of the cost and with significantly higher scratch and moisture resistance are gaining market share rapidly. Porcelain tile steps designed to look like concrete or stone are becoming a mainstream option even in residential spaces, driven by their near-zero maintenance requirements
Common Mistakes & Hidden Gaps in DIY Staircase Makeovers
Mistake #1: Skipping surface preparation.
The number-one cause of paint peeling or stain failure on stair treads and risers is inadequate surface prep. Sanding, cleaning, degreasing, and priming are not optional steps they are the entire foundation on which every subsequent coat depends. Skipping even one of these steps almost guarantees visible failure within months.
Mistake #2: Choosing the wrong paint finish.
Using flat or matte paint on stair risers is a common beginner error. Matte finishes scuff, mark, and stain easily on high-contact surfaces. The correct choice is semi-gloss or gloss for risers and a satin or semi-gloss enamel for any painted tread surfaces. The sheen is not just decorative it provides a cleanable, durable surface that can withstand the abrasion of foot traffic.
Mistake #3: Working in both directions simultaneously.
Many first-time staircase painters start at the bottom and work upward then trap themselves at the top with wet paint below. Always start at the top and work downward, painting alternate steps to allow access during drying. This seemingly obvious rule is missed constantly by beginners.
Mistake #4: Hidden Gap Acoustic Planning:
Almost no DIY staircase content addresses the sound transmission issue. Hardwood or tile staircases in open-plan homes create significant noise between floors every footfall is amplified. Adding a stair runner or applying a sound-dampening underlayment beneath replacement treads addresses this completely, yet it is almost never mentioned as part of the design conversation. It should be.
Mistake #5: Hidden Gap Code Compliance:
DIYers replacing handrails or balusters must check local building codes for baluster spacing (no more than 4 inches between balusters to prevent child entrapment), handrail height (34–38 inches above the nose of each tread in most jurisdictions), and handrail grip requirements. Non-compliant railings can create liability issues if you ever sell your home.
Frequently Asked Questions
What is the cheapest way to update a staircase?
The cheapest effective staircase update is painting the risers. With materials costing as little as $30–$50, a fresh coat of semi-gloss paint on the riser faces transforms the visual impression of the entire staircase in an afternoon. Adding a stair runner is the second most impactful budget upgrade.
Can you DIY a staircase makeover without removing carpet?
Yes. If you want to keep carpet, you can still update the exposed wood balusters and handrail with paint or stain, add a gallery wall in the stairwell, and improve the staircase lighting all without touching the carpet. However, removing carpet often reveals beautiful hardwood underneath worth refinishing.
How do I make my staircase look more expensive?
Three changes deliver the highest perceived-value return: (1) painting balusters satin black or replacing them with iron balusters, (2) adding board-and-batten wainscoting along the stairwell wall, and (3) installing a quality stair runner. Together these three changes cost $150–$400 but deliver a transformation that reads as a $1,500+ renovation.
Is it safe to paint stair treads?
Yes, with the right products. Use a floor-rated porch and deck paint or oil-modified polyurethane over stain for durability. Always work from top to bottom, paint alternate steps to maintain access, and allow full cure time (72 hours) before heavy foot traffic to prevent scuffing.
What paint is best for stair risers?
The best paint for stair risers is a water-based alkyd or urethane-fortified interior enamel in semi-gloss or gloss finish. Recommended products include Benjamin Moore Advance, Sherwin-Williams Emerald Urethane Trim Enamel, and Behr Alkyd Semi-Gloss Enamel. All offer excellent hardness, scrubbability, and coverage.

Rameen Zara is the founder of Clarity Nooks, bringing over five years of experience in home décor and interior styling. She shares simple yet practical design ideas that suit real homes and everyday living. Her approach focuses on cozy aesthetics, soft color palettes, and natural textures that create warm, inviting spaces.


