

DIY Basement Bar Ideas to Create a Fun Entertainment Corner
Let’s be honest most basements are graveyards for old furniture, forgotten gym equipment, and boxes that haven’t been opened since 2019. But that raw, underused space? It’s actually one of the highest-ROI home improvement opportunities you own.
A well-built DIY basement bar doesn’t just give you a cool place to entertain. It adds real estate value, creates a dedicated social hub, and when done right costs a fraction of what contractors charge. Homeowners who convert their basements report an average return of 70–75% on their investment, according to remodeling industry data.
This guide covers nine original, well-tested DIY basement bar ideas that go beyond the generic “buy a bar cart” advice you’ll find everywhere else. Whether you’re working with 100 square feet or 400, a $500 budget or $5,000, there’s a buildable idea here that fits your space, your style, and your Saturday afternoon.
What Makes a Great Basement Bar? (Quick Answer)
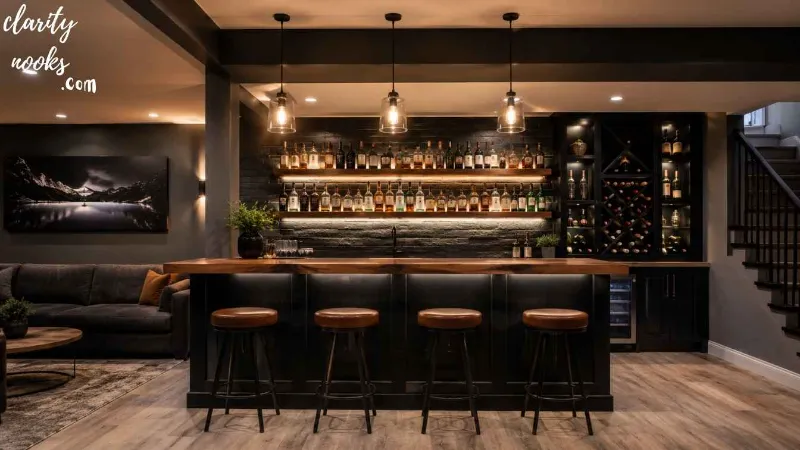
A great DIY basement bar combines three things: functional layout (proper clearance, storage, and plumbing if possible), intentional design (lighting, materials, theme), and smart budgeting (knowing when to splurge vs. save). The best home bars feel purposeful not like an afterthought.
Pallet Wood Rustic Bar
Budget-Friendly and Character-Rich

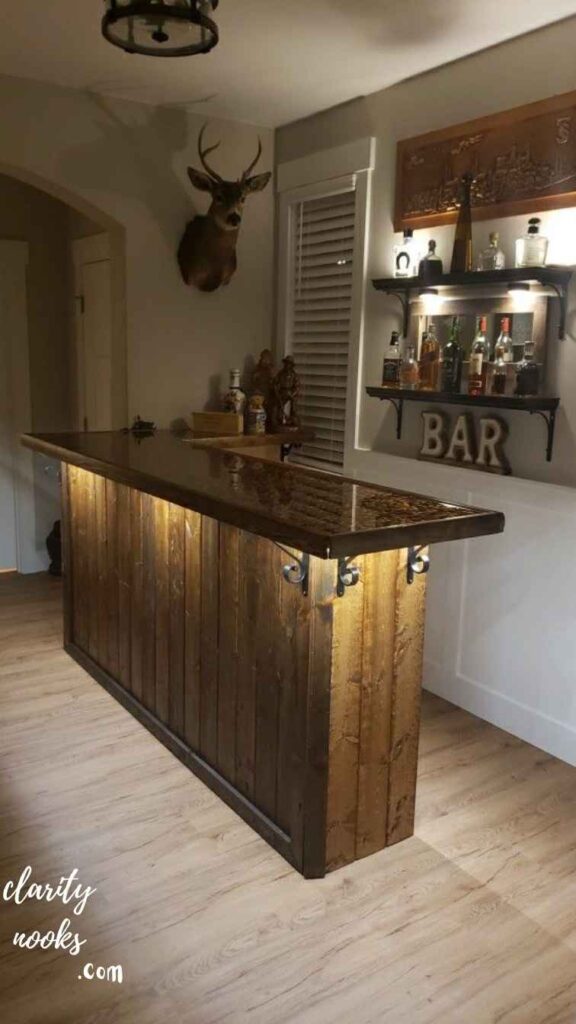
Reclaimed pallet wood is one of the most underrated bar-building materials available. It’s cheap (often free), easy to work with, and produces that warm, weathered aesthetic that’s nearly impossible to fake with new lumber. A standard basement bar front roughly 8 feet wide can be built for under $150 using pallets sourced from local hardware stores, Facebook Marketplace, or warehouses.
The key to making pallet wood look intentional rather than accidental is surface preparation. Sand each board to 120-grit, then stain with a dark walnut or ebony finish. Seal with two coats of polyurethane to protect against moisture critical in any basement environment. Add Edison-style pendant lights overhead and you’ve got a bar that looks like it belongs in a Brooklyn gastropub.
Real scenario: A homeowner in Ohio built his entire basement bar front and back wall shelving from reclaimed pallets he sourced for free from a local nursery. Total materials cost: $340 including stain, screws, and a bartop made from butcher block. Guests consistently assume it was professionally built.
Read More: DIY Gaming Chair Ideas for a Cool and Comfortable Setup at Home
L-Shaped Corner Bar
Maximum Use of Dead Space
Corner spaces are criminally underutilized in most basements. An L-shaped bar design turns that awkward corner into the most functional part of the room. The longer arm handles the main bar surface and drink prep; the shorter arm becomes a serving or seating extension. This layout naturally creates a social gathering point and allows multiple people to interact with the bar simultaneously.
Building an L-shaped frame requires basic carpentry: 2×4 framing, plywood sheathing, then your choice of finish (tile, stone veneer, beadboard, or wood). The corner joint is where most DIYers make mistakes use a 45-degree miter cut for a clean seam, and reinforce the interior corner with a solid vertical post for structural support.
For the bartop, consider waterfall-edge butcher block or a poured concrete surface. Both are DIY-friendly, durable, and visually impressive. Concrete countertops especially have a designer look that adds serious style credibility.
→ Featured snippet opportunity:
“How do you build an L-shaped basement bar?”
Answer: Frame two perpendicular walls at 90 degrees, connect at a mitered 45-degree corner joint with a reinforced post, then surface with plywood and your finish of choice.
Must Read: DIY Gaming Desk Ideas: Creative Designs for a Powerful Gaming Station
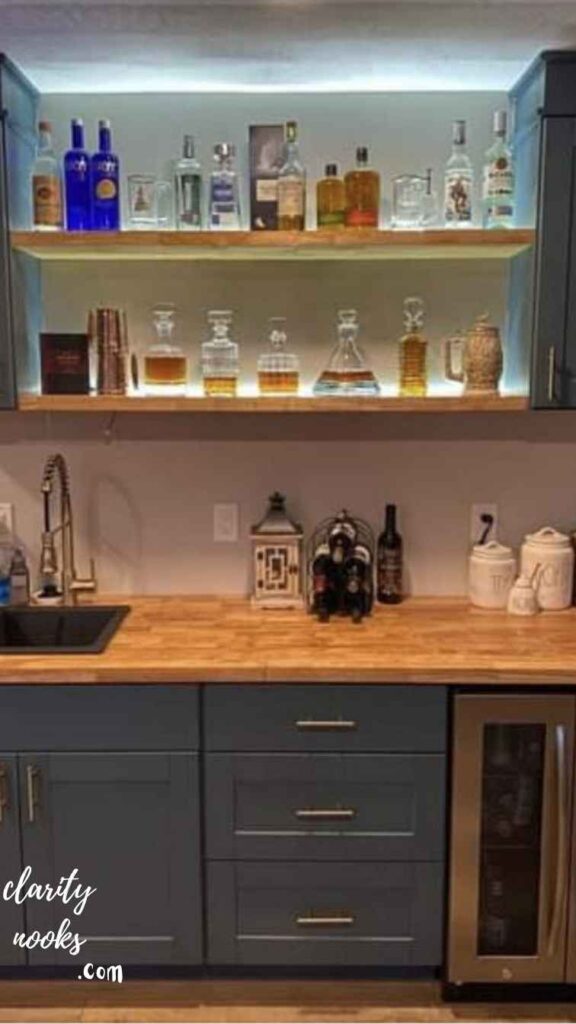
Dry Bar with a Statement Wall
Design-Forward, No Plumbing Needed
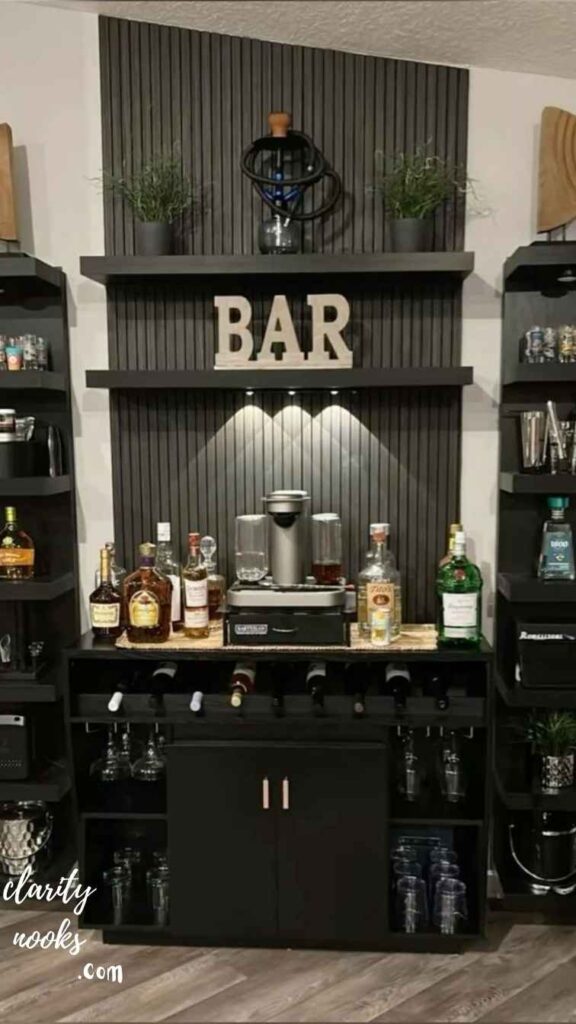
Not every basement bar needs a sink. A dry bar meaning no running water dramatically reduces cost and complexity while still delivering an impressive result. The trick is making the back wall do all the visual heavy lifting through bold design choices.
Think floor-to-ceiling floating shelves with integrated LED strip lighting behind frosted acrylic panels. Or a geometric tile backsplash in a herringbone or chevron pattern. One of the most striking DIY dry bar ideas involves mounting a large mirror as the back wall, then floating shelves in front of it the reflection doubles the perceived depth of your bottle collection and lighting.
A well-designed dry bar with a statement wall can be built in a single weekend. The investment is mostly in materials and planning, not labor. Keep a dedicated mini-fridge below the counter (a 3.2 cu ft model works perfectly) and you’ve covered 95% of what a wet bar offers without touching a single pipe.
Read Also: DIY Living Room Carpet Ideas: Transform Your Space Without Breaking the Bank
Industrial Pipe and Reclaimed Wood Bar
Urban Loft Aesthetic
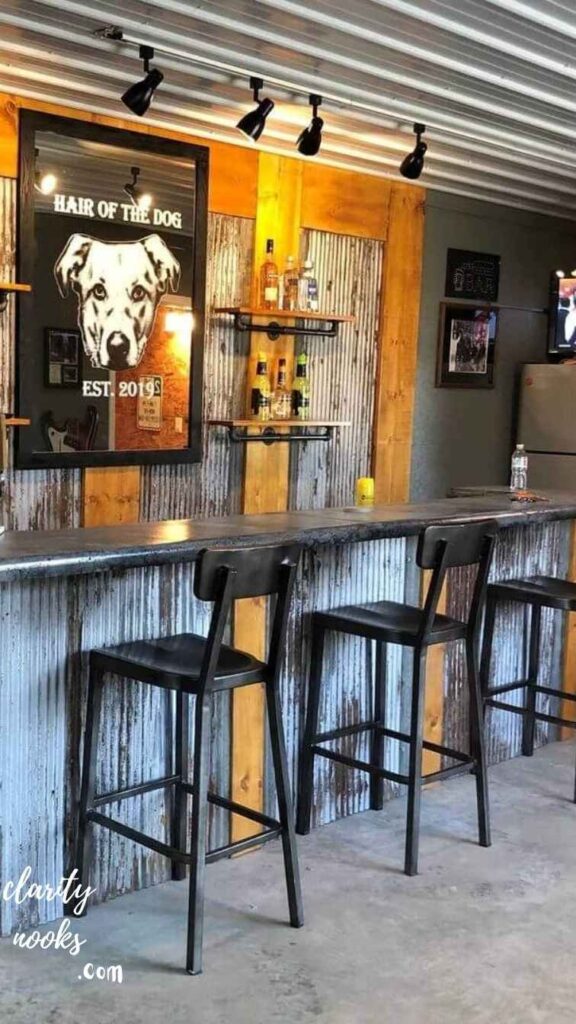
The industrial style has dominated interior design for a decade and it translates exceptionally well to basement bars. The signature elements are simple: black iron pipe for structural and decorative elements, reclaimed wood surfaces, exposed bulb lighting, and a palette of dark tones with metallic accents.
To build this style, start with a pipe shelving system for your back bar. Use 3/4-inch black iron floor flanges, nipples, and fittings from any hardware store to construct custom shelf brackets. A single 6-foot shelf unit with three tiers costs around $80 in pipe materials and $30 in lumber. The finished product is sturdy enough to hold dozens of bottles and looks like it costs ten times as much.
Extend the industrial language to your bar front by using corrugated metal panels as a facing material. These are available at home improvement stores for about $15 per panel, and they add instant texture and character. Pair with Edison bulb pendant lights on wire hangers, and the aesthetic is complete.
Don’t Miss: Simple DIY Boys Bedroom Ideas with Easy Decor and Storage Hacks
Wet Bar with Basement Sink
The Professional-Grade Build
If you’re ready to invest a weekend and a few hundred dollars more, adding a sink to your basement bar changes everything. A wet bar allows you to rinse glasses, dump ice, and make cocktails without constant trips upstairs and it increases your home’s value more than any other bar improvement.
The plumbing reality: most homeowners are intimidated by this step, but a basic wet bar sink requires only a cold water supply line, a drain line, and a P-trap. If your basement already has a utility sink or bathroom, tapping into existing supply and drain lines is a legitimate DIY project. The key supplies you need are a bar sink (under $100), a faucet ($40–$150), SharkBite fittings for supply lines (no soldering required), and ABS pipe for the drain.
Mini case study:
A couple in Minnesota added a wet bar sink to their existing dry bar by running a cold-water line from their nearby laundry room. Total plumbing cost: $175 in materials. They hired a plumber only to cap the vent stack a 30-minute job. The full wet bar conversion took one weekend.
Sports Bar Theme Build
For the Ultimate Game Day Host
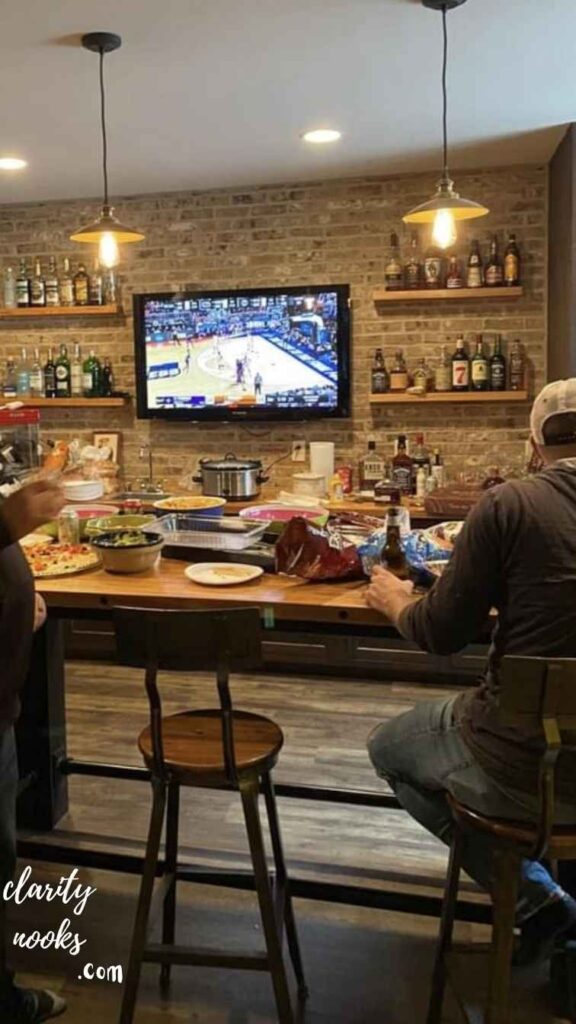
A sports bar basement is about creating an immersive viewing and social experience. The build priorities shift from aesthetics alone to a combination of technology integration, seating comfort, and bar functionality. Done right, this is the setup that turns your house into everyone’s favorite game-day destination.
Start with the screen wall. Mount your TV at bar-viewing height slightly higher than eye level when seated, typically 55–65 inches off the floor. Frame the TV with LED color-changing strips synced to your smart home system for ambiance. Build the bar itself across from or adjacent to the screen wall so guests at the bar face the game without straining their necks.
For the bar structure, lean into team colors and sports memorabilia. Jersey display cases, vintage pennants, and a chalkboard or whiteboard panel for scores give the space personality. Use a tile or epoxy-painted floor that’s easy to clean after the inevitable spilled drinks. Install bar-height stools with backs they’re far more comfortable during a 4-hour game than backless options.
Wine Cellar Bar Hybrid
Elevated, Functional, and Impressive
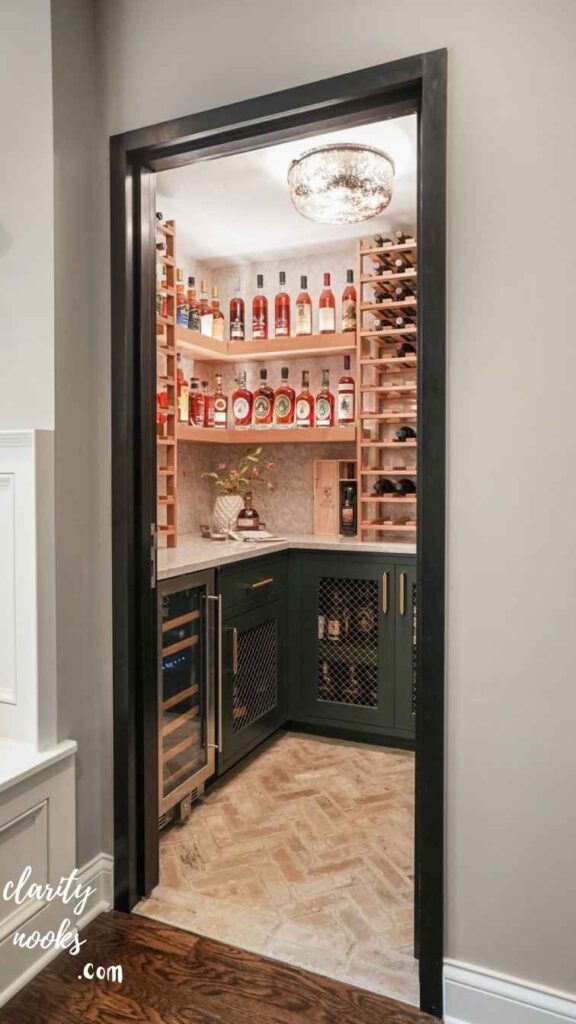
Basements are naturally the best place in any home for wine storage cooler temperatures, lower light exposure, and stable humidity create near-ideal conditions. A wine cellar bar hybrid capitalizes on this by combining a functional wine rack system with a proper bar area for tasting and entertaining.
The structural element is a dedicated wine wall. You can build individual bottle slots from 2×4 lumber cut into diamond or horizontal configurations, or invest in a modular metal wine rack system. A 100-bottle capacity wall takes up roughly 8 square feet of wall space and can be built from lumber for under $100. Add a temperature-controlled wine fridge under the bar counter for the bottles you’re actively consuming.
The design payoff of this concept is significant. The visual of a floor-to-ceiling wine wall with proper lighting is genuinely dramatic it photographs beautifully and creates an immediate impression of sophistication. This is one of the few DIY bar ideas that genuinely surprises guests.
Speakeasy-Inspired Hidden Bar
The Secret Room Concept
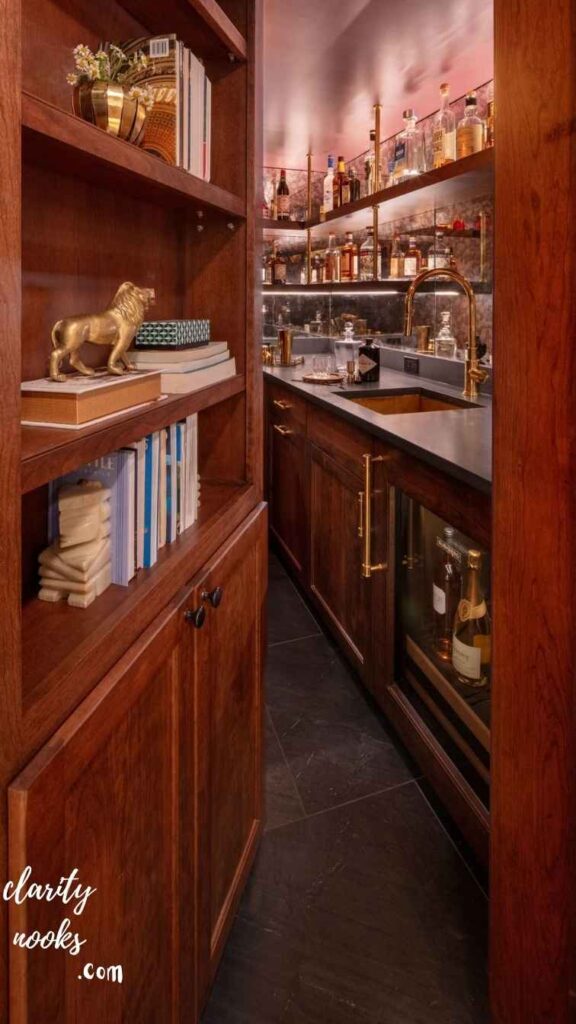
This is the idea that separates the truly ambitious DIY basement bar builders from everyone else. A speakeasy-style hidden bar concealed behind a bookcase door, a mirror, or a false wall panel is a design choice that creates lasting memories for every guest who experiences it for the first time.
The bookcase door is the most popular execution. It uses a standard door frame with a false bookcase built on the visible side. The “books” are either real (mounted with L-brackets for stability) or faux panel props. The door swings inward on a heavy-duty pivot hinge a critical detail, since standard hinges won’t support the weight of a full bookcase. Hydraulic soft-close hinges make the mechanism feel premium and controlled.
The bar inside doesn’t need to be elaborate to create impact the experience of passing through the hidden entrance is the star of the show. Keep the interior intimate, use warm lighting (amber Edison bulbs or candlelight-temperature LEDs), and choose materials that feel slightly vintage: aged wood, leather barstools, old maps or framed liquor labels on the walls.
→ Featured snippet opportunity:
How do you build a hidden bookcase door for a basement bar?”
Answer: Install a pivot hinge system in a standard door frame, build a lightweight bookcase face on a plywood backing, and use a magnetic or handle-free latch for the reveal mechanism.
Epoxy Countertop and LED Bar
The Modern Showstopper

For homeowners who want a contemporary, high-gloss bar that looks like it belongs in a high-end nightclub, a self-leveling epoxy countertop paired with integrated LED lighting is the move. Epoxy pours are a legitimate DIY technique that produces a glass-smooth, fully waterproof surface and the customization options are extraordinary.
You can embed objects in the epoxy layer: bottle caps, coins, your team’s logo, vintage maps, playing cards, or custom graphics. The pour process involves mixing two-part epoxy resin, pouring over your substrate (plywood or MDF), and using a heat gun to pop air bubbles before the surface cures. Total cost for an 8-foot bar surface: approximately $120–$180 in epoxy materials.
Pair the epoxy bar top with LED strip lights installed under the counter lip. When switched on, the light bounces off the glossy epoxy surface and creates a lit-from-within effect that genuinely looks spectacular in the evening. Add a floating shelf backsplash with the same under-shelf LED treatment and the bar becomes a focal point of the entire basement.
Conclusion
DIY Basement Bar Ideas can turn any empty basement into a warm and fun place for family and friends. Simple lighting, smart storage, and comfortable seating can make a big difference. You do not need a huge budget to create a stylish bar area. Small changes and creative designs can give your basement a fresh and modern look.
These DIY Basement Bar Ideas help you build a space that matches your style and daily needs. You can choose rustic, modern, or cozy themes to fit your home perfectly. A well-designed basement bar also adds beauty and value to your house. With the right ideas, your basement can become the favorite spot for relaxing and entertaining.
Trend Analysis
Where DIY Basement Bars Are Heading (2026–2029)
Smart bar integration: is the dominant trend of 2026. Homeowners are embedding smart technology directly into bar builds: app-controlled LED systems (Govee, Philips Hue), smart mini-fridges with inventory tracking, and voice-activated lighting scenes. These features no longer require professional installation they’re DIY-native.
Sustainability-driven material choices: are reshaping aesthetics. The demand for reclaimed wood, recycled glass countertops, and salvaged tile has grown significantly. This is partly aesthetic preference and partly values-alignment homeowners increasingly want their builds to reflect environmental consciousness.
The “cocktail culture at home” movement: accelerated post-pandemic, shows no sign of reversing. Home bartenders are investing in proper bar tools, spirits collections, and dedicated prep space which justifies more sophisticated bar builds than previous generations considered. By 2028, expect modular bar systems (pre-fab components that assemble like IKEA furniture) to become mainstream at the consumer level.
Practical Tips and Expert Insights
Plan clearance before framing. The minimum comfortable bar clearance behind the bar is 36 inches. For two bartenders working simultaneously, you want 42–48 inches. Many DIYers underestimate this until the build is done.
Lighting layers are non-negotiable: A great bar uses at least three light layers: ambient (overhead), task (under-cabinet for prep), and accent (shelf and toe-kick LEDs). Relying on a single overhead fixture is the most common DIY bar lighting mistake
Waterproof everything below grade: Any surface below the basement’s frost line should be treated as potentially exposed to moisture. Use cement board (not drywall) behind any splash zone, seal concrete floors before installing flooring, and keep wood framing off the slab with a pressure-treated bottom plate.
Build your bar height correctly: Standard bar height is 42 inches. Standard kitchen counter height is 36 inches. Choose bar height if you want stools; counter height if you want standing prep space. Many DIYers build at the wrong height and regret it later.
Rough-in electrical early: If you add a bar fridge, ice maker, or blender station later, you’ll want dedicated 20-amp circuits. Running electrical during the build costs nearly nothing; adding it later after walls are finished is expensive. Even if you don’t need it now, rough in conduit.
Long-Term Strategy and Sustainability
A basement bar is a long-term investment, and the best-built ones are designed for evolution. Choose a neutral structural framework neutral framing, flexible shelving systems, and a countertop material that ages well and make the decorative elements (lighting, stools, accessories) the components you update over time.
Modular shelving systems (like those from IKEA’s KALLAX or Anthropologie-inspired floating shelf systems) allow you to reconfigure your back bar as your bottle collection grows or changes. Avoid permanently built-in back bar solutions unless you’re certain about your layout.
For resale value, a basement bar that can be described in a listing as a “finished wet bar” or “entertainment space” adds meaningful square footage value. In most U.S. markets, a well-finished basement bar adds $10,000–$20,000 to perceived home value significantly above the cost of most DIY builds.
Future Predictions and Innovations
The most significant near-term innovation for DIY basement bars is prefabricated modular bar systems. Companies are beginning to offer interlocking components bar tops, cabinet bases, back bar units designed for self-assembly without specialized tools. Expect this category to grow substantially by 2027.
AI-assisted bar planning tools: are emerging. Several design platforms already offer room visualization tools that let you place and customize a virtual bar in your actual basement dimensions using your phone’s camera. These tools will become standard for planning before purchasing materials.
Biophilic design elements: living walls, natural stone, water features are increasingly appearing in high-end basement bars. As these materials become more accessible through DIY channels, expect them to trickle down to mid-range builds. A small preserved moss panel above a bar, for example, is currently achievable for under $150.
Common Mistakes and Hidden Gaps
Underestimating moisture. Basement moisture is the number one enemy of any bar build. DIYers who skip a proper vapor barrier, fail to seal concrete, or use standard drywall in a below-grade space will face mold and rot within a few years. Test your basement’s moisture level before building.
Ignoring acoustics. Basements echo badly without soft surfaces. A basement bar with no rugs, upholstered furniture, or acoustic panels creates an unpleasant noise environment. Add at minimum a large area rug and some upholstered seating.
Over-building the back bar. Many DIYers build elaborate back bar shelving systems only to find they don’t actually stock enough bottles to fill them. Build your back bar to match your realistic inventory a sparse back bar looks worse than a smaller, full one.
Skipping permits where required. A finished basement bar with electrical, plumbing, and structural elements may require a building permit in your municipality. Unpermitted work can create real estate complications at sale. Check local requirements before starting.
Forgetting about ventilation. A crowded basement bar generates heat and odors. At minimum, ensure your HVAC system reaches the space. For larger builds, consider a dedicated mini-split or exhaust fan.
The “I’ll finish the details later” trap. Unfinished trim, missing switch plates, and incomplete caulk lines make an otherwise good bar look permanently under construction. Budget time specifically for finishing work it’s 20% of the labor but 80% of the first impression.
FAQ’S About DIY Basement Bar Ideas
How much does it cost to build a DIY basement bar?
A basic dry bar can be built for $300–$600. A mid-range build with a wet bar and proper lighting typically runs $1,500–$3,000. A high-end DIY build with epoxy counters, integrated tech, and premium materials can reach $5,000–$8,000 still far below the $15,000–$30,000 contractor cost for comparable work.
Do I need a permit to build a basement bar?
It depends on your municipality. Structural framing, electrical, and plumbing work typically require permits. Cosmetic builds (a freestanding bar cart, floating shelves, paint) generally do not. Check with your local building department before starting.
What’s the best countertop material for a DIY basement bar?
Butcher block is the most DIY-friendly option it’s easy to cut, affordable, and looks excellent. Epoxy resin is the most visually dramatic. Concrete tile or poured concrete offers an industrial look. Avoid laminate for high-use bars it chips and stains over time.
How long does it take to build a basement bar?
A simple dry bar can be completed in a single weekend. A full wet bar with framing, electrical, plumbing, and finishing work typically takes 2–4 weekends spread over 3–6 weeks (accounting for drying, curing, and inspection times).

Rameen Zara is the founder of Clarity Nooks, bringing over five years of experience in home décor and interior styling. She shares simple yet practical design ideas that suit real homes and everyday living. Her approach focuses on cozy aesthetics, soft color palettes, and natural textures that create warm, inviting spaces.


